更新
![]()
2021年5月23日: 現在有 印尼語 翻譯可用,感謝 Ariandy/1kb。
2021年4月2日: 增加 BuyMeACoffee 連結 給那些想請我喝杯咖啡的人。
2021年2月1日: Youtube影片! 兩個月後: 到2021年4月1日為止,總共有186支影片全部完成(稍微超過23小時)。
2021年1月4日: mdBook 線上閱讀。
2020年11月28日: 現在也有簡體中文 翻譯可用,感謝 kumakichi!
2021年11月27日: 現在有韓語錄製的Easy Rust影片了! 한국어판 비디오도 녹화 시작!
介紹
Rust 是一門已經有了很好教科書的新程式設計語言。但有時候它的教材很難,因為難在它是寫給以英語為母語的人看的。現在有許多公司及人們在學習 Rust,如果能有一本使用簡單英語寫的書,他們可以學習得更快。這本書就是用簡單英語寫給這些公司和人們來學習 Rust 的。
Rust 是一門相當新卻已經非常流行的程式設計語言。它之所以受歡迎,是因為它給了你 C 或 C++ 的運作速度和控制能力,但也有在其他像 Python 等較新型語言上有的記憶體安全機制。它有時以不同於其他語言的新想法做到這一點。這也意味著需要學習一些新東西,不能只是"邊走邊想辦法"。Rust 更是一門你必須思考一段時間才能理解的語言。但它看起來還是蠻熟悉的如果你會其他程式設計語言的話,它是為了幫助你寫好程式碼而生的。
我是誰?
我是一個生活在韓國的加拿大人,我在寫 Easy Rust 的同時,也在思考如何讓這裡的公司更容易開始使用它。我希望其他母語不是英語的國家也能使用它。
簡單英語學 Rust
簡單英語學Rust 寫於 2020 年 7 月至 8 月,長達400多頁。如果你有任何問題,可以在這裡或在 LinkedIn 上或在 Twitter 上聯絡我。如果你發現有什麼不對的地方,或者要提出 pull request,去做吧。已經有超過 20 人幫助我們修復了程式碼中的錯別字和問題,所以你也可以。我不是世界上最好的 Rust 專家,所以我總是喜歡聽到新的想法,或者看看哪裡可以讓這本書變得更好。
- 第一部 - 瀏覽器中的 Rust
- Rust Playground
- 🚧 和 ⚠️
- 註解
- 型別
- 型別推導
- 列印 hello, world!
- 顯示和除錯
- 可變性
- 堆疊、堆積和指標
- 更多關於列印
- 字串
- const 和 static
- 更多關於參考
- 可變參考
- 傳遞參考給函式
- 複製型別
- 集合型別
- 向量
- 元組
- 控制流程
- 結構體
- 列舉
- 迴圈
- 實作結構體和列舉
- 解構
- 參考和點運算子
- 泛型
- Option 和 Result
- 其他集合型別
- 問號(?)運算子
- 特徵
- 鏈結方法
- 疊代器
- 閉包
- dbg! 巨集和 .inspect
- &str 的種類
- 生命週期
- 內部可變性
- Cow
- 類型別名
- todo! 巨集
- Rc
- 多執行緒
- 函式中的閉包
- impl 特徵
- Arc
- 通道
- 閱讀 Rust 文件
- 屬性
- Box
- Box 包裹的特徵
- Default 和生成器模式
- Deref 和 DerefMut
- Crates 和模組
- 測試
- 外部 crates
- 標準函式庫之旅
- 撰寫巨集
- 第二部 - 電腦上的 Rust
第一部 - 瀏覽器中的 Rust
本書有分兩部。第一部,你將在瀏覽器中就能學到儘可能多的 Rust 知識。實際上你幾乎可以在不安裝 Rust 的情況下學到所有你需要知道的東西,所以第一部非常長。最後是第二部。它要短得多,是關於電腦上的 Rust。在這裡,你將學習到其他一切你需要知道的、只能在瀏覽器之外進行的事情。例如:處理檔案、接受使用者輸入、圖形和個人設定。希望在第一部結束時,你會喜歡 Rust 到想安裝它。如果你不喜歡,也沒問題──第一部教了你很多,你不會介意的。
Rust Playground
也許你還不想安裝 Rust,這也沒關係。不用離開瀏覽器你可以去https://play.rust-lang.org/,開始寫 Rust。你可以在那裡寫下你的程式碼,然後點選 Run 來檢視結果。你可以在瀏覽器裡用 Playground 裡面執行本書中大多數的範例。只有在接近本書結尾的時候,才會看到無法在 Playground 操作的範例(比如開啟檔案)。
以下是使用 Rust Playground 時的一些提示。
- 用 RUN 來執行你的程式碼
- 如果你想讓你的程式碼更快,就把 DEBUG 改為 RELEASE 模式。 Debug:編譯速度較快,執行速度較慢,包含除錯資訊。Release:編譯速度較慢,執行速度較快,移除除錯資訊。
- 點選 SHARE ,得到當下程式碼的網址連結。如果你需要幫助,可以用它來分享你的程式碼。點選 SHARE 後,你可以點選
Open a new thread in the Rust user forum,馬上向論壇那裡的人尋求幫助。 - TOOLS: Rustfmt 會幫你的程式碼排版好。
- TOOLS: Clippy 會給你如何讓程式碼更好的額外資訊。
- CONFIG: 你可以在這裡把你的主題改成黑暗模式,方便在晚上工作,以及很多其他配置。
如果你想安裝 Rust,請到官方網站安裝頁面,然後按照說明操作。通常你會使用 rustup 來安裝和更新 Rust。
🚧 和 ⚠️
有時書中的程式碼範例是不能用的。如果一個範例不能用,它將會有一個 🚧 (施工路障 emoji)或 ⚠️ (警告標誌 emoji)在裡面。🚧 就像"正在建設中"一樣:它意味著程式碼不完整。Rust 需要一個 fn main()(一個主函式)來執行,但有時我們只是想看一些小的程式碼,所以它不會有 fn main()。這些範例是正確的,但需要一個 fn main() 讓你執行。而有些程式碼範例是向你展示一個我們將解決的問題。那些可能有一個 fn main(),但會產生錯誤,所以它們會有一個⚠️。
註解
註解是給程式設計師看的,而不是給電腦看的。寫註解是為了幫助別人理解你的程式碼。這也有利於幫助你以後理解你的程式碼。 (很多人寫了很好的程式碼,但後來卻忘記了他們為什麼要寫它。)在 Rust 中寫註解,你通常會使用 //:
fn main() {
    // Rust 程式從 fn main() 開始
    // 程式碼放在區塊中,用 { 開始和 } 結束
    let some_number = 100; // 我們寫多少在這裡都可以,編譯器都不會看
}
當你這樣做時,編譯器不會看到出現在 // 右邊的任何東西。
還有一種註解是,你可以用 /* 開頭,以 */ 結尾。這種寫法在程式碼中間很有用。
fn main() {
    let some_number/*: i16*/ = 100;
}
對編譯器來說,let some_number/*: i16*/ = 100; 看起來就跟 let some_number = 100; 一樣。
/* */ 註解形式對於超過一行的非常長的註釋也很有用。在這個範例中,你可以看到你需要為每一行去寫 //。但是如果你輸入 /*,它不會停止註解,直到你用 */ 結束這個註解。
fn main() {
    let some_number = 100; /* 讓我來告訴你
    有關這個數字的一些事情。
    它是100,我最愛的數字。
    他叫做 some_number 但實際上我思考的是… */

    let some_number = 100; // 讓我來告訴你
    // 有關這個數字的一些事情。
    // 它是100,我最愛的數字。
    // 他叫做 some_number 但實際上我思考的是…
}
型別
Rust 有許多型別,讓你可以處理數字、字元等等。有些型別很簡單,有些型別比較複雜,你甚至可以建立自己的型別。
原始型別
Rust 有簡單的型別,這些型別被稱為原始型別(原始 = 非常基本)。我們將從整數和 char(字元)開始。沒有包含小數點的一整個數字就是整數。整數有兩種型別:
- 有符號整數
- 無符號整數
符號是指 + (加號)與 - (減號),所以有符號整數可以是正數,也可以是負數(如 +8,-8)。但無符號整數只能是正數,因為它們沒有符號。
有符號整數是 i8、i16、i32、i64、i128 和 isize。
無符號整數是 u8、u16、u32、u64、u128 和 usize。
i 或 u 後面的數字表示該數字的位元數,所以位元數愈多的可以表示更大的數字。8 位元 = 一個位元組,所以 i8 是佔用一個位元組空間的型別,i64 是 8 個位元組,以此類推。尺寸較大的數字型別可以容納更大的數字。例如,u8 最多可以容納最大的數字是 255,但 u16 最多可以容納 65535。而 u128 最多可以容納 340282366920938463463374607431768211455。
那什麼是 isize 和 usize 呢?這表示你的電腦類型的位元數。(你的電腦裡中央處理器的位元數叫做電腦的架構)。所以在 32 位元電腦上的 isize 和 usize 就像是 i32 和 u32,64 位元電腦上的 isize 和 usize 就像是 i64 和 u64。
需要不同整數型別的原因有很多。其中之一是電腦效能:位元組數量愈少處理速度愈快。例如,數字 -10 在 i8 是 11110110,但在 i128 會是11111111111111111111111111111111111111111111111111111111111111111111111111111111111111111111111111111111111111111111111111110110。不過這裡它還有一些其它用途:
Rust 中的字元稱做 char。每一個 char 都對應到一個數字:字母 A 對應到數字 65,而字元 友 (中文的"朋友")對應數字 21451。這個數字列表被稱為 "Unicode"。Unicode 給愈常用的字元使用愈小的數字,如字母 A 到 Z,數字 0 到 9,或空格等等。
fn main() {
    let first_letter = 'A';
    let space = ' '; // ' ' 裡的空白也算一個字元
    let other_language_char = 'Ꮔ'; // 感謝 Unicode,其它語言像是切羅基語 (Cherokee) 也顯示的很好
    let cat_face = '😺'; // Emojis 也算字元
}
最常用字元的對應數字少於 256,剛好可以放進 u8 裡。要記得,u8 是 0 加上到 255 的所有數字,總共 256 種。這意味著 Rust 能使用 as 關鍵字安全地將一個 u8 轉換型別(cast) 為 char。("轉換 u8 為 char" 意味著 "假裝 u8 是char")
透過 as 轉型很有用,因為 Rust 對型別非常嚴格。它總是必需知道是什麼型別,也不會讓你一起用不同的兩種型別,即使它們都是整數。舉例來說,不能這樣用:
fn main() { // main() 是 Rust 程式開始執行的地方。程式碼會放在 {} (大括號)裡

    let my_number = 100; // 我們沒有寫出整數的型別,
                         // 因此 Rust 選擇了 i32。
                         // Rust 總是給整數選擇 i32,
                         // 如果你不教它用不同型別的話。

    println!("{}", my_number as char); // ⚠️
}
編譯器給的理由是:
error[E0604]: only `u8` can be cast as `char`, not `i32`
 --> src\main.rs:3:20
  |
3 |     println!("{}", my_number as char);
  |                    ^^^^^^^^^^^^^^^^^
幸運的是,我們可以用 as 輕鬆修正這個錯誤。我們無法將 i32 轉型為 char,但我們可以將 i32 轉型為 u8。接著我們同樣可以將 u8 轉型為 char。所以在同一行中,我們先用 as 讓 my_number 變成 u8,再變成 char。現在它就能通過編譯了:
fn main() {
    let my_number = 100;
    println!("{}", my_number as u8 as char);
}
它會印出 d 是因為它就是100對應的 char。
然而,更簡單的方法是你只要告訴 Rust 說 my_number 的型別是 u8。你要像這樣做:
fn main() {
    let my_number: u8 = 100; //  更改 my_number 為 my_number: u8
    println!("{}", my_number as char);
}
所以這些是 Rust 中會有不同整數型別的兩個原因。這裡還有一個原因:usize 是 Rust 用來 索引 的型別。(索引的意思是"哪項是第一","哪項是第二"等等) usize 是最佳的索引型別,因為:
- 索引值不能是負數,所以它需要是一個帶 u 的數字(註:指無符號數)
- 它要可以夠大,因為有時你需要索引很多東西,但是
- 它不能是
u64,因為 32 位元電腦無法使用u64。
所以Rust使用了 usize,這樣你的電腦就能以它能讀取到的最大整數值進行索引。
我們再來了解一下 char。你會看到 char 總是一個字元,並且使用 '' 而不是 ""。
所有的 chars 都使用 4 個位元組的記憶體,因為 4 個位元組足以容納任何種類的字元:
- 基本字母和符號通常只需要 4 個位元組中的1個:
a b 1 2 + - = $ @ - 其他字母,如德文元音變音 (Umlauts) 或重音,需要 4 個位元組中的 2 個:
ä ö ü ß è é à ñ - 韓文、日文或中文字元需要 3 或 4 個位元組:
國 안 녕
當使用字元作為字串的一部分時,字串是用每個字元所需的最少記憶體來編碼的。
我們可以自己用 .len() 來觀察這個情況。
fn main() {
    println!("Size of a char: {}", std::mem::size_of::<char>()); // 4 位元組
    println!("Size of string containing 'a': {}", "a".len()); // .len() 給出以位元組為單位的字串大小
    println!("Size of string containing 'ß': {}", "ß".len());
    println!("Size of string containing '国': {}", "国".len());
    println!("Size of string containing '𓅱': {}", "𓅱".len());
}
這個程式會印出:
Size of a char: 4
Size of string containing 'a': 1
Size of string containing 'ß': 2
Size of string containing '国': 3
Size of string containing '𓅱': 4
你可以看到 a 的大小是一個位元組,德文的 ß 是兩個位元組,日文的 國 是三個位元組,古埃及的 𓅱 是四個位元組。
fn main() {
    let slice = "Hello!";
    println!("Slice is {} bytes.", slice.len());
    let slice2 = "안녕!"; // 韓文的 "hi"
    println!("Slice2 is {} bytes.", slice2.len());
}
這個程式會印出:
Slice is 6 bytes.
Slice2 is 7 bytes.
slice 長 6 個字元,佔 6 個位元組,但 slice2 長 3 個字元,佔 7 個位元組。
如果 .len() 給出的是以位元組為單位的大小,那麼以字元為單位的大小呢?我們在後面會學習這些方法,但這裡你只要記得 .chars().count() 做得到這件事就可以了。.chars().count() 會將你寫的東西變成字元,然後算出有多少個。
fn main() {
    let slice = "Hello!";
    println!("Slice is {} bytes and also {} characters.", slice.len(), slice.chars().count());
    let slice2 = "안녕!";
    println!("Slice2 is {} bytes but only {} characters.", slice2.len(), slice2.chars().count());
}
這個程式會印出:
Slice is 6 bytes and also 6 characters.
Slice2 is 7 bytes but only 3 characters.
型別推導
型別推導的意思是,如果你沒有告訴編譯器型別,但它可以自己判斷時它就會自己決定型別。編譯器總是必需知道變數的型別,但你不需要都告訴它。實際上,通常你不需要告訴它。例如,像 let my_number = 8,my_number 將會是 i32。這是因為如果你不告訴它,編譯器會給整數選擇 i32。但是如果你說 let my_number: u8 = 8,它就會把 my_number 視為 u8,因為你明確告訴它是 u8。
通常編譯器都能猜到。但有時你需要告訴它,原因有兩個:
- 你正在做一些非常複雜的事情,而編譯器不知道你想要的型別。
- 你想要一個不同的型別 (例如,你想要一個
i128,而不是i32)。
這時可以指定一個型別,只要在變數名後新增一個冒號和型別。
fn main() {
    let small_number: u8 = 10;
}
對數字來說,你可以在數字後面加上型別。你不需要空格──只需要在數字後面直接輸入。
fn main() {
    let small_number = 10u8; // 10u8 = 型別為 u8 的 10
}
如果你想讓數字容易閱讀,也可以加上 _。
fn main() {
    let small_number = 10_u8; // 好讀
    let big_number = 100_000_000_i32; // 用 _ 時更容易讀出是 100 百萬
}
_不會改變數字。它只是為了讓你方便閱讀。而且你用多少個_都沒有關係。
fn main() {
    let number = 0________u8;
    let number2 = 1___6______2____4______i32;
    println!("{}, {}", number, number2);
}
這個程式會印出 0, 1624.
浮點數
浮點數是帶有小數點的數字。5.5 是一個浮點數,6 是一個整數。5.0 也是一個浮點數,甚至 5. 也是一個浮點數。
fn main() {
    let my_float = 5.; // Rust 看到 . 時,知道它是 float
}
但寫出型別時不叫 float,叫 f32 和 f64。這點和整數一樣:f 後面的數字顯示的是位元數。如果你不寫型別,Rust 會選擇 f64。
當然,只有同樣型別的浮點數可以一起使用。所以你不能把 f32 和 f64 加起來。
fn main() {
    let my_float: f64 = 5.0; // 這是 f64
    let my_other_float: f32 = 8.5; // 這是 f32

    let third_float = my_float + my_other_float; // ⚠️
}
當你嘗試執行這個程式時,Rust 會說:
error[E0308]: mismatched types
 --> src\main.rs:5:34
  |
5 |     let third_float = my_float + my_other_float;
  |                                  ^^^^^^^^^^^^^^ expected `f64`, found `f32`
當你用錯型別時,編譯器會寫 "expected (type), found (type)"。它是像這樣讀你的程式碼:
fn main() {
    let my_float: f64 = 5.0; // 編譯器見到 f64
    let my_other_float: f32 = 8.5; // 編譯器見到 f32 是個不同型別
    let third_float = my_float + // 你想把 my_float 加上什麼,所以它一定要是 f64 加上另一個 f64。現在它預期有另一個 f64…
    let third_float = my_float + my_other_float;  // ⚠️ 不過它發現是個 f32。它沒辨法把它們加起來。
}
所以當你看到 "expected(type), found(type)" 時,你必須找到為什麼編譯器預期的是不同的型別。
當然,單純的數字很容易修正。你可以用 as 把 f32 轉型成 f64:
fn main() {
    let my_float: f64 = 5.0;
    let my_other_float: f32 = 8.5;

    let third_float = my_float + my_other_float as f64; // my_other_float as f64 = 把 my_other_float 當 f64 來用
}
或者更簡單,去掉型別宣告。("宣告一個型別" = "告訴Rust使用該型別") Rust會選擇可以加在一起的型別。
fn main() {
    let my_float = 5.0; // Rust 會選 f64
    let my_other_float = 8.5; // 這裡還是會選 f64

    let third_float = my_float + my_other_float;
}
Rust 編譯器很聰明,如果你需要 f32,就不會選擇 f64:
fn main() {
    let my_float: f32 = 5.0;
    let my_other_float = 8.5; // 通常 Rust 是選 f64,

    let third_float = my_float + my_other_float; // 但現在它知道你需要把它加上 f32。所以它也選了 f32 給 my_other_float
}
列印 hello, world!
當你啟動一個新的Rust程式時,它總是有這樣的程式碼。
fn main() {
    println!("Hello, world!");
}
fn的意思是函式,main是啟動程式的函式。()表示我們沒有給函式任何變數來啟動。
{} 被稱為程式碼區塊。這是程式碼所在的空間。
println! 是一個列印訊息到控制台(console)的巨集,。一個巨集就像一個為你寫程式碼的函式。巨集名稱後面都有一個 !。我們以後會學習如何建立巨集。現在只要記住有 ! 表示它是一個巨集。
為了學習 ;,我們將建立另一個函式。首先,在 main 中,我們將印出數字 8。
fn main() {
    println!("Hello, world number {}!", 8);
}
println! 中的 {} 的意思是 "把變數放在這裡面"。這樣就會印出 Hello, world number 8!。
我們可以像之前一樣,放更多的東西進去。
fn main() {
    println!("Hello, worlds number {} and {}!", 8, 9);
}
這將會印出 Hello, worlds number 8 and 9!。
現在我們來建立函式。
fn number() -> i32 {
    8
}

fn main() {
    println!("Hello, world number {}!", number());
}
這個程式也會印出 Hello, world number 8!。當 Rust 觀察到 number() 時,它看到一個函式。這個函式:
- 沒有用到引數(因為它是
()) - 回傳一個
i32。->(稱為 "瘦箭")右邊顯示了函式回傳內容的型別
函式內部只有 8。因為行尾沒有 ;,所以這就是它回傳的值。如果它有 ;,它將不會回傳任何東西(意思是它會回傳 ())。如果它有 ;,Rust 將無法編譯,因為回傳的是 i32,而 ; 回傳 (),不是 i32:
fn main() {
    println!("Hello, world number {}", number());
}

fn number() -> i32 {
    8;  // ⚠️
}
5 | fn number() -> i32 {
  |    ------      ^^^ expected `i32`, found `()`
  |    |
  |    implicitly returns `()` as its body has no tail or `return` expression
6 |     8;
  |      - help: consider removing this semicolon
這意味著 "你告訴我 number() 回傳的是 i32,但你加了 ;,它就沒回傳值了"。所以編譯器建議去掉分號。
你也可以寫 return 8;,但在Rust中,正常情況下只需將;去掉即可回傳。
當你想提供變數給函式時,把它們放在 () 裡。還必須給它們命名並寫上型別。
fn multiply(number_one: i32, number_two: i32) { // 兩個 i32 傳入函式。將它們取名為number_one和number_two。
    let result = number_one * number_two;
    println!("{} times {} is {}", number_one, number_two, result);
}

fn main() {
    multiply(8, 9); // 可以直接給數值
    let some_number = 10; // 或者宣告兩個變數
    let some_other_number = 2;
    multiply(some_number, some_other_number); // 把它們給函式當作引數
}
我們也可以回傳 i32。只要把行尾的分號拿掉就可以了:
fn multiply(number_one: i32, number_two: i32) -> i32 {
    let result = number_one * number_two;
    println!("{} times {} is {}", number_one, number_two, result);
    result // 這是我們要回傳的 i32
}

fn main() {
    let multiply_result = multiply(8, 9); // 我們用multiply()印出結果並回傳給multiply_result
}
宣告變數和程式碼區塊
使用 let 宣告變數(宣告一個變數 = 告訴 Rust 建立一個變數)。
fn main() {
    let my_number = 8;
    println!("Hello, number {}", my_number);
}
變數使用範圍的開始和結束都在程式碼區塊 {} 內。在這個例子中,my_number 在我們呼叫 println! 之前結束,因為它在自己的程式區碼塊裡面。
fn main() {
    {
        let my_number = 8; // my_number 在這裡開始
                           // my_number 在這裡結束!
    }

    println!("Hello, number {}", my_number); // ⚠️ 沒有 my_number,而且
                                             // println!() 也找不到它
}
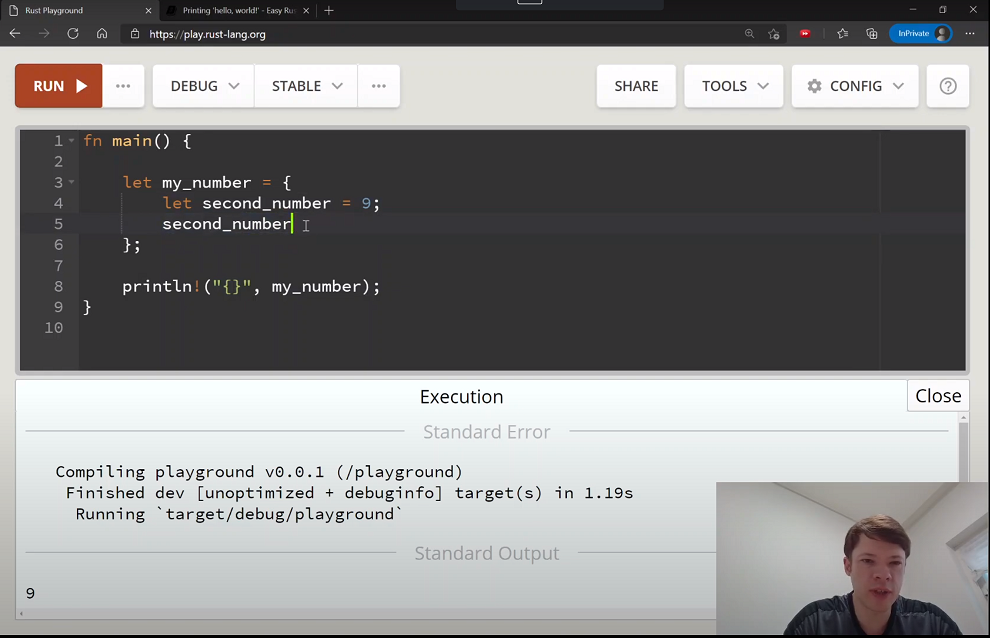
你可以用程式碼區塊來回傳一個值:
fn main() {
    let my_number = {
    let second_number = 8;
        second_number + 9 // 沒分號,程式碼區塊回傳 returns 8 + 9。
                          // 就像函式一樣運作
    };

    println!("My number is: {}", my_number);
}
如果在程式碼區塊內結束前加上分號,它將回傳 () (沒有值):
fn main() {
    let my_number = {
    let second_number = 8; // 宣告 second_number,
        second_number + 9; // 加 9 到 second_number
                           // 但沒回傳它!
                           // second_number 現在就結束
    };

    println!("My number is: {:?}", my_number); // my_number 會是 ()
}
那麼為什麼我們要寫 {:?} 而不是 {} 呢?我們現在就來談談這個問題。
顯示和除錯
Rust 中單純的變數可以在 println! 裡用 {}1 來被印出。但是有些變數不能,你需要用 除錯列印(debug print)。除錯列印是給程式設計師用的列印方法,因為它通常會顯示更多的資訊。除錯(Debug)有時看起來並不漂亮,因為它有額外的資訊來幫助你。
你怎麼知道你是否需要 {:?}2 而不是 {}?編譯器會告訴你。比如說:
fn main() {
    let doesnt_print = ();
    println!("This will not print: {}", doesnt_print); // ⚠️
}
當我們執行這個程式時,編譯器會說:
error[E0277]: `()` doesn't implement `std::fmt::Display`
 --> src\main.rs:3:41
  |
3 |     println!("This will not print: {}", doesnt_print);
  |                                         ^^^^^^^^^^^^ `()` cannot be formatted with the default formatter
  |
  = help: the trait `std::fmt::Display` is not implemented for `()`
  = note: in format strings you may be able to use `{:?}` (or {:#?} for pretty-print) instead
  = note: required by `std::fmt::Display::fmt`
  = note: this error originates in a macro (in Nightly builds, run with -Z macro-backtrace for more info)
這有相當多的資訊,但重要的部分是 you may be able to use {:?} (or {:#?} for pretty-print) instead。這意味著你可以試試 {:?},也可以試試 {:#?}。{:#?} 叫做"漂亮列印"。它和 {:?} 一樣,但是用更多行和不同的格式印出內容。所以 Display 意思是用 {} 列印,Debug 則是用 {:?} 列印。還有一點:如果你不想要換行,你也可以使用 print! 而不需要有 ln。
fn main() {
    print!("This will not print a new line");
    println!(" so this will be on the same line");
}
這個將會印出 This will not print a new line so this will be on the same line。
譯註: 即顯示列印 (Display print)。
譯註: 除錯列印的格式。
最小和最大的數
如果你想知道最小和最大的數字,你可以在型別名稱後使用 MIN 和 MAX:
fn main() {
    println!("The smallest i8 is {} and the biggest i8 is {}.", i8::MIN, i8::MAX); // 提示: 印出 std::i8::MIN 表示 "列印在標準函式庫裡 i8 型別的 MIN 值"
    println!("The smallest u8 is {} and the biggest u8 is {}.", u8::MIN, u8::MAX);
    println!("The smallest i16 is {} and the biggest i16 is {}.", i16::MIN, i16::MAX);
    println!("The smallest u16 is {} and the biggest u16 is {}.", u16::MIN, u16::MAX);
    println!("The smallest i32 is {} and the biggest i32 is {}.", i32::MIN, i32::MAX);
    println!("The smallest u32 is {} and the biggest u32 is {}.", u32::MIN, u32::MAX);
    println!("The smallest i64 is {} and the biggest i64 is {}.", i64::MIN, i64::MAX);
    println!("The smallest u64 is {} and the biggest u64 is {}.", u64::MIN, u64::MAX);
    println!("The smallest i128 is {} and the biggest i128 is {}.", i128::MIN, i128::MAX);
    println!("The smallest u128 is {} and the biggest u128 is {}.", u128::MIN, u128::MAX);

}
將會印出:
The smallest i8 is -128 and the biggest i8 is 127.
The smallest u8 is 0 and the biggest u8 is 255.
The smallest i16 is -32768 and the biggest i16 is 32767.
The smallest u16 is 0 and the biggest u16 is 65535.
The smallest i32 is -2147483648 and the biggest i32 is 2147483647.
The smallest u32 is 0 and the biggest u32 is 4294967295.
The smallest i64 is -9223372036854775808 and the biggest i64 is 9223372036854775807.
The smallest u64 is 0 and the biggest u64 is 18446744073709551615.
The smallest i128 is -170141183460469231731687303715884105728 and the biggest i128 is 170141183460469231731687303715884105727.
The smallest u128 is 0 and the biggest u128 is 340282366920938463463374607431768211455.
可變性
當你用 let 宣告變數時,它是不可變的(immutable,內容不可被變動)。
這個程式不能編譯:
fn main() {
    let my_number = 8;
    my_number = 10; // ⚠️
}
編譯器說:error[E0384]: cannot assign twice to immutable variable my_number。這是因為如果你只寫 let,變數是不可變的。
但有時你想更改你的變數。要建立一個可以改變的變數,就要在 let 後面加上 mut。
fn main() {
    let mut my_number = 8;
    my_number = 10;
}
現在就沒問題了。
但是,你不能改變型別:即使加上 mut 也做不到。這樣將會無法編譯:
fn main() {
    let mut my_variable = 8; // 它現在是 i32. 型別不能被改變
    my_variable = "Hello, world!"; // ⚠️
}
你會看到編譯器發出的同樣的"預期"訊息。expected integer, found &str。我們很快就會知道 &str 是一個字串型別。
遮蔽
遮蔽 (Shadowing) 是指使用 let 宣告與另一個變數同名的新變數。它看起來像可變性,但完全不同。遮蔽看起來像這樣:
fn main() {
    let my_number = 8; // 這是 i32
    println!("{}", my_number); // 印出 8
    let my_number = 9.2; // 這是同名的 f64。 但它已經不是第一個 my_number──它完全不一樣!
    println!("{}", my_number) // 印出 9.2
}
這裡我們會說我們用一個新的 "let 繫結(binding)" 對 my_number 進行了"遮蔽"。
那麼第一個 my_number 是否被銷毀了呢?沒有,但是當我們叫用 my_number 時,我們現在得到 f64 型別的 my_number。因為它們在同一個作用域區塊中(同一個 {}),我們無法再看到第一個 my_number 了。
但如果它們在不同的區塊中,我們可以同時看到兩者。例如:
fn main() {
    let my_number = 8; // 這是 i32
    println!("{}", my_number); // 印出 8
    {
        let my_number = 9.2; // 這是 f64。 它不是原先的 my_number──它完全不一樣!
        println!("{}", my_number) // 印出 9.2
                                  // 但是被遮蔽的 my_number 只活到這裡。
                                  // 原來的 my_number 還活著!
    }
    println!("{}", my_number); // 印出 8
}
因此,當你對一個變數遮蔽時,你不會銷毀它。你阻擋了它。
那麼遮蔽的好處是什麼呢?當你需要經常改變一個變數的時候,遮蔽很好用。想象你想用變數做很多簡單數學運算時:
fn times_two(number: i32) -> i32 {
    number * 2
}

fn main() {
    let final_number = {
        let y = 10;
        let x = 9; // x 從 9 開始
        let x = times_two(x); // 遮蔽後新的 x: 18
        let x = x + y; // 遮蔽後新的 x: 28
        x // 回傳 x: final_number 現在是 x 的值
    };
    println!("The number is now: {}", final_number)
}
如果沒有遮蔽,你將要思考用什麼不同的名稱,即使你並不關心變數 x:
fn times_two(number: i32) -> i32 {
    number * 2
}

fn main() {
    // Pretending we are using Rust without 遮蔽
    let final_number = {
        let y = 10;
        let x = 9; // x 從 9 開始
        let x_twice = times_two(x); // x 的第二個名字
        let x_twice_and_y = x_twice + y; // x 的第三個名字!
        x_twice_and_y // 真糟糕沒有遮蔽可用──我們只要用 x 就好
    };
    println!("The number is now: {}", final_number)
}
一般來說,你在 Rust 中看到的遮蔽就是這種情況。它發生在你想快速得對變數做一些事情,然後再做其他事情的地方。而你通常將它用在那些你不太關心的臨時變數上。
堆疊、堆積和指標
堆疊(stack)、堆積(heap)和指標(pointer)在 Rust 中非常重要。
堆疊和堆積是電腦中保存記憶體的兩個地方。主要的區別在:
- 堆疊的速度非常快,但堆積就不那麼快了。它也不是超慢,但堆疊總是更快。但是你不能一直使用堆疊,因為:
- Rust 在編譯時必需知道變數的大小。所以像
i32的簡單變數就放在堆疊上,因為我們知道它們的確切大小。你總是知道i32要 4 位元組,因為 32 位元 = 4 位元組。所以i32總是可以放在堆疊上。 - 但有些型別在編譯時不知道大小。但是堆疊需要知道確切的大小。那麼你該怎麼做呢?首先你把資料放在堆積中,因為堆積中可以有任何大小的資料。然後為了找到它,一個指標就會放上堆疊。這樣沒問題,因為我們總是知道指標的大小。所以,電腦就會先去堆疊讀取指標,然後跟著指標到資料所在的堆積。
指標聽起來很複雜,但它們很容易。指標就像一本書的目錄。想象一下這本書:
MY BOOK

TABLE OF CONTENTS

Chapter                        Page
Chapter 1: My life              1
Chapter 2: My cat               15
Chapter 3: My job               23
Chapter 4: My family            30
Chapter 5: Future plans         43
所以這就像有五個指標。你可以閱讀它們,找到它們所說的資訊。"My life" 這一章在哪裡?它在第 1 頁(它 指向 第 1 頁)。"My job" 這一章在哪裡?它在第23頁。
通常在 Rust 中看到的指標稱做 參考。重點在於知道:一個參考指向另一個值的記憶體位置。參考意味著你 借 了這個值,但你並不擁有它。這和我們的書一樣:目錄並不擁有資訊。章節裡才有資訊。在 Rust 中,參考的前面有一個 &。所以:
let my_variable = 8是一個正規的變數,但是:let my_reference = &my_variable是一個變數參考。
你把 my_reference = &my_variable 讀成這樣:"my_reference 是對my_variable 的參考" 或者:"my_reference 參照到 my_variable"。
這意味著 my_reference 只看 my_variable 的資料。my_variable 仍然擁有它的資料。
你也可以有一個參考的參考,或者任何數量的參考。
fn main() {
    let my_number = 15; // 這是 i32
    let single_reference = &my_number; //  這是 &i32
    let double_reference = &single_reference; // 這是 &&i32
    let five_references = &&&&&my_number; // 這是 &&&&&i32
}
這些都是不同的型別,就像 "朋友的朋友"和 "朋友"不同一樣。
更多關於列印
在 Rust 中,你幾乎可以用任何你想要的方式列印東西。這裡可以知道更多關於列印的事情。
加入 \n 將會產生一個新行(newline),而 \t 將會產生定位字元(tab):
fn main() {
    // Note: 這是 print!, 不是 println!
    print!("\t Start with a tab\nand move to a new line");
}
印出:
         Start with a tab
and move to a new line
"" 裡面可以寫上許多行都沒有問題,但是要注意間距:
fn main() {
    // Note: 第一行後你要從最左邊開始。
    // 如果你直接寫在 println! 下面,它會加入開頭的空白
    println!("Inside quotes
you can write over
many lines
and it will print just fine.");

    println!("If you forget to write
    on the left side, the spaces
    will be added when you print.");
}
印出:
Inside quotes
you can write over
many lines
and it will print just fine.
If you forget to write
    on the left side, the spaces
    will be added when you print.
如果你想印出 \n 這樣的字元(稱為"跳脫字元"),你可以多加一個額外的 \。
fn main() {
    println!("Here are two escape characters: \\n and \\t");
}
印出:
Here are two escape characters: \n and \t
有時你有太多的 " 和跳脫字元,並希望 Rust 忽略所有要處理的東西。要做到這件事,你可以在開頭加上 r#,在結尾加上 #。
fn main() {
    println!("He said, \"You can find the file at c:\\files\\my_documents\\file.txt.\" Then I found the file."); // 這裡用了 \ 五次
    println!(r#"He said, "You can find the file at c:\files\my_documents\file.txt." Then I found the file."#)
}
這會印出一樣的東西,但是用 r# 使人更容易閱讀。
He said, "You can find the file at c:\files\my_documents\file.txt." Then I found the file.
He said, "You can find the file at c:\files\my_documents\file.txt." Then I found the file.
如果你需要在內容裡面印出 #,那麼你可以用 r## 開頭,用 ## 結尾。如果你要印超過一個 #,兩邊要再各多加一個 #。
這有四個範例:
fn main() {

    let my_string = "'Ice to see you,' he said."; // 單引號
    let quote_string = r#""Ice to see you," he said."#; // 雙引號
    let hashtag_string = r##"The hashtag #IceToSeeYou had become very popular."##; // 一個 # 所以我們至少要用 ##
    let many_hashtags = r####""You don't have to type ### to use a hashtag. You can just use #.""####; // 有三個 ### 所以我們至少要用 ####

    println!("{}\n{}\n{}\n{}\n", my_string, quote_string, hashtag_string, many_hashtags);

}
會印出:
'Ice to see you,' he said.
"Ice to see you," he said.
The hashtag #IceToSeeYou had become very popular.
"You don't have to type ### to use a hashtag. You can just use #."
r# 還有另一個用途:你能用它來把關鍵字(如 let、fn 等)當作變數名稱。
fn main() {
    let r#let = 6; // 變數名是 let
    let mut r#mut = 10; // 變數名是 mut
}
r# 之所以有這個功能,是因為舊版的 Rust 關鍵字比現在的少。所以有了 r# 以前不是關鍵字的變數名就能避免出錯。
又或者因為某些原因,你 確實 需要一個名字像是 return 的函式。那麼你可以這樣寫:
fn r#return() -> u8 {
    println!("Here is your number.");
    8
}

fn main() {
    let my_number = r#return();
    println!("{}", my_number);
}
印出:
Here is your number.
8
所以你大概不會需要它,但是如果你真的需要用關鍵字當變數,那就用 r#。
如果你想印出 &str 或 char 的位元組,你可以在字串前寫上 b 就可以了。這適用於所有 ASCII 字元。以下這些是所有的 ASCII 字元:
☺☻♥♦♣♠♫☼►◄↕‼¶§▬↨↑↓→∟↔▲▼123456789:;<=>?@ABCDEFGHIJKLMNOPQRSTUVWXYZ[\]^_`abcdefghijklmnopqrstuvwxyz{|}~
所以,當你印出這個程式:
fn main() {
    println!("{:?}", b"This will look like numbers");
}
結果是這樣:
[84, 104, 105, 115, 32, 119, 105, 108, 108, 32, 108, 111, 111, 107, 32, 108, 105, 107, 101, 32, 110, 117, 109, 98, 101, 114, 115]
對 char 來說,這叫做 位元組,對 &str 來說,這叫做 位元組字串。
如果有需要,你也可以把 b 和 r 放在一起:
fn main() {
    println!("{:?}", br##"I like to write "#"."##);
}
它會印出 [73, 32, 108, 105, 107, 101, 32, 116, 111, 32, 119, 114, 105, 116, 101, 32, 34, 35, 34, 46]。
還有一個 Unicode 轉義(escape),可以讓你在字串中印出任何 Unicode 字元:\u{}。{} 裡面要有一個可以列印的十六進位制數字。這個是說明如何獲得 Unicode 數字及如何再把它印出來的簡短例子。
fn main() {
    println!("{:X}", '행' as u32); // char 轉型 u32 來取得十六進位值
    println!("{:X}", 'H' as u32);
    println!("{:X}", '居' as u32);
    println!("{:X}", 'い' as u32);

    println!("\u{D589}, \u{48}, \u{5C45}, \u{3044}"); // 試著以 unicode 轉義 \u 印出它們
}
我們知道 println! 可以用 {}(用於顯示) 或 {:?}(用於除錯) 來列印,再加上 {:#?} 可以進行漂亮列印。但是還有許多其他列印方式。
例如,如果你有一個變數參考,你可以用 {:p} 來印出 指標地址。指標地址指的是電腦記憶體中的位置。
fn main() {
    let number = 9;
    let number_ref = &number;
    println!("{:p}", number_ref);
}
這會印出 0xe2bc0ffcfc 或者其它地址。它可能每次都不一樣,這取決於你的電腦在哪裡儲存它。
或者你可以列印二進位、十六進位和八進位的值:
fn main() {
    let number = 555;
    println!("Binary: {:b}, hexadecimal: {:x}, octal: {:o}", number, number, number);
}
印出了 Binary: 1000101011, hexadecimal: 22b, octal: 1053。
或者你可以加上數字來改變順序。第一個變數將在索引0 中,下一個在索引1 中,以此類推。
fn main() {
    let father_name = "Vlad";
    let son_name = "Adrian Fahrenheit";
    let family_name = "Țepeș";
    println!("This is {1} {2}, son of {0} {2}.", father_name, son_name, family_name);
}
father_name 在位置0,son_name 在位置1,family_name 在位置2。所以它印出的是 This is Adrian Fahrenheit Țepeș, son of Vlad Țepeș。
也許你有一個非常複雜的字串要列印,有太多的變數要放在 {} 括號內。或者你需要印同一個變數不止一次。那麼在 {} 裡加上變數名就幫得上忙:
fn main() {
    println!(
        "{city1} is in {country} and {city2} is also in {country},
but {city3} is not in {country}.",
        city1 = "Seoul",
        city2 = "Busan",
        city3 = "Tokyo",
        country = "Korea"
    );
}
這樣會印出:
Seoul is in Korea and Busan is also in Korea,
but Tokyo is not in Korea.
在Rust中也可以進行非常複雜的列印,如果你想的話。這裡看到它是如何做到的:
{variable:padding alignment minimum.maximum}
要理解這個語法,看以下規則
- 你想要有變數名嗎?先寫出來,就像我們上面寫 {country} 一樣。
(如果你想做更多事,就在後面加一個
:) - 你想要用填充字元嗎?例如,55 加上三個 "填充零" 就像 00055。
- 填充的對齊方式(左/中/右)?
- 你想要有最小長度嗎?(寫數字就行)
- 你想要有最大長度嗎?(寫數字,前面有個
.)
例如,我想寫 "a",在它左邊有五個 ㅎ,在它右邊有五個 ㅎ:
fn main() {
    let letter = "a";
    println!("{:ㅎ^11}", letter);
}
這印出來是 ㅎㅎㅎㅎㅎaㅎㅎㅎㅎㅎ。我們看看 1) 到 5) 怎麼解釋這個情況,就能明白編譯器是怎麼解讀的:
- 你要不要變數名?
{:ㅎ^11}沒有變數名。:之前沒有任何內容。 - 你需要填充字元嗎?
{:ㅎ^11}是。ㅎ 在:後面,還有一個^。<表示變數在填充字元左邊,>表示在填充字元右邊,^表示在填充字元中間。 - 要不要設定最小長度?
{:ㅎ^11}是:後面有一個 11。 - 要不要設定最大長度?
{:ㅎ^11}不是:前面沒有.的數字。
下面是許多種型別格式化的例子:
fn main() {
    let title = "TODAY'S NEWS";
    println!("{:-^30}", title); // 沒變數名, 用-填充, 放中間, 30個字元長
    let bar = "|";
    println!("{: <15}{: >15}", bar, bar); // 沒變數名, 用空白填充, 各是15個字元長, 一左一右
    let a = "SEOUL";
    let b = "TOKYO";
    println!("{city1:-<15}{city2:->15}", city1 = a, city2 = b); // 變數city1和city2, 用-填充, 一左一右
}
印出:
---------TODAY'S NEWS---------
|                            |
SEOUL--------------------TOKYO
字串
Rust 的字串主要型別有兩類:String 和 &str。有什麼差別呢?
&str是種簡單的字串。當你寫let my_variable = "Hello, world!"時,你建立的是一個&str。&str建立非常快。String是比較復雜的字串。它比較慢一點,但它有更多的功能。String是一個指標,資料在堆積上。
另外注意,&str 前面有 &,因為你需要一個參考來使用 str。這是因為我們先前看到的原因:堆疊需要知道資料大小。所以我們給它一個它知道大小的 &,然後它就滿意了。另外,因為你是用 & 去和 str 互動,你並不擁有它。但是 String 是一個 擁有所有權 的型別。我們很快就會知道為什麼這一點很重要。
&str 和String 都是UTF-8。例如,你可以寫:
fn main() {
    let name = "서태지"; // 這是韓國名字。沒問題,因為 &str 是 UTF-8。
    let other_name = String::from("Adrian Fahrenheit Țepeș"); // UTF-8 的 Ț 和 ș 沒問題。
}
你可以在 String::from("Adrian Fahrenheit Țepeș") 中看到,從 &str 中建立 String 很容易。這兩種型別雖然不同,但彼此聯繫非常緊密。
你甚至可以寫表情符號,這要感謝 UTF-8。
fn main() {
    let name = "😂";
    println!("My name is actually {}", name);
}
在你的電腦上,會印出 My name is actually 😂,除非你的命令列印不出(Unicode字元)。那麼它會顯示 My name is actually �。但 Rust 對 emojis 或其他 Unicode (處理上)沒有問題。
我們再來看看 str 使用 & 的原因,以確保我們有理解。
str是一個動態大小(dynamically sized)的型別(動態大小 = 大小可以不同)。比如 "서태지" 和 "Adrian Fahrenheit Țepeș" 這兩個名字的大小是不一樣的:
fn main() {

    println!("A String is always {:?} bytes. It is Sized.", std::mem::size_of::<String>()); // std::mem::size_of::<Type>() 給你型別的位元組單位大小
    println!("And an i8 is always {:?} bytes. It is Sized.", std::mem::size_of::<i8>());
    println!("And an f64 is always {:?} bytes. It is Sized.", std::mem::size_of::<f64>());
    println!("But a &str? It can be anything. '서태지' is {:?} bytes. It is not Sized.", std::mem::size_of_val("서태지")); // std::mem::size_of_val() 給你變數的位元組單位大小
    println!("And 'Adrian Fahrenheit Țepeș' is {:?} bytes. It is not Sized.", std::mem::size_of_val("Adrian Fahrenheit Țepeș"));
}
列出:
A String is always 24 bytes. It is Sized.
And an i8 is always 1 bytes. It is Sized.
And an f64 is always 8 bytes. It is Sized.
But a &str? It can be anything. '서태지' is 9 bytes. It is not Sized.
And 'Adrian Fahrenheit Țepeș' is 25 bytes. It is not Sized.
這就是為什麼我們需要一個 &,因為 & 建立一個指標,而 Rust 知道指標的大小。所以指標會放在堆疊中。如果我們寫的是 str,Rust 因為不知道大小就不曉得該怎麼做了。
有很多方法可以建立 String。這裡是其中一些:
String::from("This is the string text");這是 String 型別用文字建立 String 的方法。"This is the string text".to_string()。 這是 &str 型別用來做出 String 的方法。format!巨集。 像是println!,只不過它是建立 String,而不是列印。所以你可以這樣做:
fn main() {
    let my_name = "Billybrobby";
    let my_country = "USA";
    let my_home = "Korea";

    let together = format!(
        "I am {} and I come from {} but I live in {}.",
        my_name, my_country, my_home
    );
}
現在我們有了名為 together 的 String,但還沒有印出來。
還有一種建立 String 的方法叫做 .into(),但它有點不同,因為 .into() 並不只是用來建立 String。有些型別可以很容易地使用 From 和 .into() 來回轉換為另一種型別。而如果你有 From,那麼你也有 .into()。From 更加清晰,因為你已經知道了型別:你知道 String::from("Some str") 是來自 &str 的 String。但是對於 .into(),有時候編譯器並不知道:
fn main() {
    let my_string = "Try to make this a String".into(); // ⚠️
}
Rust 不知道你要的是什麼型別,因為很多型別都可以由 &str 來組成。它說:"我可以把 &str 變成很多東西。你想要哪一種?"
error[E0282]: type annotations needed
 --> src\main.rs:2:9
  |
2 |     let my_string = "Try to make this a String".into();
  |         ^^^^^^^^^ consider giving `my_string` a type
所以你可以這樣做:
fn main() {
    let my_string: String = "Try to make this a String".into();
}
現在你得到 String 了。
const 和 static
有兩種宣告值的方法,不僅僅是用 let。它們是 const 和 static。另外,Rust 不會使用型別推理:你需要為它們編寫型別。這些都是用於不改變的值(const 表示常數)。區別在於:
const是用於不改變的值,當使用它時,名字會被替換成值。static與const類似,但有一個固定的記憶體位置,可以作為一個全域性變數使用。
所以它們幾乎是一樣的。Rust 程式設計師幾乎總是使用 const。
你用全大寫字母命名,而且通常放在 main 之外,這樣它們就可以在整個程式中生存。
兩個範例是 const NUMBER_OF_MONTHS: u32 = 12; 和 static SEASONS: [&str; 4] = ["Spring", "Summer", "Fall", "Winter"];
更多關於參考
參考在 Rust 中非常重要。Rust 使用參考來確保所有的記憶體訪問是安全的。我們知道,我們用 & 來建立參考:
fn main() {
    let country = String::from("Austria");
    let ref_one = &country;
    let ref_two = &country;

    println!("{}", ref_one);
}
這樣會印出 Austria。
在程式碼中,country 是 String。我們接著建立了兩個 country 的參考。它們的型別是 &String,你會講說這是 "String 的參考"。我們可以建立三個參考或者一百個對 country 的參考,這都沒有問題。
但這裡有問題:
fn return_str() -> &str {
    let country = String::from("Austria");
    let country_ref = &country;
    country_ref // ⚠️
}

fn main() {
    let country = return_str();
}
return_str() 函式建立了 String,它接著建立了對這個 String 的參考。然後它試圖回傳參考。但是 country 這個 String 只活在函式里面,然後它就死了。一旦變數消失了,電腦就會清理記憶體,並將其用於其他用途。所以在函式結束後,country_ref 參考到的是已經消失的記憶體,這是不對的。Rust 防止我們在這裡犯記憶體的錯誤。
這就是我們前面講到的 "擁有所有權" 型別的重要部分。因為你擁有 String,你可以把它傳給別人。但是如果 &String 的 String 死了,那麼 &String 就會死掉,所以你不能把它的 "所有權" 傳給別人。
可變參考
如果你想使用參考來改變資料,你可以使用可變參考(mutable reference)。可變參考你要寫做 &mut 而不是 &。
fn main() {
    let mut my_number = 8; // 這裡不要忘記寫 mut!
    let num_ref = &mut my_number;
}
那麼這兩種型別是什麼呢?my_number 是 i32,而 num_ref 是 &mut i32(我們讀作 "可變參考 i32")。
那麼讓我們用它來給 my_number 加上 10。但是你不能寫 num_ref += 10,因為 num_ref 不是 i32 的值,它是 &i32。其實這個值就在 i32 裡面。為了達到值所在的地方,我們用 *。* 的意思是"我不要參考,我想要參考所參照的值"。換句話說,* 與 & 是相反的動作。也就是一個 * 消去了一個 &。
fn main() {
    let mut my_number = 8;
    let num_ref = &mut my_number;
    *num_ref += 10; // 使用 * 來改變 i32 的值.
    println!("{}", my_number);

    let second_number = 800;
    let triple_reference = &&&second_number;
    println!("Second_number = triple_reference? {}", second_number == ***triple_reference);
}
印出:
18
Second_number = triple_reference? true
因為使用 & 時叫做 "參考",所以用 * 叫做 "反參考(dereferencing)"。
Rust在可變和不可變參考有兩個規則。它們非常重要卻也容易記住,因為它們很有道理。
- 規則1:如果你只有不可變參考,你可以同時有任意多的參考。1 個也好,3 個也好,1000 個也好,都沒問題。
- 規則2:如果是可變參考,你只能有一個。另外,你不能同時有一個不可變參考和一個可變參考。
這是因為可變參考能變更資料。如果你在其他參考讀取資料時更改資料,你可能會遇到問題。
理解的好方法是設想一場 Powerpoint 簡報。
情境一是關於只有一個可變參考。
情境一: 一位員工正在編寫一個 Powerpoint 簡報,他希望他的經理能幫助他。該員工將自己的登入資訊提供給經理,並請他幫忙進行編輯。現在經理對該員工的簡報有了"可變參考"。經理可以做任何他想做的修改,然後把電腦還回去。這很好,因為沒有其他人看得到這個簡報。
情境二是關於只有不可變參考。
情境二: 該員工要給100個人做簡報。現在這100個人都可以看到該員工的資料。他們全都有對該員工簡報的"不可變參考"。這很好,因為他們可以看得到,但沒人可以改動資料。
情境三是有問題的情形
情境三: 員工把他的登入資訊給了經理 他的經理現在有了一個 "可變參考"。然後該員工去給 100 個人做簡報,但是經理還是可以登入。這是不對的,因為經理可以登入,可以做任何事情。也許他的經理會登入電腦,然後開始給他的母親打一封信!現在這 100 人不得不看著經理給他母親寫信,而不是簡報。這不是他們期望看到的。
這裡有一個可變借用借用自不可變借用的範例:
fn main() {
    let mut number = 10;
    let number_ref = &number;
    let number_change = &mut number;
    *number_change += 10;
    println!("{}", number_ref); // ⚠️
}
編譯器印出了一則有用的資訊來告訴我們問題所在。
error[E0502]: cannot borrow `number` as mutable because it is also borrowed as immutable
 --> src\main.rs:4:25
  |
3 |     let number_ref = &number;
  |                      ------- immutable borrow occurs here
4 |     let number_change = &mut number;
  |                         ^^^^^^^^^^^ mutable borrow occurs here
5 |     *number_change += 10;
6 |     println!("{}", number_ref);
  |                    ---------- immutable borrow later used here
然而,這段程式碼可以運作。為什麼?
fn main() {
    let mut number = 10;
    let number_change = &mut number; // 建立可變借用
    *number_change += 10; // 用可變借用來加上 10
    let number_ref = &number; // 建立不可變借用
    println!("{}", number_ref); // 印出不可變借用
}
它印出 20 沒有問題。它能運作是因為編譯器夠聰明,能理解我們的程式碼。它知道我們使用了 number_change 來改變 number,但沒有再使用它。所以這裡沒有問題。我們並沒有將不可變和可變參考一起使用。
早期在 Rust 中,這種程式碼實際上會產生錯誤,但現在的編譯器更聰明了。它不僅能理解我們輸入的內容,還能理解我們如何使用所有的東西。
再談遮蔽
還記得我們說過,遮蔽(shadowing)不會銷毀一個值,而是阻擋它嗎?現在我們可以用參考來看這個問題。
fn main() {
    let country = String::from("Austria");
    let country_ref = &country;
    let country = 8;
    println!("{}, {}", country_ref, country);
}
這會印出 Austria, 8 還是 8, 8?它印出的是 Austria, 8。首先我們宣告一個 String,叫做 country。然後我們給這個字串建立一個參考 country_ref。然後我們用 8,這是 i32,來遮蔽 country。但是第一個 country 並沒有被銷毀,所以 country_ref 仍然參照著 "Austria",而不是 "8"。這是同樣的程式碼附上了一些註解來說明它如何運作:
fn main() {
    let country = String::from("Austria"); // 現在我們有個 String 叫作 country
    let country_ref = &country; // country_ref 是這筆資料的參考。它不會改動
    let country = 8; // 現在我們有個變數叫作 country 型別是 i8。但它和另一個變數或 country_ref 沒有關聯
    println!("{}, {}", country_ref, country); // country_ref 仍然參照自我們給的 String::from("Austria") 的資料.
}
傳遞參考給函式
參考對函式非常有用。Rust 中關於值的規則是:一個值只能有一個所有者。
這段程式碼將無法運作:
fn print_country(country_name: String) {
    println!("{}", country_name);
}

fn main() {
    let country = String::from("Austria");
    print_country(country); // 我們印出 "Austria"
    print_country(country); // ⚠️ 蠻有趣的,讓我們再做一次!
}
它不能運作,因為 country 被銷毀了。它是這麼來的:
- 第一步:我們建立稱為
country的String。country是所有者。 - 第二步:我們把
country給了print_country。print_country沒有->,所以它不回傳任何東西。在print_country完成後,我們的String現在已經死了。 - 第三步:我們嘗試把
country給print_country,但我們已經這樣做過了。我們已經沒有country可以給了。
我們可以讓 print_country 給回 String,但是有點奇怪。
fn print_country(country_name: String) -> String {
    println!("{}", country_name);
    country_name // 這裡回傳它
}

fn main() {
    let country = String::from("Austria");
    let country = print_country(country); // 我們現在要在這裡用 let 拿回 String
    print_country(country);
}
現在印出了:
Austria
Austria
更好的解決方式是加上 &。
fn print_country(country_name: &String) {
    println!("{}", country_name);
}

fn main() {
    let country = String::from("Austria");
    print_country(&country); // 我們印出 "Austria"
    print_country(&country); // 蠻有趣的,讓我們再做一次!
}
現在 print_country() 是一個函式,接受 String 的參考:即 &String。另外,我們寫 &country 來給 country 一個參考,。這表示 "你可以查看它,但我會保有它"。
現在讓我們用一個可變參考來做類似的事情。這是個使用可變變數的函式範例:
fn add_hungary(country_name: &mut String) { // 首先我們說函式接受一個可變參考
    country_name.push_str("-Hungary"); // push_str() 加入 &str 到 String
    println!("Now it says: {}", country_name);
}

fn main() {
    let mut country = String::from("Austria");
    add_hungary(&mut country); // 我們也要給它可變參考。
}
這印出了 Now it says: Austria-Hungary。
所以得出結論:
fn function_name(variable: String)接受String並擁有它。如果它不回傳任何東西,那麼這個變數就會死在函數裡面。fn function_name(variable: &String)借用String並可以查看它fn function_name(variable: &mut String)借用String並可以更改
這是個看起來像可變參考但不同的範例。
fn main() {
    let country = String::from("Austria"); // country 是不可變的,但我們想要印出 Austria-Hungary。怎麼做?
    adds_hungary(country);
}

fn adds_hungary(mut country: String) { // 它是這樣做的:adds_hungary 接受 String 並宣告它是可變的!
    country.push_str("-Hungary");
    println!("{}", country);
}
這怎麼可能呢?因為 mut country 不是參考。adds_hungary 現在擁有 country。(記得,它接受的是 String 而不是 &String)。當你呼叫 adds_hungary 的那一刻,它就完全成了 country 的所有者。country 與 String::from("Austria") 沒有關係了。所以,adds_hungary 可以把 country 當作可變的,這樣做是完全安全的。
還記得前面我們的員工 Powerpoint 和經理的情況嗎?在這種情況下,就好比員工只是把自己的整臺電腦交給了經理。員工不會再碰它,所以經理可以對它做任何他想做的事情。
複製型別
Rust 中的一些型別非常簡單。它們被稱為複製型別。這些簡單型別都在堆疊上,編譯器知道它們的大小。這意味著它們非常容易複製,所以當你把它傳送到函式時,編譯器永遠會用複製的方式。它永遠會複製,是因為它們如此的小而容易到沒有理由不複製。所以你不需要擔心這些型別的所有權問題。
這些簡單的型別包括:整數、浮點數、布林值(true 和 false)和 char。
如何知道一個型別是否實作複製?(實作 = 能夠使用)你可以檢查文件。例如,這是 char 的文件:
https://doc.rust-lang.org/std/primitive.char.html
在左邊你可以看到 Trait Implementations。例如你可以看到 Copy, Debug, 和 Display。所以你知道 char型別:
- 當傳送到函式時就被複制了 (Copy)
- 可以用
{}列印 (Display) - 可以用
{:?}列印 (Debug)
fn prints_number(number: i32) { // 沒有 -> 所以不回傳任何東西
                             // 如果數字不是複製型別,它會拿走資料
                             // 我們也不能再拿來用
    println!("{}", number);
}

fn main() {
    let my_number = 8;
    prints_number(my_number); // 印出 8。prints_number 得到 my_number 的拷貝
    prints_number(my_number); // 又印出 8。
                              // 沒問題,因為 my_number 是複製型別!
}
但是如果你有看到 String 的文件,它不是複製型別。
https://doc.rust-lang.org/std/string/struct.String.html
在左邊的 Trait Implementations 中,你可以按字母順序查詢。A、B、C......在 C 裡面沒有 Copy,但是有 Clone。Clone 和 Copy 類似,但通常需要更多的記憶體。另外,你必須用 .clone() 來呼叫它──它不會為自己克隆(clone)。
在這個範例中,prints_country() 印出國家名稱,是個 String。我們想印兩次,但沒辦法:
fn prints_country(country_name: String) {
    println!("{}", country_name);
}

fn main() {
    let country = String::from("Kiribati");
    prints_country(country);
    prints_country(country); // ⚠️
}
但現在我們懂這個訊息了。
error[E0382]: use of moved value: `country`
 --> src\main.rs:4:20
  |
2 |     let country = String::from("Kiribati");
  |         ------- move occurs because `country` has type `std::string::String`, which does not implement the `Copy` trait
3 |     prints_country(country);
  |                    ------- value moved here
4 |     prints_country(country);
  |                    ^^^^^^^ value used here after move
重點是 which does not implement the Copy trait。但在文件中我們看到 String 實現了 Clone 特徵。所以我們可以把 .clone() 加到我們的程式碼中。這樣就建立了一個克隆,然後我們將克隆傳送到函式中。現在 country 還活著,所以我們可以使用它。
fn prints_country(country_name: String) {
    println!("{}", country_name);
}

fn main() {
    let country = String::from("Kiribati");
    prints_country(country.clone()); // 做一個克隆並傳遞給函式。只有克隆送進去,且 country 仍然還活著
    prints_country(country);
}
如果 String 非常大,當然 .clone() 就會佔用很多記憶體。一個 String 可以是一整本書的長度,每次我們呼叫 .clone() 都會複製這本書。所以這時如果可以用 & 來做參考的話會比較快。例如,這段程式碼將 &str 推送到 String 上,然後每次被使用在函式時都會做一個克隆:
fn get_length(input: String) { // 接收String的所有權
    println!("It's {} words long.", input.split_whitespace().count()); // 分開算字數
}

fn main() {
    let mut my_string = String::new();
    for _ in 0..50 {
        my_string.push_str("Here are some more words "); // 推送字句
        get_length(my_string.clone()); // 每次給它一份克隆
    }
}
印出:
It's 5 words long.
It's 10 words long.
...
It's 250 words long.
這樣是 50 次克隆。這裡用參考代替更好:
fn get_length(input: &String) {
    println!("It's {} words long.", input.split_whitespace().count());
}

fn main() {
    let mut my_string = String::new();
    for _ in 0..50 {
        my_string.push_str("Here are some more words ");
        get_length(&my_string);
    }
}
0 次克隆,而不是 50 次。
無值變數
一個沒有值的變數叫做"未初始化"變數。未初始化的意思是"還沒有開始"。它們很簡單:只需要寫上 let 和變數名:
fn main() {
    let my_variable; // ⚠️
}
但是你還不能使用它,如果有任何東西沒有被初始化 Rust 不會開始編譯。
但有時它們會很有用。一個好範列是:
- 當你有一個程式碼區塊,而你的變數值就在裡面,並且
- 變數需要活在程式碼區塊之外。
fn loop_then_return(mut counter: i32) -> i32 {
    loop {
        counter += 1;
        if counter % 50 == 0 {
            break;
        }
    }
    counter
}

fn main() {
    let my_number;

    {
        // 假裝我們需要這個程式碼區塊
        let number = {
            // 假裝這有程式碼產生數字
            // 滿滿的程式,終於:
            57
        };

        my_number = loop_then_return(number);
    }

    println!("{}", my_number);
}
印出 100。
你可以看到 my_number 是在 main() 函式中宣告的,所以它一直活到最後。但是它的值是在迴圈裡面得到的。然而,這個值和 my_number 活得一樣長,因為 my_number 擁有這個值。而如果你在區塊裡面寫了 let my_number = loop_then_return(number),它就會馬上死掉。
如果你簡化程式碼,有助於想像這個概念。loop_then_return(number) 給出的結果是 100,所以我們刪除它,改寫 100。另外,現在我們不需要 number,所以我們也刪除它。現在它看起來像這樣:
fn main() {
    let my_number;
    {
        my_number = 100;
    }

    println!("{}", my_number);
}
所以和說 let my_number = { 100 }; 差不多。
另外注意,my_number 不是 mut。我們在給它 50 之前並沒有給它一個值,所以它的值不曾改變過。最後,my_number 的真正程式碼只是 let my_number = 100;。
集合型別
Rust 有許多型別用來做出集合(collection)。集合是在某個地方你需要有超過一個值時用的。例如,你可以在一個變數中包含你所在國家的所有城市資訊。我們會先從陣列(array)開始,它的速度最快,但功能也最少。在這方面它們有點像 &str。
陣列
陣列是放在中括號裡的資料:[]。陣列特性:
- 不能改變其大小,
- 必須只包含相同型別資料。
然而它們的速度卻非常快。
陣列的型別是:[type; number]。例如,["One", "Two"] 的型別是 [&str; 2]。這意味著,即使這兩個是陣列也有不同的型別:
fn main() {
    let array1 = ["One", "Two"]; // 這個型別是 [&str; 2]
    let array2 = ["One", "Two", "Five"]; // 但這個型別是 [&str; 3]。不同型別!
}
這裡有個好提示:要想知道變數的型別,你可以藉由給編譯器不正確的程式碼來"詢問"它。比如說:
fn main() {
    let seasons = ["Spring", "Summer", "Autumn", "Winter"];
    let seasons2 = ["Spring", "Summer", "Fall", "Autumn", "Winter"];
    seasons.ddd(); // ⚠️
    seasons2.thd(); // 還是⚠️
}
編譯器說:"什麼?seasons 沒有 .ddd() 的方法,seasons2 也沒有 .thd() 的方法!!" 你可以看到:
error[E0599]: no method named `ddd` found for array `[&str; 4]` in the current scope
 --> src\main.rs:4:13
  |
4 |     seasons.ddd(); //
  |             ^^^ method not found in `[&str; 4]`

error[E0599]: no method named `thd` found for array `[&str; 5]` in the current scope
 --> src\main.rs:5:14
  |
5 |     seasons2.thd(); //
  |              ^^^ method not found in `[&str; 5]`
所以它告訴你 method not found in `[&str; 4]`,這就是變數的型別。
如果你想要一個數值都一樣的陣列,你可以像這樣宣告:
fn main() {
    let my_array = ["a"; 10];
    println!("{:?}", my_array);
}
這裡印出 ["a", "a", "a", "a", "a", "a", "a", "a", "a", "a"]。
這個方法經常用來建立緩衝區(buffer)。例如,let mut buffer = [0; 640] 建立一個 640 個零的陣列。然後我們可以將零改為其他數字,以便新增資料。
你可以用 [] 來索引(獲取)陣列中的項目。第一個索引項目是 [0],第二個是 [1],以此類推。
fn main() {
    let my_numbers = [0, 10, -20];
    println!("{}", my_numbers[1]); // 印出 10
}
你可以得到陣列的一個切片(slice,一塊)。首先你需要 &,因為編譯器不知道大小。然後你可以使用 .. 來表示範圍。
例如,讓我們使用這個陣列:[1, 2, 3, 4, 5, 6, 7, 8, 9, 10]。
fn main() {
    let array_of_ten = [1, 2, 3, 4, 5, 6, 7, 8, 9, 10];

    let three_to_five = &array_of_ten[2..5];
    let start_at_two = &array_of_ten[1..];
    let end_at_five = &array_of_ten[..5];
    let everything = &array_of_ten[..];

    println!("Three to five: {:?}, start at two: {:?}, end at five: {:?}, everything: {:?}", three_to_five, start_at_two, end_at_five, everything);
}
記住這些:
- 索引號從 0 開始(不是 1)
- 索引範圍是排除的(不包括最後一個數字)。
所以 [0..2] 是指第一項索引和第二項索引(0 和 1)。或者你也可以稱它為"第零和第一項"索引。它沒有第三項,也就是索引 2。
你也可以有一個 包含的 範圍,這意味著它也包括最後一個數字。要做到這一點。加上 =,寫成 ..=,而不是 ..。所以,如果你想要第一、第二和第三項,可以寫成 [0..=2],而不是 [0..2]。
向量
就像我們有 &str 和 String 一樣的方式,我們有陣列和向量(vector)。陣列的功能少了就快,向量的功能多了就慢。(當然,Rust 的速度一直都是非常快的,所以向量並不慢,只是比陣列慢一點)。型別被寫作 Vec,你也可以直接叫它 "vec"。
向量的宣告主要有兩種方式。一種像 String 使用 new:
fn main() {
    let name1 = String::from("Windy");
    let name2 = String::from("Gomesy");

    let mut my_vec = Vec::new();
    // 如果我們現在就跑程式,編譯器會給出錯誤。
    // 它不知道vec的型別。

    my_vec.push(name1); // 現在它知道了:它是Vec<String>
    my_vec.push(name2);
}
你可以看到 Vec 裡面總是有其他東西,這就是 <>(角括號)的作用。Vec<String>是有一或多個 String 的向量。你還可以在裡面有更多的型別。舉例來說:
Vec<(i32, i32)>這個Vec的每個元素是元組(tuple):(i32, i32)。Vec<Vec<String>>這個Vec裡面有包含String的Vec。假設說你想把你喜歡的書保存在Vec<String>。然後你再拿另一本書重做一次,就會得到另一個Vec<String>。為了保留這兩本書,你會把它們放入另一個Vec中,這就是Vec<Vec<String>>。
與其使用 .push() 讓 Rust 決定型別,不如直接宣告型別。
fn main() {
    let mut my_vec: Vec<String> = Vec::new(); // 編譯器知道型別
                                              // 所以沒有錯誤。
}
你可以看到,向量中的元素必須具有相同的型別。
建立向量的另一個簡單方法是使用 vec! 巨集。它看起來像一個陣列宣告,但前面有 vec!。
fn main() {
    let mut my_vec = vec![8, 10, 10];
}
型別是 Vec<i32>。你稱它為 "i32 的 Vec"。而 Vec<String> 是 "String 的 Vec"。Vec<Vec<String>> 是 "String 的 Vec 的 Vec"。
你也可以對一個向量進行切片,就像用在陣列一樣。
fn main() {
    let vec_of_ten = vec![1, 2, 3, 4, 5, 6, 7, 8, 9, 10];
    // 所有東西都和前面的陣列一樣,除了我們加上vec!。
    let three_to_five = &vec_of_ten[2..5];
    let start_at_two = &vec_of_ten[1..];
    let end_at_five = &vec_of_ten[..5];
    let everything = &vec_of_ten[..];

    println!("Three to five: {:?},
start at two: {:?}
end at five: {:?}
everything: {:?}", three_to_five, start_at_two, end_at_five, everything);
}
因為向量比陣列慢,我們可以用一些方法讓它更快。向量都有容量(capacity),也就是給予向量使用的空間。當你在向量上推送一個新元素時,它會越來越接近容量。然後,如果你超過了容量,它將使其容量翻倍,並將元素複製到新的空間。這就是所謂的再分配(reallocation)。我們將使用名為 .capacity() 的方法,在我們向它新增元素時來查看向量的容量。
例如:
fn main() {
    let mut num_vec = Vec::new();
    println!("{}", num_vec.capacity()); // 0 個元素: 印出 0
    num_vec.push('a'); // 加人一個字元
    println!("{}", num_vec.capacity()); // 1 個元素: 印出 4. 一筆資料的 Vec 容量永遠從 4 開始
    num_vec.push('a'); // 多加一個
    num_vec.push('a'); // 多加一個
    num_vec.push('a'); // 多加一個
    println!("{}", num_vec.capacity()); // 4 個元素: 仍印出 4.
    num_vec.push('a'); // 多加一個
    println!("{}", num_vec.capacity()); // 印出 8. 我們有 5 個元素, 但容量從 4 加倍到 8 騰出了空間
}
印出:
0
4
4
8
所以這個向量再分配兩次:0 到 4,4 到 8。我們可以讓它更快:
fn main() {
    let mut num_vec = Vec::with_capacity(8); // 給它容量 8
    num_vec.push('a'); // 加一個字元
    println!("{}", num_vec.capacity()); // 印出 8
    num_vec.push('a'); // 再加一個
    println!("{}", num_vec.capacity()); // 印出 8
    num_vec.push('a'); // 再加一個
    println!("{}", num_vec.capacity()); // 印出 8.
    num_vec.push('a'); // 再加一個
    num_vec.push('a'); // 再加一個 // 現在我們有 5 個元素
    println!("{}", num_vec.capacity()); // 仍是 8
}
這個向量比較好再分配是 0 次。所以如果你認為你知道你需要多少元素,你可以使用 Vec::with_capacity() 來使它更快。
你記得你可以用 .into() 把 &str 變成 String。你也可以用它把一個陣列變成 Vec。你必須告訴 .into() 你想要 Vec,但你可以不用選擇 Vec 的型別。如果你不想選擇,你可以寫 Vec<_>。
fn main() {
    let my_vec: Vec<u8> = [1, 2, 3].into();
    let my_vec2: Vec<_> = [9, 0, 10].into(); // Vec<_> 表示 "幫我選 Vec 的型別"
                                             // Rust 會選 Vec<i32>
}
元組
Rust 中的元組(tuple)使用 () 表示。我們已經見過很多空元組了,因為函式中的 nothing 實際上意味著一個空元組:
fn do_something() {}
其實是這個的簡寫:
fn do_something() -> () {}
這個函式什麼也得不到(空元組),也不回傳什麼(空元組)。所以我們已經經常使用元組了。當你在函式中不回傳任何東西時,你實際上回傳的是空元組。
fn just_prints() {
    println!("I am printing"); // 加上 ; 表示我們回傳空元組
}

fn main() {}
但是元組可以容納很多東西,也可以容納不同的型別。元組裡面的元素也是用數字 0、1、2 等來被索引的。但要存取它們,你要用 . 而不是 []。讓我們把一大群型別放進元組裡。
fn main() {
    let random_tuple = ("Here is a name", 8, vec!['a'], 'b', [8, 9, 10], 7.7);
    println!(
        "Inside the tuple is: First item: {:?}
Second item: {:?}
Third item: {:?}
Fourth item: {:?}
Fifth item: {:?}
Sixth item: {:?}",
        random_tuple.0,
        random_tuple.1,
        random_tuple.2,
        random_tuple.3,
        random_tuple.4,
        random_tuple.5,
    )
}
印出:
Inside the tuple is: First item: "Here is a name"
Second item: 8
Third item: ['a']
Fourth item: 'b'
Fifth item: [8, 9, 10]
Sixth item: 7.7
這個元組的型別是 (&str, i32, Vec<char>, char, [i32; 3], f64)。
你可以使用一個元組來建立多個變數。看看這段程式碼:
fn main() {
    let str_vec = vec!["one", "two", "three"];
}
str_vec 裡面有三個元素。如果我們想把它們拉出來呢?這時我們可以使用元組。
fn main() {
    let str_vec = vec!["one", "two", "three"];

    let (a, b, c) = (str_vec[0], str_vec[1], str_vec[2]); // 叫它們 a, b, 和 c
    println!("{:?}", b);
}
它印出 "two",也就是 b。這就是所謂的解構(destructuring)。這是因為變數一開始是在結構體裡面的,但接著我們又做了 a、b、c 這些不是在結構體裡面的變數。
如果你需要解構,但又不想要所有的變數,你可以使用 _。
fn main() {
    let str_vec = vec!["one", "two", "three"];

    let (_, _, variable) = (str_vec[0], str_vec[1], str_vec[2]);
}
現在它只建立了一個叫 variable 的變數,但沒有為其他值做變數。
還有很多集合型別,及許許多多使用陣列、向量和元組的方式。我們也將學習更多關於它們的知識,但我們將先學習控制流程。
控制流程
YouTube 上觀看本章內容: Part 1 及 Part 2
控制流程(control flow)的意思是告訴你的程式碼在不同的情況下該怎麼做。最簡單的控制流程是 if。
fn main() {
    let my_number = 5;
    if my_number == 7 {
        println!("It's seven");
    }
}
另外注意,你用的是 == 而不是 =。== 是用來比較的,= 是用來賦值的(給一個值)。另外注意,我們寫的是 if my_number == 7 而不是 if (my_number == 7)。在 Rust 中,你不需要在 if 條件用括號。
else if 和 else 給你更多的控制:
fn main() {
    let my_number = 5;
    if my_number == 7 {
        println!("It's seven");
    } else if my_number == 6 {
        println!("It's six")
    } else {
        println!("It's a different number")
    }
}
印出 It's a different number,因為它不等於 7 或 6。
您可以使用 &&(和)和 ||(或)來新增更多條件。
fn main() {
    let my_number = 5;
    if my_number % 2 == 1 && my_number > 0 { // % 2 表示除以2之後的餘下的數
        println!("It's a positive odd number");
    } else if my_number == 6 {
        println!("It's six")
    } else {
        println!("It's a different number")
    }
}
印出 It's a positive odd number,因為當你把它除以 2 時,你有餘數 1,且它大於0。
你可以看到,過多的 if、else 和 else if 會很難讀。在這種情況下,你可以使用 match 來代替,它看起來更乾淨。但是您必須為每一個可能的結果進行匹配(match)。例如,這將無法運作:
fn main() {
    let my_number: u8 = 5;
    match my_number {
        0 => println!("it's zero"),
        1 => println!("it's one"),
        2 => println!("it's two"),
        // ⚠️
    }
}
編譯器說:
error[E0004]: non-exhaustive patterns: `3u8..=std::u8::MAX` not covered
 --> src\main.rs:3:11
  |
3 |     match my_number {
  |           ^^^^^^^^^ pattern `3u8..=std::u8::MAX` not covered
這就意味著"你告訴我 0 到 2,但 u8 可以到 255。那 3 呢?4 呢?5 呢?"以此類推。所以你可以加上 _,意思是"其他任何東西"。
fn main() {
    let my_number: u8 = 5;
    match my_number {
        0 => println!("it's zero"),
        1 => println!("it's one"),
        2 => println!("it's two"),
        _ => println!("It's some other number"),
    }
}
印出 It's some other number。
記住這些匹配的規則:
- 你寫下
match,然後做一個{}程式碼區塊。 - 在左邊寫上模式,用
=>胖箭頭說明匹配時該怎麼做。 - 每一行稱為一個"分支(arm)"。
- 在分支之間放一個逗號(不是分號)。
你可以用匹配結果來宣告一個值:
fn main() {
    let my_number = 5;
    let second_number = match my_number {
        0 => 0,
        5 => 10,
        _ => 2,
    };
}
second_number 將是 10。你看到最後的分號了嗎?那是因為,在 match 結束後,我們實際上告訴了編譯器這個資訊:let second_number = 10;
你也可以在更復雜的事情上進行匹配。你要用元組來做到。
fn main() {
    let sky = "cloudy";
    let temperature = "warm";

    match (sky, temperature) {
        ("cloudy", "cold") => println!("It's dark and unpleasant today"),
        ("clear", "warm") => println!("It's a nice day"),
        ("cloudy", "warm") => println!("It's dark but not bad"),
        _ => println!("Not sure what the weather is."),
    }
}
印出 It's dark but not bad,因為它與 sky 和 temperature 的 "cloudy" 和 "warm" 相匹配。
你甚至可以把 if 放在 match 裡面。這稱為 "match guard":
fn main() {
    let children = 5;
    let married = true;

    match (children, married) {
        (children, married) if married == false => println!("Not married with {} children", children),
        (children, married) if children == 0 && married == true => println!("Married but no children"),
        _ => println!("Married? {}. Number of children: {}.", married, children),
    }
}
這將印出 Married? true. Number of children: 5.
在匹配時,你可以隨意多次使用 _。在這個關於顏色的匹配中,我們有三個顏色,但一次只能選中一個。
fn match_colours(rbg: (i32, i32, i32)) {
    match rbg {
        (r, _, _) if r < 10 => println!("Not much red"),
        (_, b, _) if b < 10 => println!("Not much blue"),
        (_, _, g) if g < 10 => println!("Not much green"),
        _ => println!("Each colour has at least 10"),
    }
}

fn main() {
    let first = (200, 0, 0);
    let second = (50, 50, 50);
    let third = (200, 50, 0);

    match_colours(first);
    match_colours(second);
    match_colours(third);

}
印出:
Not much blue
Each colour has at least 10
Not much green
這也說明了 match 陳述式的作用,因為在第一個例子中,它只印了 Not much blue。但是 first 也沒有多少綠色。match 陳述式總是在找到一個匹配項時停止,而不檢查其他的。這就是程式碼編譯得很好,但不是你想要的程式碼的一個好例子。
你可以做一個非常大的 match 陳述式來解決這個問題,但是使用 for 迴圈(loop)可能更好。我們將很快會討論到迴圈。
匹配必須回傳相同的型別。所以你不能這樣做:
fn main() {
    let my_number = 10;
    let some_variable = match my_number {
        10 => 8,
        _ => "Not ten", // ⚠️
    };
}
編譯器告訴你:
error[E0308]: `match` arms have incompatible types
  --> src\main.rs:17:14
   |
15 |       let some_variable = match my_number {
   |  _________________________-
16 | |         10 => 8,
   | |               - this is found to be of type `{integer}`
17 | |         _ => "Not ten",
   | |              ^^^^^^^^^ expected integer, found `&str`
18 | |     };
   | |_____- `match` arms have incompatible types
這樣也不行,原因同上。
fn main() {
    let some_variable = if my_number == 10 { 8 } else { "something else "}; // ⚠️
}
但是這樣就可以了,因為不是 match,所以你每次都有不同的 let 陳述式:
fn main() {
    let my_number = 10;

    if my_number == 10 {
        let some_variable = 8;
    } else {
        let some_variable = "Something else";
    }
}
你也可以使用 @ 給 match 表示式的值命名,然後你就可以使用它。在這個範例中,我們在函式中匹配 i32 輸入。如果是 4 或 13,我們要在 println! 陳述式中使用這個數字。否則,我們不需要使用它。
fn match_number(input: i32) {
    match input {
    number @ 4 => println!("{} is an unlucky number in China (sounds close to 死)!", number),
    number @ 13 => println!("{} is unlucky in North America, lucky in Italy! In bocca al lupo!", number),
    _ => println!("Looks like a normal number"),
    }
}

fn main() {
    match_number(50);
    match_number(13);
    match_number(4);
}
印出:
Looks like a normal number
13 is unlucky in North America, lucky in Italy! In bocca al lupo!
4 is an unlucky number in China (sounds close to 死)!
結構體
YouTube 上觀看本章內容: Part 1 及 Part 2
有了結構體(struct),你可以建立自己的型別。在 Rust 中,你會無時無刻用著結構體,因為它們非常方便。結構體是用關鍵字 struct 建立的。結構體的名稱應該用大駝峰式命名法(UpperCamelCase,每個字首用大寫字母,不含空格)。如果你用全小寫的結構體,編譯器會告訴你。
結構體有三種類型。一種是"單元結構體"。單元的意思是"沒有任何東西"。對於一個單元結構體,你只需要寫名字和一個分號。
struct FileDirectory;
fn main() {}
下一種是元組結構體(tuple struct),或者說是未具名結構體。之所以是"未具名",是因為你只需要寫型別,而不是欄位(field)名。元組結構體適合在你需要一個簡單的結構,並且不需要記住名字時。
struct Colour(u8, u8, u8);

fn main() {
    let my_colour = Colour(50, 0, 50); // 從RGB (red, green, blue)做出顏色
    println!("The second part of the colour is: {}", my_colour.1);
}
印出 The second part of the colour is: 0。
第三種類型是具名結構體。這可能是最常見的結構體。在這個結構體中,你在 {} 程式碼區塊中宣告欄位名和型別。請注意,在具名結構體後面不要寫分號,因為它後面是一整個程式碼區塊。
struct Colour(u8, u8, u8); // 宣告一樣的 Colour 元組結構體

struct SizeAndColour {
    size: u32,
    colour: Colour, // 並且我們把它放在我們的新具名結構體裡
}

fn main() {
    let my_colour = Colour(50, 0, 50);

    let size_and_colour = SizeAndColour {
        size: 150,
        colour: my_colour
    };
}
在具名結構體中,你也可以用逗號來分隔欄位。對於最後一個欄位,你可以加或不加逗號──這取決於你。SizeAndColour 在 colour 後面有一個逗號:
struct Colour(u8, u8, u8); // 宣告一樣的 Colour 結構體

struct SizeAndColour {
    size: u32,
    colour: Colour, // 並且我們把它放在我們的新具名結構體裡
}

fn main() {}
但你不需要它。但總是放一個逗號可能是個好主意,因為有時你會改變欄位的順序:
struct Colour(u8, u8, u8); // 宣告一樣的 Colour 結構體

struct SizeAndColour {
    size: u32,
    colour: Colour // 這裡沒有逗號
}

fn main() {}
然後我們決定改變順序...
struct SizeAndColour {
    colour: Colour // ⚠️ Whoops! 現在這裡沒有逗號。
    size: u32,
}

fn main() {}
但無論哪種方式都不是很重要,所以你可以選擇是否要使用逗號。
我們建立一個 Country 結構體來舉例說明。Country 結構有 population、capital 和 leader_name 三個欄位。
struct Country {
    population: u32,
    capital: String,
    leader_name: String
}

fn main() {
    let population = 500_000;
    let capital = String::from("Elista");
    let leader_name = String::from("Batu Khasikov");

    let kalmykia = Country {
        population: population,
        capital: capital,
        leader_name: leader_name,
    };
}
你有沒有注意到,我們把同樣的東西寫了兩次?我們寫了 population: population、capital: capital 和 leader_name: leader_name。實際上,你不需要這樣做。如果欄位名和變數名相同,你就不用寫兩次。
struct Country {
    population: u32,
    capital: String,
    leader_name: String
}

fn main() {
    let population = 500_000;
    let capital = String::from("Elista");
    let leader_name = String::from("Batu Khasikov");

    let kalmykia = Country {
        population,
        capital,
        leader_name,
    };
}
列舉
YouTube 上觀看本章內容: Part 1, Part 2, Part 3 及 Part 4
enum 是列舉(enumeration)的簡稱。它們看起來與結構體非常相似,但又有所不同。區別有:
- 當你想要一個東西和另一個東西時,使用
struct。 - 當你想要一個東西或另一個東西時,請使用
enum。
所以,結構體是用於多個事物在一起,而列舉則是用於多個選擇在一起。
要宣告列舉時,寫下 enum,並用程式碼區塊將包含的選項用逗號分隔。就像 struct 一樣,最後一部分的逗號則可有可無。我們將建立一個名為 ThingsInTheSky 的列舉:
enum ThingsInTheSky {
    Sun,
    Stars,
}

fn main() {}
這是個列舉,因為你可以看到太陽或星星:你必須選擇一個。這些叫做變體(variants)。
// 建立兩個選擇的列舉
enum ThingsInTheSky {
    Sun,
    Stars,
}

// 有這個函式我們可以用i32來建立ThingsInTheSky。
fn create_skystate(time: i32) -> ThingsInTheSky {
    match time {
        6..=18 => ThingsInTheSky::Sun, // 介於6到18小時之間我們可以見到太陽
        _ => ThingsInTheSky::Stars, // 除此之外,我們可以見到星星
    }
}

// 有這個函式我們可以匹配到ThingsInTheSky的兩個選擇。
fn check_skystate(state: &ThingsInTheSky) {
    match state {
        ThingsInTheSky::Sun => println!("I can see the sun!"),
        ThingsInTheSky::Stars => println!("I can see the stars!")
    }
}

fn main() {
    let time = 8; // 這是 8 點鐘
    let skystate = create_skystate(time); // create_skystate回傳ThingsInTheSky
    check_skystate(&skystate); // 給它參考那麼它就能讀到變數skystate
}
印出 I can see the sun!。
你也可以將資料新增到列舉中。
enum ThingsInTheSky {
    Sun(String), // 現在每個變體都有字串
    Stars(String),
}

fn create_skystate(time: i32) -> ThingsInTheSky {
    match time {
        6..=18 => ThingsInTheSky::Sun(String::from("I can see the sun!")), // 這裡寫下字串
        _ => ThingsInTheSky::Stars(String::from("I can see the stars!")),
    }
}

fn check_skystate(state: &ThingsInTheSky) {
    match state {
        ThingsInTheSky::Sun(description) => println!("{}", description), // 給字串命名為description那麼我們就能使用它
        ThingsInTheSky::Stars(n) => println!("{}", n), // 或你能命名成 n。或其它任何東西──它無關緊要
    }
}

fn main() {
    let time = 8; // 這是 8 點鐘
    let skystate = create_skystate(time); // create_skystate 回傳 ThingsInTheSky
    check_skystate(&skystate); // 給它參考那麼它就能讀到變數skystate
}
印出來的結果一樣:I can see the sun!。
你也可以"匯入(import)"一個列舉,這樣你就不用打那麼多字了。下面這個例子裡,我們每次在匹配我們的 mood 時都要輸入 Mood:::
enum Mood {
    Happy,
    Sleepy,
    NotBad,
    Angry,
}

fn match_mood(mood: &Mood) -> i32 {
    let happiness_level = match mood {
        Mood::Happy => 10, // 我們每次都要輸入 Mood::
        Mood::Sleepy => 6,
        Mood::NotBad => 7,
        Mood::Angry => 2,
    };
    happiness_level
}

fn main() {
    let my_mood = Mood::NotBad;
    let happiness_level = match_mood(&my_mood);
    println!("Out of 1 to 10, my happiness is {}", happiness_level);
}
印出的是 Out of 1 to 10, my happiness is 7。讓我們匯入,這樣我們就可以少打點字了。要匯入所有的東西時寫做 *。注意:它和反參考關鍵字的 * 一樣,但完全不同。
enum Mood {
    Happy,
    Sleepy,
    NotBad,
    Angry,
}

fn match_mood(mood: &Mood) -> i32 {
    use Mood::*; // 我們匯入Mood裡的所有東西。現在我們可以只寫Happy、Sleepy等變體名。
    let happiness_level = match mood {
        Happy => 10, // 我們不用再寫 Mood:: 了
        Sleepy => 6,
        NotBad => 7,
        Angry => 2,
    };
    happiness_level
}

fn main() {
    let my_mood = Mood::Happy;
    let happiness_level = match_mood(&my_mood);
    println!("Out of 1 to 10, my happiness is {}", happiness_level);
}
enum 的一部分也可以轉變成整數。這是因為 Rust 給 enum 提供了以 0 開頭的數字給每個分支各自使用。如果你的列舉中沒有任何其他資料的話,你可以拿它來做些事情。
enum Season {
    Spring, // 如果這是 Spring(String) 或其它東西,它就不能這樣用
    Summer,
    Autumn,
    Winter,
}

fn main() {
    use Season::*;
    let four_seasons = vec![Spring, Summer, Autumn, Winter];
    for season in four_seasons {
        println!("{}", season as u32);
    }
}
印出:
0
1
2
3
不過如果你想的話,你也可以給它一個不同的數字──Rust 並不在意,可以用同樣的方式來使用它。只要在你想要有數值的變體加上 = 和數字。你不必給數字到所有變體。但如果你不這樣做,Rust 就會給變體從前一個分支數字加 1 的數字。
enum Star {
    BrownDwarf = 10,
    RedDwarf = 50,
    YellowStar = 100,
    RedGiant = 1000,
    DeadStar, // 想想看這個數字會有多少?
}

fn main() {
    use Star::*;
    let starvec = vec![BrownDwarf, RedDwarf, YellowStar, RedGiant];
    for star in starvec {
        match star as u32 {
            size if size <= 80 => println!("Not the biggest star."), // 記得: size 沒有任何意思。只不過是我們為了可以列印所選的名稱
            size if size >= 80 => println!("This is a good-sized star."),
            _ => println!("That star is pretty big!"),
        }
    }
    println!("What about DeadStar? It's the number {}.", DeadStar as u32);
}
印出:
Not the biggest star.
Not the biggest star.
This is a good-sized star.
This is a good-sized star.
What about DeadStar? It's the number 1001.
DeadStar 本來是 4 號,但現在是 1001。
使用多種型別的列舉
你知道向量、陣列等等之中的元素都需要相同的型別(只有 tuple 不同)。但其實你可以用列舉來放不同的型別。想象一下,我們想要有個向量,有 u32 或 i32。當然,你可以做出 Vec<(u32, i32)>(帶有 (u32, i32) 元組的向量),但是我們想要每次只有一種。所以這裡可以使用列舉。這是簡單的範例:
enum Number {
    U32(u32),
    I32(i32),
}

fn main() {}
所以這有兩個變體:U32 變體裡有 u32,I32 變體裡有 i32。U32 和 I32 只是我們取的名字。它們可以取名叫 UThirtyTwo、IThirtyTwo 或其他任何東西。
現在,如果我們把它們放到向量中,我們就會有 Vec<Number>,因為都是同一個型別編譯器會很開心。編譯器並不在乎我們有的是 u32 或者是 i32,因為它們都在一個叫做 Number 的單一型別裡面。因為它是列舉,你必須選擇一種,這就是我們想要的。我們將使用 .is_positive() 方法來挑選。如果是 true,那麼我們將選擇 U32,如果是 false,那麼我們將選擇 I32。
現在程式碼像這樣:
enum Number {
    U32(u32),
    I32(i32),
}

fn get_number(input: i32) -> Number {
    let number = match input.is_positive() {
        true => Number::U32(input as u32), // 如果是正數改成 u32
        false => Number::I32(input), // 不然就給數字因為它已經是 i32
    };
    number
}


fn main() {
    let my_vec = vec![get_number(-800), get_number(8)];

    for item in my_vec {
        match item {
            Number::U32(number) => println!("It's a u32 with the value {}", number),
            Number::I32(number) => println!("It's an i32 with the value {}", number),
        }
    }
}
印出了我們想看到的結果:
It's an i32 with the value -800
It's a u32 with the value 8
迴圈
有了迴圈,你可以告訴 Rust 繼續做某件事,直到你想停止它。你也能使用 loop 來啟動一個不會停止的迴圈,除非你告訴它何時 break(中斷)。
fn main() { // 這個程式永不停止
    loop {

    }
}
那讓我們告訴編譯器什麼時候能停止。
fn main() {
    let mut counter = 0; // 設定計數器為 0
    loop {
        counter +=1; // 計數器遞增 1
        println!("The counter is now: {}", counter);
        if counter == 5 { // 當計數器 == 5 時停止
            break;
        }
    }
}
將會印出:
The counter is now: 1
The counter is now: 2
The counter is now: 3
The counter is now: 4
The counter is now: 5
如果你的迴圈裡面還有迴圈,你可以給它們命名。有了名字,你可以告訴 Rust 要從哪個迴圈中 break 出來。使用 ' (稱為 "tick") 和 : 來給它命名:
fn main() {
    let mut counter = 0;
    let mut counter2 = 0;
    println!("Now entering the first loop.");

    'first_loop: loop {
        // 給第一個迴圈名字
        counter += 1;
        println!("The counter is now: {}", counter);
        if counter > 9 {
            // 在迴圈裡開始第二個迴圈
            println!("Now entering the second loop.");

            'second_loop: loop {
                // 現在我們在 'second_loop 裡面
                println!("The second counter is now: {}", counter2);
                counter2 += 1;
                if counter2 == 3 {
                    break 'first_loop; // 中斷到 'first_loop 標籤外我們才能離開程式
                }
            }
        }
    }
}
將會印出:
Now entering the first loop.
The counter is now: 1
The counter is now: 2
The counter is now: 3
The counter is now: 4
The counter is now: 5
The counter is now: 6
The counter is now: 7
The counter is now: 8
The counter is now: 9
The counter is now: 10
Now entering the second loop.
The second counter is now: 0
The second counter is now: 1
The second counter is now: 2
while 迴圈是指在某件事物還在 true 時繼續運作的迴圈。每一次迴圈,Rust 都會檢查它是否仍然是 true。如果變成 false,Rust 會停止迴圈。
fn main() {
    let mut counter = 0;

    while counter < 5 {
        counter +=1;
        println!("The counter is now: {}", counter);
    }
}
for 迴圈讓你告訴 Rust 每次要做什麼。但是在 for 迴圈中,迴圈會在一定次數後停止。for 迴圈經常使用範圍(range)。你能用 .. 和 ..= 來建立範圍。
..建立一個排除的範圍:0..3建立0, 1, 2。..=建立一個包含的範圍:0..=3建立0, 1, 2, 3。
fn main() {
    for number in 0..3 {
        println!("The number is: {}", number);
    }

    for number in 0..=3 {
        println!("The next number is: {}", number);
    }
}
印出:
The number is: 0
The number is: 1
The number is: 2
The next number is: 0
The next number is: 1
The next number is: 2
The next number is: 3
同時注意到,number 成為 0..3 的變數名。我們也能叫它做 n,或者 ntod_het___hno_f,或者任何名字。然後我們就可以在 println! 中使用這個名字。
如果你不需要變數名,就用 _。
fn main() {
    for _ in 0..3 {
        println!("Printing the same thing three times");
    }
}
印出:
Printing the same thing three times
Printing the same thing three times
Printing the same thing three times
因為我們每次都沒有給它任何數字來列印。
而實際上,如果你給了變數名卻沒用,Rust 會告訴你:
fn main() {
    for number in 0..3 {
        println!("Printing the same thing three times");
    }
}
印出的內容和上面一樣。程式編譯正常,但 Rust 會提醒你沒有使用 number:
warning: unused variable: `number`
 --> src\main.rs:2:9
  |
2 |     for number in 0..3 {
  |         ^^^^^^ help: if this is intentional, prefix it with an underscore: `_number`
Rust 建議寫 _number 而不是 _。在變數名前加上 _ 意味著 "也許我以後會用到它"。但是只用 _ 意味著"我根本不關心這個變數"。所以,如果你以後會使用它們,並且不想讓編譯器告訴你,你可以在變數名前面加上_。
你也可以用 break 來回傳值。只要把值寫在 break 後面以及 ;。這個有 loop 和 break 的範例賦值給 my_number。
fn main() {
    let mut counter = 5;
    let my_number = loop {
        counter +=1;
        if counter % 53 == 3 {
            break counter;
        }
    };
    println!("{}", my_number);
}
印出 56。break counter; 的意思是"中斷並回傳計數器的值"。而且因為整個區塊以 let 開始,my_number 最後會得到回傳值。
現在我們知道了如何使用迴圈,對於我們之前的顏色"匹配"問題這是更好的解決方案。這個解決方案更好是因為我們要比較所有的東西,而"for"迴圈會檢視每一項元素。
fn match_colours(rbg: (i32, i32, i32)) {
    println!("Comparing a colour with {} red, {} blue, and {} green:", rbg.0, rbg.1, rbg.2);
    let new_vec = vec![(rbg.0, "red"), (rbg.1, "blue"), (rbg.2, "green")]; // 將顏色放進向量。裡面是含顏色名的元組
    let mut all_have_at_least_10 = true; // 從true開始。我們會設定為false如果其中一種顏色少於10
    for item in new_vec {
        if item.0 < 10 {
            all_have_at_least_10 = false; // 現在是false
            println!("Not much {}.", item.1) // 接著我們印出顏色。
        }
    }
    if all_have_at_least_10 { // 檢查是否仍是true,是就印出
        println!("Each colour has at least 10.")
    }
    println!(); // 多加一行
}

fn main() {
    let first = (200, 0, 0);
    let second = (50, 50, 50);
    let third = (200, 50, 0);

    match_colours(first);
    match_colours(second);
    match_colours(third);
}
印出:
Comparing a colour with 200 red, 0 blue, and 0 green:
Not much blue.
Not much green.

Comparing a colour with 50 red, 50 blue, and 50 green:
Each colour has at least 10.

Comparing a colour with 200 red, 50 blue, and 0 green:
Not much green.
實作結構體和列舉
從這裡開始你可以給予你的結構體和列舉一些真正的威力。要對 struct 或 enum 呼叫的函式,要寫在 impl 區塊。這些函式被稱為方法(method)。impl 區塊中的方法有兩類。
- 方法:這些方法會取用 self(或是 &self 或 &mut self)。正規方法使用"."(英文句號)。
.clone()是一個正規方法的例子。 - 關聯函式(associated function, 在某些語言中被稱為"靜態(static)"方法):這些函式不使用 self。關聯的意思是"有相關的"。它們的書寫方式不同,用的是
::。String::from()是一個關聯函式,Vec::new()也是。你看到的關聯函式最常被用來建立新變數。
我們將在我們的範例中建立 Animal 並印出它們。
對於新的 struct 或 enum,如果你想使用 {:?} 印出來,你需要給它Debug,我們也將會這樣做。如果你在結構體或列舉上面寫了 #[derive(Debug)],那麼你就可以用 {:?} 印出來。這些帶有 #[] 的訊息被稱為屬性(attributes)。你有時可以用它們來告訴編譯器給你的結構體像是 Debug 的能力。屬性有很多種,我們以後會學到。但是 derive 可能是最常見的,你經常在結構體和列舉上面看到它。
#[derive(Debug)]
struct Animal {
    age: u8,
    animal_type: AnimalType,
}

#[derive(Debug)]
enum AnimalType {
    Cat,
    Dog,
}

impl Animal {
    fn new() -> Self {
        // Self 指的是 Animal。
        // 你也可以寫 Animal 而非 Self

        Self {
            // 當我們寫 Animal::new() 我們永遠會得到10歲的貓
            age: 10,
            animal_type: AnimalType::Cat,
        }
    }

    fn change_to_dog(&mut self) { // 因為我們在Animal裡, &mut self 指的是 &mut Animal
                                  // 用 .change_to_dog() 把貓改成狗
                                  // 有了 &mut self 我們就能更改
        println!("Changing animal to dog!");
        self.animal_type = AnimalType::Dog;
    }

    fn change_to_cat(&mut self) {
        // 用 .change_to_cat() 把狗改成貓
        // 有了 &mut self 我們就能更改
        println!("Changing animal to cat!");
        self.animal_type = AnimalType::Cat;
    }

    fn check_type(&self) {
        // we want to read self
        match self.animal_type {
            AnimalType::Dog => println!("The animal is a dog"),
            AnimalType::Cat => println!("The animal is a cat"),
        }
    }
}


fn main() {
    let mut new_animal = Animal::new(); // 用關聯函式建立新動物
                                        // 它是一隻10歲的貓
    new_animal.check_type();
    new_animal.change_to_dog();
    new_animal.check_type();
    new_animal.change_to_cat();
    new_animal.check_type();
}
印出:
The animal is a cat
Changing animal to dog!
The animal is a dog
Changing animal to cat!
The animal is a cat
記住,Self(型別 Self)和 self(變數 self)是縮寫。(縮寫 = 簡寫方式)
所以在我們的程式碼中,Self = Animal。另外,fn change_to_dog(&mut self) 的意思是 fn change_to_dog(&mut Animal)。
下面再舉一個小例子。這次我們將在 enum 上使用 impl:
enum Mood {
    Good,
    Bad,
    Sleepy,
}

impl Mood {
    fn check(&self) {
        match self {
            Mood::Good => println!("Feeling good!"),
            Mood::Bad => println!("Eh, not feeling so good"),
            Mood::Sleepy => println!("Need sleep NOW"),
        }
    }
}

fn main() {
    let my_mood = Mood::Sleepy;
    my_mood.check();
}
印出 Need sleep NOW。
解構
我們再來多看些解構(destructuring)。你可以反過來透過使用 let 從結構體或列舉中獲取值。我們瞭解到這是 destructuring,因為你得到的變數不是結構體的一部分。現在你分別得到了它們的值。首先是一個簡單的範例:
struct Person { // 為個人資料做一個簡單的結構體
    name: String,
    real_name: String,
    height: u8,
    happiness: bool
}

fn main() {
    let papa_doc = Person { // 建立變數 papa_doc
        name: "Papa Doc".to_string(),
        real_name: "Clarence".to_string(),
        height: 170,
        happiness: false
    };

    let Person { // 解構 papa_doc
        name: a,
        real_name: b,
        height: c,
        happiness: d
    } = papa_doc;

    println!("They call him {} but his real name is {}. He is {} cm tall and is he happy? {}", a, b, c, d);
}
印出:They call him Papa Doc but his real name is Clarence. He is 170 cm tall and is he happy? false
你可以看到它是反過來的。首先我們說 let papa_doc = Person { fields } 來建立結構體。然後我們說 let Person { fields } = papa_doc 來解構它。
你不必寫 name: a──你可以直接寫 name。但這裡我們寫 name: a 是因為我們想使用一個名字為 a 的變數。
現在再舉一個更大的例子。在這個例子中,我們有一個 City 結構體。我們給它一個 new 函式來做出它。然後我們有一個 process_city_values 函式來處理這些值。在函式中,我們只是建立了一個 Vec,但你可以想象,我們可以在解構它之後做更多的事情。
struct City {
    name: String,
    name_before: String,
    population: u32,
    date_founded: u32,
}

impl City {
    fn new(name: String, name_before: String, population: u32, date_founded: u32) -> Self {
        Self {
            name,
            name_before,
            population,
            date_founded,
        }
    }
}

fn process_city_values(city: &City) {
    let City {
        name,
        name_before,
        population,
        date_founded,
    } = city;
        // 現在我們有可分別使用的值了
    let two_names = vec![name, name_before];
    println!("The city's two names are {:?}", two_names);
}

fn main() {
    let tallinn = City::new("Tallinn".to_string(), "Reval".to_string(), 426_538, 1219);
    process_city_values(&tallinn);
}
印出 The city's two names are ["Tallinn", "Reval"]。
參考和點運算子
我們學過當你有一個參考時,你要用 * 來取得值。參考是一種不同的型別,所以這是無法執行的:
fn main() {
    let my_number = 9;
    let reference = &my_number;

    println!("{}", my_number == reference); // ⚠️
}
編譯器印出:
error[E0277]: can't compare `{integer}` with `&{integer}`
 --> src\main.rs:5:30
  |
5 |     println!("{}", my_number == reference);
  |                              ^^ no implementation for `{integer} == &{integer}`
所以我們把第 5 行改成 println!("{}", my_number == *reference);,現在印出的是 true,因為現在是比較 i32 == i32,而不是比較 i32 == &i32。這就是所謂的反參考。
但是當你使用方法時,Rust 會為你反參考。方法中的 . 被稱為點運算子(dot operator),用來免費做反參考。
首先,讓我們寫一個有 u8 欄位的結構。然後,我們將對它做參考,並嘗試進行比較。它將無法執行:
struct Item {
    number: u8,
}

fn main() {
    let item = Item {
        number: 8,
    };

    let reference_number = &item.number; // 型別是 &u8

    println!("{}", reference_number == 8); // ⚠️ &u8 和 u8 不能比較
}
為了讓它能執行,我們需要去反參考:println!("{}", *reference_number == 8);。
但用了點運算子,我們就不需要*。例如:
struct Item {
    number: u8,
}

fn main() {
    let item = Item {
        number: 8,
    };

    let reference_item = &item;

    println!("{}", reference_item.number == 8); // 我們不要需寫成 *reference_item.number
}
現在讓我們為 Item 建立方法來比較 number 與另一個數字。我們不需要在任何地方使用 *:
struct Item {
    number: u8,
}

impl Item {
    fn compare_number(&self, other_number: u8) { // 接受 self 的參考
        println!("Are {} and {} equal? {}", self.number, other_number, self.number == other_number);
            // 我們不需要寫 *self.number
    }
}

fn main() {
    let item = Item {
        number: 8,
    };

    let reference_item = &item; // 型別 &Item
    let reference_item_two = &reference_item; // 型別 &&Item

    item.compare_number(8); // 方法可以執行
    reference_item.compare_number(8); // 它在這裡也可以執行
    reference_item_two.compare_number(8); // 還有這裡

}
所以只要記住:當你使用 . 運算子時,你不需要擔心有沒有 *。
泛型
在函式中,你要寫出拿什麼型別作為輸入:
fn return_number(number: i32) -> i32 {
    println!("Here is your number.");
    number
}

fn main() {
    let number = return_number(5);
}
但是如果你想用的不僅僅是 i32 呢?你可以用泛型(Generics)來解決。泛型的意思是 "也許是某一種型別,也許是另一種型別"。
泛型的寫法要用角括號裡面加上型別,像這樣:<T> 這個意思是"你放進函式的任意型別"。通常泛型會使用一個大寫字母的型別(T、U、V等),儘管你不必只使用一個字母。
這個範例是你如何改變函式讓它用泛型:
fn return_number<T>(number: T) -> T {
    println!("Here is your number.");
    number
}

fn main() {
    let number = return_number(5);
}
重點是函式名稱後的 <T>。如果沒有這個,Rust 會認為 T 是一個具體的(concrete,具體的 = 不是泛型的)型別,像是 String 或 i8。
如果我們能寫出型別名,就更容易理解了。看看我們把 T 改成 MyType 會發生什麼:
#![allow(unused)]
fn main() {
fn return_number(number: MyType) -> MyType { // ⚠️
    println!("Here is your number.");
    number
}
}
大家可以看到,MyType 是具體的,不是泛型的。所以我們需要寫成這樣,它現在就可以執行了:
fn return_number<MyType>(number: MyType) -> MyType {
    println!("Here is your number.");
    number
}

fn main() {
    let number = return_number(5);
}
所以單字母 T 是給人眼看的,但函式名稱後的部分是給編譯器的"眼睛"看的。沒有了它,就不是泛型了。
現在我們再回到型別 T,因為 Rust 程式碼通常使用 T。
你會記得 Rust 中有些型別是 Copy,有些是 Clone,有些是 Display,有些是 Debug,等等。有 Debug,我們可以用 {:?} 來列印。所以現在大家可以看到,我們如果要印出 T 就有問題了:
fn print_number<T>(number: T) {
    println!("Here is your number: {:?}", number); // ⚠️
}

fn main() {
    print_number(5);
}
print_number 需要 Debug 印出 number,但是 T 是一個有 Debug 的型別嗎?也許不是。也許它沒有 #[derive(Debug)],誰知道呢?編譯器也不知道,所以它給了錯誤:
error[E0277]: `T` doesn't implement `std::fmt::Debug`
  --> src\main.rs:29:43
   |
29 |     println!("Here is your number: {:?}", number);
   |                                           ^^^^^^ `T` cannot be formatted using `{:?}` because it doesn't implement `std::fmt::Debug`
T 沒有實作 Debug。那麼我們是否要為 T 實現 Debug 呢?不,因為我們不知道(具體的) T 是什麼。但是我們可以告訴函式:"別擔心,因為這個函式用的任何 T 型別都會有 Debug"
use std::fmt::Debug; // 聲明 Debug 是來自 std::fmt::Debug。所以後面我們可以只寫 'Debug'。

fn print_number<T: Debug>(number: T) { // <T: Debug> 是重點
    println!("Here is your number: {:?}", number);
}

fn main() {
    print_number(5);
}
所以現在編譯器知道:"好的,這個型別 T 會有 Debug"。現在程式碼執行了,因為 i32 有 Debug。現在我們可以給它很多型別。String、&str 等,因為它們都有 Debug.
現在我們可以建立結構,並用 #[derive(Debug)] 給它實作 Debug,所以現在我們也可以印出它。我們的函式能接受 i32、Animal 結構體及更多型別:
use std::fmt::Debug;

#[derive(Debug)]
struct Animal {
    name: String,
    age: u8,
}

fn print_item<T: Debug>(item: T) {
    println!("Here is your item: {:?}", item);
}

fn main() {
    let charlie = Animal {
        name: "Charlie".to_string(),
        age: 1,
    };

    let number = 55;

    print_item(charlie);
    print_item(number);
}
印出:
Here is your item: Animal { name: "Charlie", age: 1 }
Here is your item: 55
有時我們在泛型函式中需要不止一種型別。我們必須寫出每個型別的名稱,並思考我們想要如何使用它。在這個範例中,我們想要兩個型別。首先我們想印出型別為 T 的陳述式。用 {} 列印更好,所以我們會要求用 Display 來列印 T。
下個是型別 U 和 num_1 和 num_2 這兩個型別為 U(U 是某種數字)的變數。我們想要比較它們,所以我們需要 PartialOrd。這個特性讓我們可以使用 <、>、== 等。我們也想印出它們,所以我們也要求有 Display 來印出 U。
use std::fmt::Display;
use std::cmp::PartialOrd;

fn compare_and_display<T: Display, U: Display + PartialOrd>(statement: T, num_1: U, num_2: U) {
    println!("{}! Is {} greater than {}? {}", statement, num_1, num_2, num_1 > num_2);
}

fn main() {
    compare_and_display("Listen up!", 9, 8);
}
印出 Listen up!! Is 9 greater than 8? true。
所以 fn compare_and_display<T: Display, U: Display + PartialOrd>(statement: T, num_1: U, num_2: U) 說得是:
- 函式名稱是
compare_and_display, - 第一個型別是泛型的 T。它必須是一個可以用 {} 列印的型別。
- 下一個型別是泛型的 U。它必須是一個可以用 {} 列印的型別。另外,它必須是一個可以比較的型別(使用
>、<和==)。
現在我們可以給 compare_and_display 不同的型別。statement 可以是 String、&str,或任何有 Display 的型別。
為了讓泛型函式更容易讀懂,我們也可以這樣寫得像這個範例,在程式碼區塊之前用 where。
use std::cmp::PartialOrd; use std::fmt::Display; fn compare_and_display<T, U>(statement: T, num_1: U, num_2: U) where T: Display, U: Display + PartialOrd, { println!("{}! Is {} greater than {}? {}", statement, num_1, num_2, num_1 > num_2); } fn main() { compare_and_display("Listen up!", 9, 8); }
尤其當你有很多泛型型別時,使用 where 是一個好主意。
還要注意:
- 如果你有一個型別 T 和另一個型別 T,它們必須是相同的。
- 如果你有一個型別 T 和另一個型別 U,它們可以是不同的。但它們也可以是相同的。
比如說:
use std::fmt::Display; fn say_two<T: Display, U: Display>(statement_1: T, statement_2: U) { // T型別要有 Display,U型別要有 Display println!("I have two things to say: {} and {}", statement_1, statement_2); } fn main() { say_two("Hello there!", String::from("I hate sand.")); // T型別是 &str,但U型別是 String。 say_two(String::from("Where is Padme?"), String::from("Is she all right?")); // 兩者型別皆是 String。 }
印出:
I have two things to say: Hello there! and I hate sand.
I have two things to say: Where is Padme? and Is she all right?
Option 和 Result
我們現在理解了列舉和泛型,所以我們也能理解 Option 和 Result。Rust 用這兩種列舉來使程式碼更安全。
我們將從 Option 開始。
Option
當你有一個值,它可能存在,也可能不存在時,你就該用 Option。當一個值存在時它就是 Some(value),不存在時就是 None,下面是一個可以用Option 來改進的壞程式碼範例。
// ⚠️ fn take_fifth(value: Vec<i32>) -> i32 { value[4] } fn main() { let new_vec = vec![1, 2]; let index = take_fifth(new_vec); }
當我們執行這段程式碼時,它發生恐慌(panic)。這是訊息:
thread 'main' panicked at 'index out of bounds: the len is 2 but the index is 4', src\main.rs:34:5
恐慌的意思是,程式在問題發生前就停止了。Rust 看到函式想要做些不可能的事情,就會停止。它"解開(unwind)堆疊"(從堆疊中取出值),並告訴你"對不起,我不能那樣做"。
所以現在我們將回傳型別從 i32 改為 Option<i32>。這意味著"如果有的話給我 Some(i32),如果沒有的話給我 None"。我們說 i32 是"包"在 Option 裡面,也就是說它放在 Option 裡面。你必須做些事情才能把這個值取出來。
fn take_fifth(value: Vec<i32>) -> Option<i32> { if value.len() < 5 { // .len() 給出向量的長度。 // 它必需是至少是 5。 None } else { Some(value[4]) } } fn main() { let new_vec = vec![1, 2]; let bigger_vec = vec![1, 2, 3, 4, 5]; println!("{:?}, {:?}", take_fifth(new_vec), take_fifth(bigger_vec)); }
印出的是 None, Some(5)。這下好了,因為現在我們再也不恐慌了。但是我們要如何得到 5 這個值呢?
我們可以用 .unwrap() 從 Option 裡面得取值,但要小心使用 .unwrap()。這就像拆禮物一樣:也許裡面有好東西,也許裡面有條憤怒的蛇。只有在你確定的情況下,你才會想要用 .unwrap()。如果你拆開一個 None 的值,程式就會恐慌。
// ⚠️ fn take_fifth(value: Vec<i32>) -> Option<i32> { if value.len() < 5 { None } else { Some(value[4]) } } fn main() { let new_vec = vec![1, 2]; let bigger_vec = vec![1, 2, 3, 4, 5]; println!("{:?}, {:?}", take_fifth(new_vec).unwrap(), // 這個是 None。 .unwrap() 會恐慌! take_fifth(bigger_vec).unwrap() ); }
訊息是:
thread 'main' panicked at 'called `Option::unwrap()` on a `None` value', src\main.rs:14:9
但我們可以不需要用 .unwrap()。我們能用 match。那麼我們就可以把我們有 Some 的值印出來,如果是 None 的值就不要碰。比如說:
fn take_fifth(value: Vec<i32>) -> Option<i32> { if value.len() < 5 { None } else { Some(value[4]) } } fn handle_option(my_option: Vec<Option<i32>>) { for item in my_option { match item { Some(number) => println!("Found a {}!", number), None => println!("Found a None!"), } } } fn main() { let new_vec = vec![1, 2]; let bigger_vec = vec![1, 2, 3, 4, 5]; let mut option_vec = Vec::new(); // 用新的向量存放我們的 option // 向量的型別: Vec<Option<i32>>。那是 Option<i32> 的向量。 option_vec.push(take_fifth(new_vec)); // 這會推送 "None" 進向量 option_vec.push(take_fifth(bigger_vec)); // 這會推送 "Some(5)" 進向量 handle_option(option_vec); // handle_option 查看向量裡的每個 option。 // 並印出值如果是 Some。如果是 None 就不碰。 }
印出:
Found a None!
Found a 5!
因為我們知道泛型,所以我們能夠讀懂 Option 的程式碼。它看起來像這樣:
enum Option<T> { None, Some(T), } fn main() {}
要記得的重點是:有了 Some,你就有了型別為 T 的值(任何型別)。還要注意的是,enum 名字後面有圍繞著 T 的角括號是用來告訴編譯器它是泛型。且它沒有 Display 這樣的特徵(trait)或任何東西來限制它,所以它可以是任何東西。但 None 的話,你就什麼都沒有。
所以在 Option 的 match 陳述式中,你不能說:
#![allow(unused)] fn main() { // 🚧 Some(value) => println!("The value is {}", value), None(value) => println!("The value is {}", value), }
因為 None 就只是 None。
當然,還有更簡單的方式來使用 Option。在這段程式碼中,我們將會使用一個叫做 .is_some() 的方法來告訴我們它是否是 Some。(對,還有個叫做 .is_none() 的方法。)在這個更簡單的方式中,我們不再需要 handle_option() 了。我們也不需要存放 Option 的向量了。
fn take_fifth(value: Vec<i32>) -> Option<i32> { if value.len() < 5 { None } else { Some(value[4]) } } fn main() { let new_vec = vec![1, 2]; let bigger_vec = vec![1, 2, 3, 4, 5]; let vec_of_vecs = vec![new_vec, bigger_vec]; for vec in vec_of_vecs { let inside_number = take_fifth(vec); if inside_number.is_some() { // 如果我們得到 Some,.is_some() 就回傳 true,None 就回傳 false println!("We got: {}", inside_number.unwrap()); // 因為我們已經檢查過了,現在它能安全的使用 .unwrap() } else { println!("We got nothing."); } } }
印出:
We got nothing.
We got: 5
Result
Result 和 Option 類似,但區別是:
- Option 和
Some或None有關 (有值或無值), - Result 和
Ok或Err有關 (成功的,或錯誤的結果)。
所以 Option 是用在如果你思考的是:"也許會有東西,也許不會有。"但 Result 則是用在如果你思考的是:"也許會失敗。"
比較一下,這是 Option 和 Result 的簽名(signature)。
enum Option<T> { None, Some(T), } enum Result<T, E> { Ok(T), Err(E), } fn main() {}
所以 Result 在 "Ok" 裡面有值,在 "Err" 裡面也有值。這是因為錯誤裡通常有包含描述錯誤的資訊。
Result<T, E> 的意思是你要想好 Ok 要回傳什麼,Err 要回傳什麼。其實,你可以決定任何事情。甚至這樣也可以:
fn check_error() -> Result<(), ()> { Ok(()) } fn main() { check_error(); }
check_error 說"如果得到 Ok 就回傳 (),如果得到 Err 就回傳 ()"。然後我們用 () 回傳 Ok。
編譯器給了我們有趣的警告:
warning: unused `std::result::Result` that must be used
--> src\main.rs:6:5
|
6 | check_error();
| ^^^^^^^^^^^^^^
|
= note: `#[warn(unused_must_use)]` on by default
= note: this `Result` may be an `Err` variant, which should be handled
這是真的:我們只回傳了 Result,但它可能是 Err。所以讓我們稍微處理一下這個錯誤,儘管我們仍然沒有真的做任何事情。
fn give_result(input: i32) -> Result<(), ()> { if input % 2 == 0 { return Ok(()) } else { return Err(()) } } fn main() { if give_result(5).is_ok() { println!("It's okay, guys") } else { println!("It's an error, guys") } }
印出 It's an error, guys。所以我們只處理了第一個錯誤。
記住,輕鬆檢查的四種方法是.is_some()、is_none()、is_ok() 和 is_err()。
有時一個帶有 Result 的函式會用 String 來表示 Err 的值。這不是最好的方法,但比我們目前所做的要好一些。
fn check_if_five(number: i32) -> Result<i32, String> { match number { 5 => Ok(number), _ => Err("Sorry, the number wasn't five.".to_string()), // 這是我們的錯誤訊息 } } fn main() { let mut result_vec = Vec::new(); // 建立新的向量放結果 for number in 2..7 { result_vec.push(check_if_five(number)); // 推送每個結果進向量 } println!("{:?}", result_vec); }
我們的向量印出:
[Err("Sorry, the number wasn\'t five."), Err("Sorry, the number wasn\'t five."), Err("Sorry, the number wasn\'t five."), Ok(5),
Err("Sorry, the number wasn\'t five.")]
就像 Option 一樣,在 Err 上用 .unwrap() 就會恐慌。
// ⚠️ fn main() { let error_value: Result<i32, &str> = Err("There was an error"); // 建立已經是Err的Result println!("{}", error_value.unwrap()); // 拆開它 }
程式恐慌並印出:
thread 'main' panicked at 'called `Result::unwrap()` on an `Err` value: "There was an error"', src\main.rs:30:20
這些資訊幫助你修正你的程式碼。src\main.rs:30:20 的意思是"在目錄 src 的 main.rs 內,第 30 行和第 20 列"。所以你可以去那裡檢視你的程式碼並修復問題。
你也可以建立自己的錯誤型別,標準函式庫中的 Result 函式和其他人的程式碼通常都會這樣做。例如,標準函式庫中的這個函式:
#![allow(unused)] fn main() { // 🚧 pub fn from_utf8(vec: Vec<u8>) -> Result<String, FromUtf8Error> }
這個函式接受位元組向量(u8),並嘗試做出 String,所以 Result 的成功情況是 String,錯誤情況是 FromUtf8Error。你可以給你的錯誤型別取任何你想要的名字。
和 Option 及 Result 一起使用的 match 有時需要很多程式碼。例如,在 Vec 的 .get() 方法回傳 Option。
fn main() { let my_vec = vec![2, 3, 4]; let get_one = my_vec.get(0); // 用 0 來取得第一個數 let get_two = my_vec.get(10); // 回傳 None println!("{:?}", get_one); println!("{:?}", get_two); }
印出:
Some(2)
None
所以現在我們可以匹配得到值了。讓我們使用 0 到 10 的範圍,看看是否匹配 my_vec 中的數字。
fn main() { let my_vec = vec![2, 3, 4]; for index in 0..10 { match my_vec.get(index) { Some(number) => println!("The number is: {}", number), None => {} } } }
這不錯,但是我們不對 None 做任何處理,因為我們不關心。這裡我們可以用 if let 讓程式碼變小。if let 的意思是"匹配就做,否則不做"。if let 是在你不要求對所有的東西都匹配的時候使用。
fn main() { let my_vec = vec![2, 3, 4]; for index in 0..10 { if let Some(number) = my_vec.get(index) { println!("The number is: {}", number); } } }
切記:if let Some(number) = my_vec.get(index) 的意思是 "如果你從 my_vec.get(index) 得到 Some(number)"。
另外注意:它使用的是 =。它不是布林值。
while let 是像 if let 的 while 迴圈。想象一下,我們有這樣的氣象站資料:
["Berlin", "cloudy", "5", "-7", "78"]
["Athens", "sunny", "not humid", "20", "10", "50"]
我們想拿到數字,而不是文字。對於數字,我們可以使用叫做 parse::<i32>() 的方法。parse() 是方法,::<i32> 是型別。它將嘗試把 &str 變成 i32,如果成功的話就把結果給我們。它回傳 Result,因為它可能無法執行(比如你想讓它解析"Billybrobby"──那不是一個數字)。
我們也會用 .pop()。這會從向量中取出最後一個元素。
fn main() { let weather_vec = vec![ vec!["Berlin", "cloudy", "5", "-7", "78"], vec!["Athens", "sunny", "not humid", "20", "10", "50"], ]; for mut city in weather_vec { println!("For the city of {}:", city[0]); // 在我們的資料中,每一筆的第一個元素都是城市名 while let Some(information) = city.pop() { // 這行意思是:直到你不能 pop 前繼續執迴圈 // 當向量沒有元素時,它會回傳 None // 並且它會停正。 if let Ok(number) = information.parse::<i32>() { // 試著解析我們稱作information的變數 // 這裡的回傳結果如果是 Ok(number),它會印出數值 println!("The number is: {}", number); } // 這裡我們不寫任何東西,因為如果我們遇到錯誤我們不做處理。會把(錯誤)它們都拋出去 } } }
將印出:
For the city of Berlin:
The number is: 78
The number is: -7
The number is: 5
For the city of Athens:
The number is: 50
The number is: 10
The number is: 20
其他集合型別
Rust 還有很多集合型別。你可以在標準函式庫中的 https://doc.rust-lang.org/beta/std/collections/ 看到它們。那個頁面對為什麼要使用某種型別有很好的解釋,所以如果你不知道你想要什麼型別就去那裡。這些集合都在標準函式庫的 std::collections 裡面。使用它們最好的方法是使用 use 陳述式。就像我們對 enums 做的。我們將從非常常見的 HashMap 開始。
HashMap (和 BTreeMap)
HashMap 是由 鍵(key) 和 值(value) 組成的集合。你使用鍵來查詢與鍵匹配的值。你可以只用 HashMap::new() 建立一個新的HashMap,並使用.insert(key, value)來插入元素。
HashMap 是沒有順序的,所以如果你把 HashMap 中的每個鍵都一起印出來,可能每次會印出不同的結果。我們可以在範例中看到這一點:
use std::collections::HashMap; // 因此這是我們能只寫 HashMap 而不用每次都寫 std::collections::HashMap struct City { name: String, population: HashMap<u32, u32>, // 這會記錄年度和該年度的人口數 } fn main() { let mut tallinn = City { name: "Tallinn".to_string(), population: HashMap::new(), // 目前為止 HashMap 是空的 }; tallinn.population.insert(1372, 3_250); // 插入三筆年度資料 tallinn.population.insert(1851, 24_000); tallinn.population.insert(2020, 437_619); for (year, population) in tallinn.population { // HashMap 型別是 HashMap<u32, u32> 所以它每次回傳有兩個元素的元組 println!("In the year {} the city of {} had a population of {}.", year, tallinn.name, population); } }
印出:
In the year 1372 the city of Tallinn had a population of 3250.
In the year 2020 the city of Tallinn had a population of 437619.
In the year 1851 the city of Tallinn had a population of 24000.
或者可能印出:
In the year 1851 the city of Tallinn had a population of 24000.
In the year 2020 the city of Tallinn had a population of 437619.
In the year 1372 the city of Tallinn had a population of 3250.
你可以看到它沒有按順序排列。
如果你想要一個可以排序的 HashMap,你可以用 BTreeMap。其實它們之間是非常相似的,所以我們可以快速的把我們的 HashMap 改成 BTreeMap 來看看。大家可以看到,這幾乎是一樣的程式碼。
use std::collections::BTreeMap; // HashMap 只改成 BTreeMap struct City { name: String, population: BTreeMap<u32, u32>, // HashMap 只改成 BTreeMap } fn main() { let mut tallinn = City { name: "Tallinn".to_string(), population: BTreeMap::new(), // HashMap 只改成 BTreeMap }; tallinn.population.insert(1372, 3_250); tallinn.population.insert(1851, 24_000); tallinn.population.insert(2020, 437_619); for (year, population) in tallinn.population { println!("In the year {} the city of {} had a population of {}.", year, tallinn.name, population); } }
現在總是會印出:
In the year 1372 the city of Tallinn had a population of 3250.
In the year 1851 the city of Tallinn had a population of 24000.
In the year 2020 the city of Tallinn had a population of 437619.
現在我們再回來看看 HashMap。
只要把鍵放在 [] 的方括號裡,就可以得到 HashMap 的值。在接下來的這個範例中,我們將帶出 Bielefeld 這個鍵的值,也就是 Germany。但是要注意,因為如果沒有鍵,程式會崩潰(crash)。比如你寫了 println!("{:?}", city_hashmap["Bielefeldd"]);,那麼就會崩潰,因為 Bielefeldd 不存在。
如果你不確定會有鍵,你可以使用 .get(),它會回傳 Option。如果它存在就會是 Some(value),如果不存在你將得到 None,而不是使程式崩潰。這就是為什麼 .get() 是從 HashMap 中取值較安全的方法。
use std::collections::HashMap; fn main() { let canadian_cities = vec!["Calgary", "Vancouver", "Gimli"]; let german_cities = vec!["Karlsruhe", "Bad Doberan", "Bielefeld"]; let mut city_hashmap = HashMap::new(); for city in canadian_cities { city_hashmap.insert(city, "Canada"); } for city in german_cities { city_hashmap.insert(city, "Germany"); } println!("{:?}", city_hashmap["Bielefeld"]); println!("{:?}", city_hashmap.get("Bielefeld")); println!("{:?}", city_hashmap.get("Bielefeldd")); }
印出:
"Germany"
Some("Germany")
None
這是因為 Bielefeld 存在,但 Bielefeldd 不存在。
如果 HashMap 已經有一個鍵,當你試圖把它放進去時,它的值將被覆蓋:
use std::collections::HashMap; fn main() { let mut book_hashmap = HashMap::new(); book_hashmap.insert(1, "L'Allemagne Moderne"); book_hashmap.insert(1, "Le Petit Prince"); book_hashmap.insert(1, "섀도우 오브 유어 스마일"); book_hashmap.insert(1, "Eye of the World"); println!("{:?}", book_hashmap.get(&1)); }
印出 Some("Eye of the World"),因為它是你最後用 .insert() 的值。
檢查項目存在很容易,因為你可以用會回傳 Option 的 .get() 檢查:
use std::collections::HashMap; fn main() { let mut book_hashmap = HashMap::new(); book_hashmap.insert(1, "L'Allemagne Moderne"); if book_hashmap.get(&1).is_none() { // is_none()回傳布林值: true如果是None, false如果是Some book_hashmap.insert(1, "Le Petit Prince"); } println!("{:?}", book_hashmap.get(&1)); }
印出 Some("L\'Allemagne Moderne") 是因為已經有個 key 為 1,所以我們沒有插入 Le Petit Prince。
HashMap 有個非常有趣的方法叫做 .entry(),你肯定想試試。有了它,你可以在沒有鍵的情況下,加入一筆項目 (entry) 並用像是 .or_insert() 這類方法來插入值。有趣的是,它還傳回了可變參考,所以如果你想的話你可以改變它。首先的範例是我們每次插入書名到 HashMap 時,我們就在值插入 true。
讓我們假裝我們有個圖書館,並希望跟蹤我們的書籍。
use std::collections::HashMap; fn main() { let book_collection = vec!["L'Allemagne Moderne", "Le Petit Prince", "Eye of the World", "Eye of the World"]; // Eye of the World 出現兩次 let mut book_hashmap = HashMap::new(); for book in book_collection { book_hashmap.entry(book).or_insert(true); } for (book, true_or_false) in book_hashmap { println!("Do we have {}? {}", book, true_or_false); } }
印出:
Do we have Eye of the World? true
Do we have Le Petit Prince? true
Do we have L'Allemagne Moderne? true
但這並不是我們想要的。也許最好數一下書的數量,這樣我們就知道 世界之眼 有兩本。首先讓我們看看 .entry() 做了什麼,以及 .or_insert() 做了什麼。.entry() 其實是回傳了名為 Entry 的 enum:
#![allow(unused)] fn main() { pub fn entry(&mut self, key: K) -> Entry<K, V> // 🚧 }
可以查看Entry 文件的網頁。下面是它的原始程式碼的簡化版。K 表示 key,V 表示 value。
#![allow(unused)] fn main() { // 🚧 use std::collections::hash_map::*; enum Entry<K, V> { Occupied(OccupiedEntry<K, V>), Vacant(VacantEntry<K, V>), } }
然後當我們呼叫 .or_insert() 時,它就會檢視列舉,並決定該怎麼做。
#![allow(unused)] fn main() { fn or_insert(self, default: V) -> &mut V { // 🚧 match self { Occupied(entry) => entry.into_mut(), Vacant(entry) => entry.insert(default), } } }
有趣的是,它回傳 mut 的引用:&mut V。這意味著你可以使用 let 將其附加到變數上,並藉由改變這個變數來改變 HashMap 中的值。所以對於每本書,如果沒有項目,我們就會插入 0。而如果有的話,我們將在參考上使用 += 1 來增加數字。現在它看起來像這樣:
use std::collections::HashMap; fn main() { let book_collection = vec!["L'Allemagne Moderne", "Le Petit Prince", "Eye of the World", "Eye of the World"]; let mut book_hashmap = HashMap::new(); for book in book_collection { let return_value = book_hashmap.entry(book).or_insert(0); // return_value 是個可變參考。如果原先沒東西,它會是 0 *return_value +=1; // 現在 return_value 至少是 1。 且如果已經有另一本書,它會往上加 1 } for (book, number) in book_hashmap { println!("{}, {}", book, number); } }
重點在 let return_value = book_hashmap.entry(book).or_insert(0);。如果去掉 let,你會得到 book_hashmap.entry(book).or_insert(0)。沒有 let 時它什麼也不做:它只插入了 0,也沒有取得指向 0 的可變參考。所以我們把它連結到 return_value 上,這樣我們就可以保留 0。然後我們把值增加 1,這樣 HashMap 中的每本書都至少有 1。接著當 .entry() 再拿到 世界之眼 時,它就不會插入任何東西,但它給我們一個可變的 1。然後我們把它增加到 2,這也是為什麼它會印出這樣的結果:
L'Allemagne Moderne, 1
Le Petit Prince, 1
Eye of the World, 2
你也可以用 .or_insert() 做一些事情,比如插入向量,然後往向量裡推入資料。讓我們假設我們問街上的男女他們對一個政治家的看法。他們給出的評分從 0 到 10。然後我們要把這些數字放在一起,看看這個政治家是更受男性還是女性的歡迎。它可以像這樣:
use std::collections::HashMap; fn main() { let data = vec![ // 原始資料 ("male", 9), ("female", 5), ("male", 0), ("female", 6), ("female", 5), ("male", 10), ]; let mut survey_hash = HashMap::new(); for item in data { // 給的型別是 (&str, i32) 的元組 survey_hash.entry(item.0).or_insert(Vec::new()).push(item.1); // 推入數字到向量裡 } for (male_or_female, numbers) in survey_hash { println!("{:?}: {:?}", male_or_female, numbers); } }
印出:
"female", [5, 6, 5]
"male", [9, 0, 10]
重點行是:survey_hash.entry(item.0).or_insert(Vec::new()).push(item.1);,所以如果它看到 "female",就會檢查 HashMap 中是否已經有 "female"。如果沒有,它就會插入 Vec::new(),然後把數字推入。如果它看到 "female" 已經在 HashMap 中,它將不會插入新的向量,而只是將數字推入其中。
HashSet 和 BTreeSet
HashSet 實際上是只有 key 的 HashMap。在 HashSet 文件的網頁上面有解釋:
A hash set implemented as a HashMap where the value is (). 所以它是有鍵無值的 HashMap。
如果你只是想知道某個鍵是不是存在,或者不存在,你經常會選擇用 HashSet。
想像一下,你有 100 個隨機數,每個數字介於 1 和 100 之間。如果你這樣做,有些數字會出現不止一次,而有些數字根本不會出現。如果你把它們放到 HashSet 中,那麼你就會有一個所有已出現的數字列表。
use std::collections::HashSet; fn main() { let many_numbers = vec![ 94, 42, 59, 64, 32, 22, 38, 5, 59, 49, 15, 89, 74, 29, 14, 68, 82, 80, 56, 41, 36, 81, 66, 51, 58, 34, 59, 44, 19, 93, 28, 33, 18, 46, 61, 76, 14, 87, 84, 73, 71, 29, 94, 10, 35, 20, 35, 80, 8, 43, 79, 25, 60, 26, 11, 37, 94, 32, 90, 51, 11, 28, 76, 16, 63, 95, 13, 60, 59, 96, 95, 55, 92, 28, 3, 17, 91, 36, 20, 24, 0, 86, 82, 58, 93, 68, 54, 80, 56, 22, 67, 82, 58, 64, 80, 16, 61, 57, 14, 11]; let mut number_hashset = HashSet::new(); for number in many_numbers { number_hashset.insert(number); } let hashset_length = number_hashset.len(); // 長度會告訴我們有多少數字在裡面 println!("There are {} unique numbers, so we are missing {}.", hashset_length, 100 - hashset_length); // 讓我們看看漏了什麼數字 let mut missing_vec = vec![]; for number in 0..100 { if number_hashset.get(&number).is_none() { // 如果 .get() 回傳 None, missing_vec.push(number); } } print!("It does not contain: "); for number in missing_vec { print!("{} ", number); } }
印出:
There are 66 unique numbers, so we are missing 34.
It does not contain: 1 2 4 6 7 9 12 21 23 27 30 31 39 40 45 47 48 50 52 53 62 65 69 70 72 75 77 78 83 85 88 97 98 99
BTreeSet 與 HashSet 相似,就像 BTreeMap 與 HashMap 相似一樣。如果把 HashSet 中的每一項都印出來,我們就不知道順序會是什麼了:
#![allow(unused)] fn main() { for entry in number_hashset { // 🚧 print!("{} ", entry); } }
也許它會印出這樣:67 28 42 25 95 59 87 11 5 81 64 34 8 15 13 86 10 89 63 93 49 41 46 57 60 29 17 22 74 43 32 38 36 76 71 18 14 84 61 16 35 90 56 54 91 19 94 44 3 0 68 80 51 92 24 20 82 26 58 33 55 96 37 66 79 73。但它幾乎不會再以同樣的方式印出。
在這裡也一樣,如果你決定需要有序印出的話,把你的 HashSet 改成 BTreeSet 也很容易。在我們的程式碼中,我們只需要做兩處改動,就可以從 HashSet 切換到 BTreeSet。
use std::collections::BTreeSet; // 把 HashSet 改成 BTreeSet fn main() { let many_numbers = vec![ 94, 42, 59, 64, 32, 22, 38, 5, 59, 49, 15, 89, 74, 29, 14, 68, 82, 80, 56, 41, 36, 81, 66, 51, 58, 34, 59, 44, 19, 93, 28, 33, 18, 46, 61, 76, 14, 87, 84, 73, 71, 29, 94, 10, 35, 20, 35, 80, 8, 43, 79, 25, 60, 26, 11, 37, 94, 32, 90, 51, 11, 28, 76, 16, 63, 95, 13, 60, 59, 96, 95, 55, 92, 28, 3, 17, 91, 36, 20, 24, 0, 86, 82, 58, 93, 68, 54, 80, 56, 22, 67, 82, 58, 64, 80, 16, 61, 57, 14, 11]; let mut number_btreeset = BTreeSet::new(); // 把 HashSet 改成 BTreeSet for number in many_numbers { number_btreeset.insert(number); } for entry in number_btreeset { print!("{} ", entry); } }
現在會依照順序印出: 0 3 5 8 10 11 13 14 15 16 17 18 19 20 22 24 25 26 28 29 32 33 34 35 36 37 38 41 42 43 44 46 49 51 54 55 56 57 58 59 60 61 63 64 66 67 68 71 73 74 76 79 80 81 82 84 86 87 89 90 91 92 93 94 95 96。
BinaryHeap
BinaryHeap 是種有趣的集合型別,因為它大部分是無序的,但也有一點有序性。它把最大的元素放前面,但其他元素是以任意順序排列的。
我們將用另一個列表來舉例,但這次資料少一些。
use std::collections::BinaryHeap; fn show_remainder(input: &BinaryHeap<i32>) -> Vec<i32> { // 這個函式呈現BinaryHeap中剩餘部分。實際上 // 疊代器會比函式快- 我們會在之後學到。 let mut remainder_vec = vec![]; for number in input { remainder_vec.push(*number) } remainder_vec } fn main() { let many_numbers = vec![0, 5, 10, 15, 20, 25, 30]; // 這些數字是有序的 let mut my_heap = BinaryHeap::new(); for number in many_numbers { my_heap.push(number); } while let Some(number) = my_heap.pop() { // 如果有數字 .pop() 回傳 Some(number),否則 None。且從前面 pop println!("Popped off {}. Remaining numbers are: {:?}", number, show_remainder(&my_heap)); } }
印出:
Popped off 30. Remaining numbers are: [25, 15, 20, 0, 10, 5]
Popped off 25. Remaining numbers are: [20, 15, 5, 0, 10]
Popped off 20. Remaining numbers are: [15, 10, 5, 0]
Popped off 15. Remaining numbers are: [10, 0, 5]
Popped off 10. Remaining numbers are: [5, 0]
Popped off 5. Remaining numbers are: [0]
Popped off 0. Remaining numbers are: []
你可以看到索引 0 的數字總是最大的25、20、15、10、5 然後是 0。但其它都不一樣。
使用 BinaryHeap<(u8, &str)> 的好方法是用在待處理事物的集合。這裡我們建立 BinaryHeap<(u8, &str)>,其中 u8 是任務重要性的數字。&str 是對要處理什麼的描述。
use std::collections::BinaryHeap; fn main() { let mut jobs = BinaryHeap::new(); // 加入一整天要做的工作 jobs.push((100, "Write back to email from the CEO")); jobs.push((80, "Finish the report today")); jobs.push((5, "Watch some YouTube")); jobs.push((70, "Tell your team members thanks for always working hard")); jobs.push((30, "Plan who to hire next for the team")); while let Some(job) = jobs.pop() { println!("You need to: {}", job.1); } }
總是會印出:
You need to: Write back to email from the CEO
You need to: Finish the report today
You need to: Tell your team members thanks for always working hard
You need to: Plan who to hire next for the team
You need to: Watch some YouTube
VecDeque
VecDeque 是一種既能從前面彈出元素,又能從後面彈出元素的 Vec。Rust 有 VecDeque 是因為 Vec 適合從後面(最後一個元素)彈出,但從前面彈出就不那麼好了。當你在 Vec 上使用 .pop() 的時候,它只是把右邊最後一個元素取出,其他的都不會動。但是如果你從其他地方取出元素,它右邊的所有元素都會被向左搬移一個位置。你可以在 .remove() 的文件描述中看到這一點:
Removes and returns the element at position index within the vector, shifting all elements after it to the left.
所以如果你這樣做:
fn main() { let mut my_vec = vec![9, 8, 7, 6, 5]; my_vec.remove(0); }
它將會刪除 9。索引 1 中的 8 將移到索引 0,索引 2 中的 7 將移到索引 1,以此類推。想像一個大停車場,每當有一輛車離開時,右邊所有的車都要移過來。
舉例來說這對電腦是很大的工作量。事實上,如果你在 Playground 上執行時,它很可能會因為工作量太大而直接放棄。
fn main() { let mut my_vec = vec![0; 600_000]; for i in 0..600000 { my_vec.remove(0); } }
這是有 60 萬個零的 Vec。每次你用 remove(0) 時,它就會把每個零向左搬移一個空間。並且它要做上 60 萬次。
用 VecDeque 就不用擔心這個問題了。它通常比 Vec 慢一點,但如果你要在資料兩端都做事情,那麼它就快多了。你可以直接從 Vec 用 VecDeque::from 做出來。那麼上面我們的程式碼就會像這樣:
use std::collections::VecDeque; fn main() { let mut my_vec = VecDeque::from(vec![0; 600000]); for i in 0..600000 { my_vec.pop_front(); // pop_front 就像 .pop 但是從前面處理 } }
現在速度快了很多,在 Playground 上它不到一秒就結束,而不是放棄。
在接下來的這個範例中,我們有個記錄待處理事物的 Vec。接著我們做出 VecDeque,用 .push_front() 把它們放到前面,使得我們新增的第一個元素會是在右邊。但是我們推送的每個元素型別是 (&str, bool):&str 是描述,false 表示還沒完成。我們用 done() 函式從後面彈出一個元素,但是我們不想刪除它。我們反而是把 false 改成 true,然後把它推到前面,使得我們可以保留它。
它看起來像這樣:
use std::collections::VecDeque; fn check_remaining(input: &VecDeque<(&str, bool)>) { // 每個元素是 (&str, bool) for item in input { if item.1 == false { println!("You must: {}", item.0); } } } fn done(input: &mut VecDeque<(&str, bool)>) { let mut task_done = input.pop_back().unwrap(); // 後面彈出 task_done.1 = true; // 它完成了 - 標記為 true input.push_front(task_done); // 現在把它放到前面 } fn main() { let mut my_vecdeque = VecDeque::new(); let things_to_do = vec!["send email to customer", "add new product to list", "phone Loki back"]; for thing in things_to_do { my_vecdeque.push_front((thing, false)); } done(&mut my_vecdeque); done(&mut my_vecdeque); check_remaining(&my_vecdeque); for task in my_vecdeque { print!("{:?} ", task); } }
印出:
You must: phone Loki back
("add new product to list", true) ("send email to customer", true) ("phone Loki back", false)
問號(?)運算子
有一種更短的方式來處理 Result(及 Option),它比 match 和 if let 更短。它叫做"問號運算子",就是 ?。在回傳 Result 的函式後,可以加上 ?。這會:
- 如果是
Ok,回傳Result裡面的內容。 - 如果是
Err,則將錯誤送回。
換句話說,它幾乎為你做了所有的事情。
我們可以用 .parse() 再試一次。我們將編寫名為 parse_str 的函式,試圖將 &str 變成 i32。它看起來像這樣:
use std::num::ParseIntError; fn parse_str(input: &str) -> Result<i32, ParseIntError> { let parsed_number = input.parse::<i32>()?; // 問號在這 Ok(parsed_number) } fn main() {}
這個函式接受 &str。如果是 Ok,則它給出包在 Ok 中的 i32。如果是 Err,則回傳包起來的 ParseIntError。然後我們嘗試解析這個數字,並加上 ?。也就是"檢查是否錯誤,如果沒問題就給出 Result 裡面的內容"。如果有問題,就會返回錯誤並結束。但如果沒問題,就會進入下一行。下一行是 Ok() 裡面的數字。我們需要用 Ok 來包裝,因為要回傳的是 Result<i32, ParseIntError>,而不是 i32。
現在我們可以試試我們的函式。讓我們看看它對 &str 的向量有什麼作用。
fn parse_str(input: &str) -> Result<i32, std::num::ParseIntError> { let parsed_number = input.parse::<i32>()?; Ok(parsed_number) } fn main() { let str_vec = vec!["Seven", "8", "9.0", "nice", "6060"]; for item in str_vec { let parsed = parse_str(item); println!("{:?}", parsed); } }
印出:
Err(ParseIntError { kind: InvalidDigit })
Ok(8)
Err(ParseIntError { kind: InvalidDigit })
Err(ParseIntError { kind: InvalidDigit })
Ok(6060)
我們是怎麼找到 std::num::ParseIntError 的呢?一個簡單的方法就是再"問"一下編譯器。
fn main() { let failure = "Not a number".parse::<i32>(); failure.rbrbrb(); // ⚠️ 編譯器: "rbrbrb()是什麼???" }
編譯器無法了解,並說:
error[E0599]: no method named `rbrbrb` found for enum `std::result::Result<i32, std::num::ParseIntError>` in the current scope
--> src\main.rs:3:13
|
3 | failure.rbrbrb();
| ^^^^^^ method not found in `std::result::Result<i32, std::num::ParseIntError>`
所以 std::result::Result<i32, std::num::ParseIntError> 就是我們所需要的簽名。
我們不需要寫 std::result::Result,因為 Result 總是"在範圍內"(in scope = 準備好使用)。Rust 對我們經常使用的所有型別都是這樣做的,所以我們不必寫 std::result::Result、std::collections::Vec 等。
我們現在還沒有處理到像檔案這樣的東西,所以 ? 運算子看起來還不太有用。但這裡有個無用但快速的例子,說明你如何在單行上使用它。與其用 .parse() 建立 i32,不如做更多。我們將做個 u16,然後把它變成 String,再變成 u32,然後再變回 String,最後變成 i32。
use std::num::ParseIntError; fn parse_str(input: &str) -> Result<i32, ParseIntError> { let parsed_number = input.parse::<u16>()?.to_string().parse::<u32>()?.to_string().parse::<i32>()?; // 每次檢查時加上 ? 並傳下去 Ok(parsed_number) } fn main() { let str_vec = vec!["Seven", "8", "9.0", "nice", "6060"]; for item in str_vec { let parsed = parse_str(item); println!("{:?}", parsed); } }
印出同樣的東西,但這次我們在一行中處理了三個 Result。稍後我們將對檔案進行處理,因為很多事情都可能出錯,它們總是回傳 Result。
想像這件事:你想開啟檔案,向它寫入,然後關閉它。首先你需要成功找到這個檔案(這是 Result)。然後你需要成功地寫入它(也是 Result)。有了 ? 你可以用一行做到那些事。
何時善用 panic 和 unwrap
Rust 有個 panic! 巨集讓你可以用來讓程式恐慌。它很容易使用:
fn main() { panic!("Time to panic!"); }
"Time to panic!" 這個訊息在你執行程式時會顯示:thread 'main' panicked at 'Time to panic!', src\main.rs:2:3
你會記得 src\main.rs 是目錄和檔名,2:3 是行號和列號。有了這些資訊,你就可以找到程式碼並修復它。
panic! 是個很好用的巨集,以確保你知道東西何時有變化。例如,這個叫做 prints_three_things 的函式總是從向量中印出索引 [0]、[1] 和 [2]。這沒關係,因為我們總是給它有三個元素的向量:
fn prints_three_things(vector: Vec<i32>) { println!("{}, {}, {}", vector[0], vector[1], vector[2]); } fn main() { let my_vec = vec![8, 9, 10]; prints_three_things(my_vec); }
印出 8, 9, 10,一切正常。
但試想之後我們程式碼愈寫越多,忘記了 my_vec 只能有三個元素。現在 my_vec 在這部分有六個元素:
fn prints_three_things(vector: Vec<i32>) { println!("{}, {}, {}", vector[0], vector[1], vector[2]); } fn main() { let my_vec = vec![8, 9, 10, 10, 55, 99]; // 現在 my_vec 有六個東西 prints_three_things(my_vec); }
沒有發生錯誤,因為 [0]、[1] 和 [2] 都在這個較長的 Vec 裡面。但如果只能有三個元素真的很重要呢?因為程式不會恐慌,我們也就不會知道有問題了。我們反而應該這樣做:
fn prints_three_things(vector: Vec<i32>) { if vector.len() != 3 { panic!("my_vec must always have three items") // 如果長度不是 3 會恐慌 } println!("{}, {}, {}", vector[0], vector[1], vector[2]); } fn main() { let my_vec = vec![8, 9, 10]; prints_three_things(my_vec); }
現在我們知道向量是否有三個元素,因為它如預期的發生恐慌:
// ⚠️ fn prints_three_things(vector: Vec<i32>) { if vector.len() != 3 { panic!("my_vec must always have three items") } println!("{}, {}, {}", vector[0], vector[1], vector[2]); } fn main() { let my_vec = vec![8, 9, 10, 10, 55, 99]; prints_three_things(my_vec); }
我們得到了 thread 'main' panicked at 'my_vec must always have three items', src\main.rs:8:9。多虧了 panic!,我們現在記得 my_vec 應該只能有三個元素。所以 panic! 是個可以在你的程式碼中建立提醒的好巨集。
還有三個與 panic! 類似的巨集,你會在測試中經常使用。它們分別是 assert!、assert_eq! 和 assert_ne!。
這是它們的涵義:
assert!(): 如果()裡面的部分不是 true,程式就會恐慌。assert_eq!():()裡面的兩個元素必須相同(equal)。assert_ne!():()裡面的兩個元素必須不相同。(ne 表示不相同)
一些範例:
fn main() { let my_name = "Loki Laufeyson"; assert!(my_name == "Loki Laufeyson"); assert_eq!(my_name, "Loki Laufeyson"); assert_ne!(my_name, "Mithridates"); }
這沒做任何事,因為三個 assert 巨集都沒出錯。(也是我們想要的)
如果你願意,還可以加個提示訊息。
fn main() { let my_name = "Loki Laufeyson"; assert!( my_name == "Loki Laufeyson", "{} should be Loki Laufeyson", my_name ); assert_eq!( my_name, "Loki Laufeyson", "{} and Loki Laufeyson should be equal", my_name ); assert_ne!( my_name, "Mithridates", "You entered {}. Input must not equal Mithridates", my_name ); }
這些訊息只有在程式恐慌時才會顯示。所以如果你執行:
fn main() { let my_name = "Mithridates"; assert_ne!( my_name, "Mithridates", "You enter {}. Input must not equal Mithridates", my_name ); }
會顯示:
thread 'main' panicked at 'assertion failed: `(left != right)`
left: `"Mithridates"`,
right: `"Mithridates"`: You entered Mithridates. Input must not equal Mithridates', src\main.rs:4:5
所以它說 "你說左邊 != 右邊,但是左邊 == 右邊"。而且它顯示我們寫的訊息為 You entered Mithridates. Input must not equal Mithridates。
unwrap 也適合用在你寫自己的程式,並想讓它在出現問題時崩潰。之後等你的程式碼寫完後,把 unwrap 改成其他不會崩潰的東西就好了。
你也可以用 expect,它像是 unwrap 但更好一些,因為它讓你寫自己的訊息內容。教科書通常會給出這樣的建議:"如果你經常使用 .unwrap(), 至少也要用 .expect() 來獲得更好的錯誤訊息。"
這樣會崩潰:
// ⚠️ fn get_fourth(input: &Vec<i32>) -> i32 { let fourth = input.get(3).unwrap(); *fourth } fn main() { let my_vec = vec![9, 0, 10]; let fourth = get_fourth(&my_vec); }
錯誤訊息是 thread 'main' panicked at 'called Option::unwrap() on a None value', src\main.rs:7:18。
現在我們用 expect 來寫自己的訊息:
// ⚠️ fn get_fourth(input: &Vec<i32>) -> i32 { let fourth = input.get(3).expect("Input vector needs at least 4 items"); *fourth } fn main() { let my_vec = vec![9, 0, 10]; let fourth = get_fourth(&my_vec); }
又崩潰了,但錯誤內容比較好:thread 'main' panicked at 'Input vector needs at least 4 items', src\main.rs:7:18。.expect() 因為這個原因比 .unwrap() 要好一點,但是在 None 上還是會恐慌。現在這裡有個不太好的案例,一個函式試圖 unwrap 兩次。它接受一個 Vec<Option<i32>>,所以可能每個部分會有 Some<i32>,也可能是 None。
fn try_two_unwraps(input: Vec<Option<i32>>) { println!("Index 0 is: {}", input[0].unwrap()); println!("Index 1 is: {}", input[1].unwrap()); } fn main() { let vector = vec![None, Some(1000)]; // 這個向量有None,所以會恐慌 try_two_unwraps(vector); }
訊息是:thread 'main' panicked at 'called `Option::unwrap()` on a `None` value', src\main.rs:2:32。我們不確定是第一個 .unwrap() 還是第二個,直到我們去檢查行號。最好是檢查一下長度,也不要 unwrap。不過有了 .expect() 至少會好 一點。這裡用 .expect():
fn try_two_unwraps(input: Vec<Option<i32>>) { println!("Index 0 is: {}", input[0].expect("The first unwrap had a None!")); println!("Index 1 is: {}", input[1].expect("The second unwrap had a None!")); } fn main() { let vector = vec![None, Some(1000)]; try_two_unwraps(vector); }
所以這有好一點:thread 'main' panicked at 'The first unwrap had a None!', src\main.rs:2:32。我們也有行號讓我們可以找到它。
如果你要永遠有值且是你想選擇的,也可以用unwrap_or。如果你這樣做,它永遠不會恐慌。也就是:
-
- 很好,因為你的程式不會恐慌,但是
-
- 可能不太好,如果你想讓程式在出現問題時恐慌。
但通常我們都不希望自己的程式恐慌,所以 unwrap_or 是個適合拿來用的方法。
fn main() { let my_vec = vec![8, 9, 10]; let fourth = my_vec.get(3).unwrap_or(&0); // 如果 .get 沒成功,我們會傳回值 &0。 // .get 回傳的是參考,所以我們需要的是 &0 而非 0 // 如果你想要 fourth 是 0 而非 &0,你可以寫帶有 * 的 // "let *fourth",但這裡我們只是要印出也就無關緊要 println!("{}", fourth); }
印出 0,因為 .unwrap_or(&0) 即使在 None 時也會回傳 0。
特徵
我們以前見過特徵(Trait):Debug、Copy、Clone 都是特徵。要賦予型別特徵,就必須實作它。因為 Debug 和其他的特徵都很常見,所以我們有可以自動實作的屬性(attribute)。那就是當你寫下 #[derive(Debug)] 時所發生的事情:你自動實作了 Debug。
#[derive(Debug)] struct MyStruct { number: usize, } fn main() {}
但是其他的特徵就比較困難了,所以需要用 impl 手動實作。例如,Add (在 std::ops::Add 找到) 是用來累加兩個東西的。但是 Rust 並不知道你到底要怎麼累加,所以你必須告訴它。
struct ThingsToAdd { first_thing: u32, second_thing: f32, } fn main() {}
我們可以累加 first_thing 和 second_thing,但我們需要提供更多資訊。也許我們想要 f32,所以像這樣:
#![allow(unused)] fn main() { // 🚧 let result = self.second_thing + self.first_thing as f32 }
但也許我們想要整數,所以像這樣:
#![allow(unused)] fn main() { // 🚧 let result = self.second_thing as u32 + self.first_thing }
或者我們只是想把 self.first_thing 放在 self.second_thing 旁邊這樣加起來。所以如果我們把 55 加到 33.4,我們想看到的是 5533.4,而不是 88.4。
所以首先讓我們看一下如何做出特徵。trait 要記得的重點在於它們的行為 (behaviour)。要實作特徵時,寫下 trait,然後建立一些函式。
struct Animal { // 簡單結構體 - Animal只有名字 name: String, } trait Dog { // 狗的特徵給出一些功能性 fn bark(&self) { // 牠會吠叫 println!("Woof woof!"); } fn run(&self) { // 並且牠會跑 println!("The dog is running!"); } } impl Dog for Animal {} // 現在Animal有了特徵Dog fn main() { let rover = Animal { name: "Rover".to_string(), }; rover.bark(); // Animal能用 bark() rover.run(); // 並且牠能用 run() }
這範例沒問題,但是我們不想印出 "The dog is running"。如果你想的話,你可以更改 trait 給你的方法,但你必須有相同的簽名。這意味著它需要接受同樣的東西,並回傳同樣的東西。例如,我們可以改變 .run() 方法,但我們必須遵循簽名。簽名是:
#![allow(unused)] fn main() { // 🚧 fn run(&self) { println!("The dog is running!"); } }
fn run(&self) 的意思是 "fn run() 接受 &self 引數,且不回傳任何內容"。所以你不能這樣做:
#![allow(unused)] fn main() { fn run(&self) -> i32 { // ⚠️ 5 } }
Rust 會說:
= note: expected fn pointer `fn(&Animal)`
found fn pointer `fn(&Animal) -> i32`
但我們可以做這樣做:
struct Animal { // 簡單結構體 - Animal只有名字 name: String, } trait Dog { // 狗的特徵給出一些功能性 fn bark(&self) { // 牠會吠叫 println!("Woof woof!"); } fn run(&self) { // 並且牠會跑 println!("The dog is running!"); } } impl Dog for Animal { fn run(&self) { println!("{} is running!", self.name); } } fn main() { let rover = Animal { name: "Rover".to_string(), }; rover.bark(); // Animal能用 bark() rover.run(); // 並且牠能用 run() }
現在印出了 Rover is running!。這樣可以是因為我們回傳的是 (),也就是什麼都沒有,也是特徵簽名所說的。
當你在寫特徵時,你可以只寫函式簽名,但如果你這樣做,使用者將必須寫出函式的實作內容。讓我們來試試。現在我們把 bark() 和 run() 改成只有 fn bark(&self); 和 fn run(&self);。這不是完整的函式,所以必須由使用者來寫。
struct Animal { name: String, } trait Dog { fn bark(&self); // bark() 說要有 &self 並且不回傳 fn run(&self); // run() 說要有 &self 並且不回傳。 // 那麼現在我們必須要自己寫出它們。 } impl Dog for Animal { fn bark(&self) { println!("{}, stop barking!!", self.name); } fn run(&self) { println!("{} is running!", self.name); } } fn main() { let rover = Animal { name: "Rover".to_string(), }; rover.bark(); rover.run(); }
所以當你建立特徵時,你必須思考:"我應該寫哪些函式?而使用者又應該寫哪些函式?"如果你認為使用者每次使用某個函式的方式應該一致,那麼就該把它寫出來。如果你認為使用者會有不同的使用方式,那就只寫出函式簽名即可。
那讓我們嘗試為我們的結構體實作 Display 特徵。首先我們將做個簡單的結構體:
struct Cat { name: String, age: u8, } fn main() { let mr_mantle = Cat { name: "Reggie Mantle".to_string(), age: 4, }; }
現在我們想要印出 mr_mantle。Debug 很容易推導出:
#[derive(Debug)] struct Cat { name: String, age: u8, } fn main() { let mr_mantle = Cat { name: "Reggie Mantle".to_string(), age: 4, }; println!("Mr. Mantle is a {:?}", mr_mantle); }
但 Debug 列印不是最漂亮的印出方式,因為它看起來像這樣。
Mr. Mantle is a Cat { name: "Reggie Mantle", age: 4 }
因此如果我們想要印出得更好看,就需要為 Cat 實作 Display。在 https://doc.rust-lang.org/std/fmt/trait.Display.html 上我們可以看到 Display 的資訊,還有一個範例。它說:
use std::fmt; struct Position { longitude: f32, latitude: f32, } impl fmt::Display for Position { fn fmt(&self, f: &mut fmt::Formatter<'_>) -> fmt::Result { write!(f, "({}, {})", self.longitude, self.latitude) } } fn main() {}
有些部分我們還不明白,比如 <'_> 和 f 是做什麼的。但我們知道 Position 結構體:它只是兩個 f32。我們也懂 self.longitude 和 self.latitude 是結構體中的欄位。所以,也許我們可以拿這個程式碼來給我們的結構體用在 self.name和self.age 上。另外 write! 看起來很像 println!,所以會感到很熟悉。所以我們寫成這樣:
use std::fmt; struct Cat { name: String, age: u8, } impl fmt::Display for Cat { fn fmt(&self, f: &mut fmt::Formatter<'_>) -> fmt::Result { write!(f, "{} is a cat who is {} years old.", self.name, self.age) } } fn main() {}
讓我們新增 fn main()。現在我們的程式碼像這樣:
use std::fmt; struct Cat { name: String, age: u8, } impl fmt::Display for Cat { fn fmt(&self, f: &mut fmt::Formatter<'_>) -> fmt::Result { write!(f, "{} is a cat who is {} years old.", self.name, self.age) } } fn main() { let mr_mantle = Cat { name: "Reggie Mantle".to_string(), age: 4, }; println!("{}", mr_mantle); }
成功了! 現在當我們使用 {} 列印時,我們得到 Reggie Mantle is a cat who is 4 years old.。這看起來好多了。
順帶一提,如果你實現了 Display,那麼你就可以免費得到 ToString 特徵。這是因為你使用 format! 巨集時間接使用了 .fmt() 函式,它讓你可以用 .to_string() 來做出 String。所以我們可以做類似這個範例做的事情,我們把 reggie_mantle 傳給想要 String 的函式,或者其他任何東西。
use std::fmt; struct Cat { name: String, age: u8, } impl fmt::Display for Cat { fn fmt(&self, f: &mut fmt::Formatter<'_>) -> fmt::Result { write!(f, "{} is a cat who is {} years old.", self.name, self.age) } } fn print_cats(pet: String) { println!("{}", pet); } fn main() { let mr_mantle = Cat { name: "Reggie Mantle".to_string(), age: 4, }; print_cats(mr_mantle.to_string()); // 這裡把牠轉換為 String println!("Mr. Mantle's String is {} letters long.", mr_mantle.to_string().chars().count()); // 把牠轉換成字元計數 }
印出:
Reggie Mantle is a cat who is 4 years old.
Mr. Mantle's String is 42 letters long.
關於特徵要記得的是,它們與某些東西的行為有關。你的 struct 是如何動作的?它能做什麼?這就是特徵的作用。如果你想想我們到目前為止所看到的一些特徵,它們全都是關於行為的:Copy 是型別可以做的事情。Display 也是型別能做的事情。ToString 是另一個特徵,它也是型別可以做的事情:它可以改變型別成為 String。在我們的 Dog 特徵中,Dog 這個詞並不意味著你能做的事情,但它給出了一些讓它做某些事情的方法。你也可以為 struct Poodle 或 struct Beagle 實作它,它們都會得到 Dog 的方法。
讓我們再看另一個更純粹是行為的範例。我們將想像一個有一些簡單角色的幻想遊戲。一個是 Monster,另外兩個是Wizard 和 Ranger。Monster 只是有 health,所以我們可以攻擊它,其他兩個還沒有任何東西。但是我們做了兩個特徵。一個叫 FightClose,讓你近身作戰。另一個是 FightFromDistance,讓你在遠處戰鬥。只有 Ranger 可以使用 FightFromDistance。它會像是這裡看到的這樣:
struct Monster { health: i32, } struct Wizard {} struct Ranger {} trait FightClose { fn attack_with_sword(&self, opponent: &mut Monster) { opponent.health -= 10; println!( "You attack with your sword. Your opponent now has {} health left.", opponent.health ); } fn attack_with_hand(&self, opponent: &mut Monster) { opponent.health -= 2; println!( "You attack with your hand. Your opponent now has {} health left.", opponent.health ); } } impl FightClose for Wizard {} impl FightClose for Ranger {} trait FightFromDistance { fn attack_with_bow(&self, opponent: &mut Monster, distance: u32) { if distance < 10 { opponent.health -= 10; println!( "You attack with your bow. Your opponent now has {} health left.", opponent.health ); } } fn attack_with_rock(&self, opponent: &mut Monster, distance: u32) { if distance < 3 { opponent.health -= 4; } println!( "You attack with your rock. Your opponent now has {} health left.", opponent.health ); } } impl FightFromDistance for Ranger {} fn main() { let radagast = Wizard {}; let aragorn = Ranger {}; let mut uruk_hai = Monster { health: 40 }; radagast.attack_with_sword(&mut uruk_hai); aragorn.attack_with_bow(&mut uruk_hai, 8); }
印出:
You attack with your sword. Your opponent now has 30 health left.
You attack with your bow. Your opponent now has 20 health left.
我們總是在特徵裡傳入 self,但是我們現在還不能用它做什麼。那是因為 Rust 不知道什麼型別會使用它。它可能是一個 Wizard,也可能是一個 Ranger,也可能是一個叫做 Toefocfgetobjtnode 的新結構體,或者其他任何東西。為了讓 self 具有一定的功能,我們可以在特徵中加入必要的特徵。比如說,如果我們想用 {:?} 列印,那麼我們就需要 Debug。你只要把它寫在 :(冒號)後面,就可以把它加入到特徵中。現在我們的程式碼像這樣:
struct Monster { health: i32, } #[derive(Debug)] // 現在 Wizard 有 Debug struct Wizard { health: i32, // 現在 Wizard 有 health } #[derive(Debug)] // Ranger 也是 struct Ranger { health: i32, // Ranger 也是 } trait FightClose: std::fmt::Debug { // 現在型別需要有 Debug 來使用 FightClose fn attack_with_sword(&self, opponent: &mut Monster) { opponent.health -= 10; println!( "You attack with your sword. Your opponent now has {} health left. You are now at: {:?}", // 我們現在可以用 {:?} 印出 self 因為我們有 Debug opponent.health, &self ); } fn attack_with_hand(&self, opponent: &mut Monster) { opponent.health -= 2; println!( "You attack with your hand. Your opponent now has {} health left. You are now at: {:?}", opponent.health, &self ); } } impl FightClose for Wizard {} impl FightClose for Ranger {} trait FightFromDistance: std::fmt::Debug { // 我們也可以加上特徵 FightFromDistance : FightClose, 因為 FightClose 需要 Debug fn attack_with_bow(&self, opponent: &mut Monster, distance: u32) { if distance < 10 { opponent.health -= 10; println!( "You attack with your bow. Your opponent now has {} health left. You are now at: {:?}", opponent.health, self ); } } fn attack_with_rock(&self, opponent: &mut Monster, distance: u32) { if distance < 3 { opponent.health -= 4; } println!( "You attack with your rock. Your opponent now has {} health left. You are now at: {:?}", opponent.health, self ); } } impl FightFromDistance for Ranger {} fn main() { let radagast = Wizard { health: 60 }; let aragorn = Ranger { health: 80 }; let mut uruk_hai = Monster { health: 40 }; radagast.attack_with_sword(&mut uruk_hai); aragorn.attack_with_bow(&mut uruk_hai, 8); }
現在印出:
You attack with your sword. Your opponent now has 30 health left. You are now at: Wizard { health: 60 }
You attack with your bow. Your opponent now has 20 health left. You are now at: Ranger { health: 80 }
在真實的遊戲中,為每個型別重寫印出內容可能比較好,因為 You are now at: Wizard { health: 60 } 看起來有點可笑。這也是為什麼特徵裡面的方法通常很簡單,因為你不知道什麼型別會使用它。例如,你不能寫出 self.0 += 10 這樣的東西。但是這個範例表明,我們可以在我們正在撰寫的特徵裡面使用其他的特徵。當我們這樣做的時候,我們會得到一些我們可以使用的方法。
另外一種使用特徵的方式是使用所謂的 特徵界限 (trait bound)。意思是"透過特徵進行限制"。特徵限制很簡單,因為特徵實際上不需要任何方法,或者說根本不需要任何東西。讓我們用類似但不同的東西重寫我們的程式碼。這次我們的特徵沒有任何方法,但我們有限定要使用的特徵的其它函式。
use std::fmt::Debug; // 所以我們現在不用再每次寫 std::fmt::Debug struct Monster { health: i32, } #[derive(Debug)] struct Wizard { health: i32, } #[derive(Debug)] struct Ranger { health: i32, } trait Magic{} // 這些特徵都沒有方法,它們只是特徵界限 trait FightClose {} trait FightFromDistance {} impl FightClose for Ranger{} // 每個型別都得到 FightClose, impl FightClose for Wizard {} impl FightFromDistance for Ranger{} // 但只有 Ranger 得到 FightFromDistance impl Magic for Wizard{} // 且只有 Wizard 得到 Magic fn attack_with_bow<T: FightFromDistance + Debug>(character: &T, opponent: &mut Monster, distance: u32) { if distance < 10 { opponent.health -= 10; println!( "You attack with your bow. Your opponent now has {} health left. You are now at: {:?}", opponent.health, character ); } } fn attack_with_sword<T: FightClose + Debug>(character: &T, opponent: &mut Monster) { opponent.health -= 10; println!( "You attack with your sword. Your opponent now has {} health left. You are now at: {:?}", opponent.health, character ); } fn fireball<T: Magic + Debug>(character: &T, opponent: &mut Monster, distance: u32) { if distance < 15 { opponent.health -= 20; println!("You raise your hands and cast a fireball! Your opponent now has {} health left. You are now at: {:?}", opponent.health, character); } } fn main() { let radagast = Wizard { health: 60 }; let aragorn = Ranger { health: 80 }; let mut uruk_hai = Monster { health: 40 }; attack_with_sword(&radagast, &mut uruk_hai); attack_with_bow(&aragorn, &mut uruk_hai, 8); fireball(&radagast, &mut uruk_hai, 8); }
印出來的東西幾乎一樣:
You attack with your sword. Your opponent now has 30 health left. You are now at: Wizard { health: 60 }
You attack with your bow. Your opponent now has 20 health left. You are now at: Ranger { health: 80 }
You raise your hands and cast a fireball! Your opponent now has 0 health left. You are now at: Wizard { health: 60 }
所以你可以看到,當你使用特徵時,有很多方式可以做到同樣的事情。這一切都取決於什麼對你正在編寫的程式最有意義。
現在讓我們來看看如何實作一些你會在 Rust 中使用的主要特徵。
From 特徵
From 是個非常方便使用的特徵,你知道這一點是因為你已經看過很多遍。有了 From 你可以從 &str 做出 String,但你也可以用許多其他型別做出許多種型別。例如,Vec 能用 From 在以下型別:
From<&'_ [T]>
From<&'_ mut [T]>
From<&'_ str>
From<&'a Vec<T>>
From<[T; N]>
From<BinaryHeap<T>>
From<Box<[T]>>
From<CString>
From<Cow<'a, [T]>>
From<String>
From<Vec<NonZeroU8>>
From<Vec<T>>
From<VecDeque<T>>
那裡還有很多種 Vec::from() 我們還沒有嘗試用過。我們來用幾個看看會怎麼樣。
use std::fmt::Display; // 我們會做個用來印出它們的泛型函式,所以我們想要 Display fn print_vec<T: Display>(input: &Vec<T>) { // 接受 Vec<T> 如果型別 T 有 Display for item in input { print!("{} ", item); } println!(); } fn main() { let array_vec = Vec::from([8, 9, 10]); // 試著對陣列 from print_vec(&array_vec); let str_vec = Vec::from("What kind of vec will I be?"); // 對 &str from 的陣列? 這會蠻有趣的 print_vec(&str_vec); let string_vec = Vec::from("What kind of vec will a String be?".to_string()); // 也是對 String 去 from print_vec(&string_vec); }
印出的內容如下:
8 9 10
87 104 97 116 32 107 105 110 100 32 111 102 32 118 101 99 32 119 105 108 108 32 73 32 98 101 63
87 104 97 116 32 107 105 110 100 32 111 102 32 118 101 99 32 119 105 108 108 32 97 32 83 116 114 105 110 103 32 98 101 63
如果你觀察型別,第二個和第三個向量都是 Vec<u8>,也就是 &str 和 String 的位元組。所以你可以看到 From 是非常靈活的,且用得很多。讓我們用自己的型別來試試看。
我們將做兩個結構體,然後為其中一個結構體實作 From。一個結構體會是 City,另一個結構體則會是 Country。我們希望能夠做到這件事:let country_name = Country::from(vector_of_cities)。
它看起來像這樣:
#[derive(Debug)] // 這樣我們可以印出 City struct City { name: String, population: u32, } impl City { fn new(name: &str, population: u32) -> Self { // 只是新的函式 Self { name: name.to_string(), population, } } } #[derive(Debug)] // Country 也要可以被印出 struct Country { cities: Vec<City>, // 我們的城市都在這裡 } impl From<Vec<City>> for Country { // 注意: 我們不用去寫 From<City>, 我們也可以改用 // From<Vec<City>>. 因此我們也能實作在我們 // 未曾建立的型別上 fn from(cities: Vec<City>) -> Self { Self { cities } } } impl Country { fn print_cities(&self) { // 函式印出 Country 內的城市 for city in &self.cities { // 用 & 因為 Vec<City> 不是 Copy println!("{:?} has a population of {:?}.", city.name, city.population); } } } fn main() { let helsinki = City::new("Helsinki", 631_695); let turku = City::new("Turku", 186_756); let finland_cities = vec![helsinki, turku]; // 這是 Vec<City> let finland = Country::from(finland_cities); // 所以現在我們能用 From finland.print_cities(); }
印出:
"Helsinki" has a population of 631695.
"Turku" has a population of 186756.
你可以看到,很容易從你沒有建立的型別中實作出 From,比如 Vec、i32 等等。這裡還有一個例子是,我們建立有兩個向量的向量。第一個向量存放偶數,第二個向量存放奇數。你可以用 From 給它一個 i32 的向量,它會把它變成 Vec<Vec<i32>>:一個向量裡面有許多容納 i32 的向量。
use std::convert::From; struct EvenOddVec(Vec<Vec<i32>>); impl From<Vec<i32>> for EvenOddVec { fn from(input: Vec<i32>) -> Self { let mut even_odd_vec: Vec<Vec<i32>> = vec![vec![], vec![]]; // 向量的裡面有兩個空向量 // 這是回傳值但首先我們必須先將它填充 for item in input { if item % 2 == 0 { even_odd_vec[0].push(item); } else { even_odd_vec[1].push(item); } } Self(even_odd_vec) // 現在它完成了那我們把它回傳為 Self (Self = EvenOddVec) } } fn main() { let bunch_of_numbers = vec![8, 7, -1, 3, 222, 9787, -47, 77, 0, 55, 7, 8]; let new_vec = EvenOddVec::from(bunch_of_numbers); println!("Even numbers: {:?}\nOdd numbers: {:?}", new_vec.0[0], new_vec.0[1]); }
印出:
Even numbers: [8, 222, 0, 8]
Odd numbers: [7, -1, 3, 9787, -47, 77, 55, 7]
像 EvenOddVec 這樣的型別可能最好是用泛型的 T,這樣我們就可以用在許多數值型別。如果你想練習的話,你可以試著把這個範例做成泛型的。
接受 String 和 &str 的函式
有時你想讓函式能同時接受 String 和 &str。你可以透過泛型和 AsRef 特徵來做到這件事。AsRef 用於從某個型別向另一個型別提供參考。如果你查閱 String 文件,你可以看到它對許多型別都有提供 AsRef:
https://doc.rust-lang.org/std/string/struct.String.html
這些是它們的一些函式簽名。
AsRef<str>:
#![allow(unused)] fn main() { // 🚧 impl AsRef<str> for String fn as_ref(&self) -> &str }
AsRef<[u8]>:
#![allow(unused)] fn main() { // 🚧 impl AsRef<[u8]> for String fn as_ref(&self) -> &[u8] }
AsRef<OsStr>:
#![allow(unused)] fn main() { // 🚧 impl AsRef<OsStr> for String fn as_ref(&self) -> &OsStr }
你可以看到,它接受 &self,並給出另一個型別的參考。這意味著,如果你有個泛型型別 T,你可以說它需要 AsRef<str>。如果你這樣做,它將會能夠接受 &str 和 String。
讓我們先從泛型函式說起。這個還不能執行:
fn print_it<T>(input: T) { println!("{}", input) // ⚠️ } fn main() { print_it("Please print me"); }
Rust說 error[E0277]: T doesn't implement std::fmt::Display。所以我們會被要求給 T 實作 Display。
use std::fmt::Display; fn print_it<T: Display>(input: T) { println!("{}", input) } fn main() { print_it("Please print me"); }
現在可以執行並印出 Please print me。這不錯,但 T 仍然可以是太多種類的型別。它可以是 i8、f32 及任何其它有 Display 的東西。所以我們加上 AsRef<str>,那麼現在 T 需要同時有實作 AsRef<str> 和 Display。
use std::fmt::Display; fn print_it<T: AsRef<str> + Display>(input: T) { println!("{}", input) } fn main() { print_it("Please print me"); print_it("Also, please print me".to_string()); // print_it(7); <- 這不會印出來 }
現在它不會接受像 i8 這樣的型別。
不要忘了,你可以在函式變長時用 where 以不一樣的方式寫出函式。如果我們加上 Debug,那麼它就會變成一整行長長的 fn print_it<T: AsRef<str> + Display + Debug>(input: T)。因此我們可以寫成這樣:
use std::fmt::{Debug, Display}; // 加上 Debug fn print_it<T>(input: T) // 現在這行好讀多了 where T: AsRef<str> + Debug + Display, // 並且這些特徵也好讀 { println!("{}", input) } fn main() { print_it("Please print me"); print_it("Also, please print me".to_string()); }
鏈結方法
Rust 是一種系統程式語言,就像 C 和 C++ 一樣,它的程式碼可以寫成獨立的命令,單獨成行,但它也有函數式風格(functional style)。兩種風格都可以,但函數式通常比較短。下面以非函數式(稱為"命令式(imperative style)")為例,做出從 1 到 10 的 Vec。
fn main() { let mut new_vec = Vec::new(); let mut counter = 1; while counter < 11 { new_vec.push(counter); counter += 1; } println!("{:?}", new_vec); }
印出 [1, 2, 3, 4, 5, 6, 7, 8, 9, 10]。
而這裡是函式式風格的範例:
fn main() { let new_vec = (1..=10).collect::<Vec<i32>>(); // 或者你能寫成像這樣: // let new_vec: Vec<i32> = (1..=10).collect(); println!("{:?}", new_vec); }
.collect() 可以做出很多型別的集合,所以我們要告訴它型別。
你可以用函數式風格來鏈結方法。"鏈結方法"的意思是把很多方法放在一個陳述式中。這裡是一個有很多方法鏈結在一起的範例:
fn main() { let my_vec = vec![0, 1, 2, 3, 4, 5, 6, 7, 8, 9, 10]; let new_vec = my_vec.into_iter().skip(3).take(4).collect::<Vec<i32>>(); println!("{:?}", new_vec); }
這樣就建立了一個是 [3, 4, 5, 6] 的 Vec。這一行的資訊量很大,所以把每個方法放在新的一行上會有幫助。讓我們這樣做,讓它更容易閱讀:
fn main() { let my_vec = vec![0, 1, 2, 3, 4, 5, 6, 7, 8, 9, 10]; let new_vec = my_vec .into_iter() // "迭代"過所有元素 (iterate = 處理它裡面的每個項目). into_iter() 給我們的是具所有權的數值, 而非參考 .skip(3) // 略過三個項目: 0, 1, 和 2 .take(4) // 拿取後面四個: 3, 4, 5, 和 6 .collect::<Vec<i32>>(); // 把它們放進新的 Vec<i32> println!("{:?}", new_vec); }
當你瞭解閉包(closure)和疊代器(iterator)時,你就可以用最佳的方式運用這種函數式風格。所以我們接下來將學會它們。
疊代器
疊代器是種可以一次拿給你集合中一個元素的構造。其實我們已經使用過疊代器很多次:for 迴圈就是給你疊代器使用。在其他時候當你想使用疊代器時,你必須選擇用那一種:
.iter()給出參考的疊代器.iter_mut()給出可變參考的疊代器.into_iter()給出取值的疊代器(不是參考)
for 迴圈其實只是一個擁有值的疊代器。這就是為什麼它可以是可變的,並在使用的時候改變值。
我們可以像這樣使用疊代器:
fn main() { let vector1 = vec![1, 2, 3]; // 我們會對這個向量使用 .iter() 和 .into_iter() let vector1_a = vector1.iter().map(|x| x + 1).collect::<Vec<i32>>(); let vector1_b = vector1.into_iter().map(|x| x * 10).collect::<Vec<i32>>(); let mut vector2 = vec![10, 20, 30]; // 我們會對這個向量使用 .iter_mut() vector2.iter_mut().for_each(|x| *x +=100); println!("{:?}", vector1_a); println!("{:?}", vector2); println!("{:?}", vector1_b); }
印出:
[2, 3, 4]
[110, 120, 130]
[10, 20, 30]
在前兩個我們用了叫做 .map() 的方法。這個方法讓你對每個元素做些事情,然後把它傳遞下去。後面這個我們用的是叫做 .for_each() 的方法。這個方法也只是讓你對每個元素做些事情。.iter_mut() 加上 for_each() 基本上就是 for 迴圈。在每一個方法裡面,我們可以給每個元素取名(我們剛才叫它 x),並用它的名字來改變它。這些被稱為閉包(closure),我們將在下個章節學到。
讓我們再來一個個看過它們一遍。
首先我們用 .iter() 對 vector1 取得元素的參考。我們給每一個元素都加上 1,並將結果變成新的 Vec。vector1 仍然還在,因為我們只用了參考:我們沒有拿走值。現在我們有 vector1,還有個新的 Vec 叫 vector1_a。因為 .map() 只是把它傳遞過去,所以我們還需要使用 .collect() 把它變成 Vec。
然後我們用 into_iter 從 vector1 中得到取值疊代器。這樣就會銷毀 vector1,因為那就是 into_iter() 的作用。所以我們做出 vector1_b 之後,就不能再使用 vector1 了。
最後我們在 vector2 上使用了 .iter_mut()。它是可變的,因此我們不需要使用 .collect() 來建立新的 Vec。反而我們用可變參考改變同一個 Vec 中的值。所以 vector2 仍然存在。也因為我們不需要新的 Vec,可以直接使用 for_each:它就像 for 迴圈。
疊代器如何運作
疊代器是藉由使用叫做 .next() 的方法來運作,這個方法會回傳 Option。當你使用疊代器時,Rust 會一遍又一遍地對它呼叫 next()。如果得到 Some,它就會繼續下去。如果得到 None,它就停止。
你還記得 assert_eq! 巨集嗎?在文件中,你總是看得到它。這裡它展示了疊代器如何運作。
fn main() { let my_vec = vec!['a', 'b', '거', '柳']; // 只是正規的 Vec let mut my_vec_iter = my_vec.iter(); // 現在這是疊代器型別, 但我們還沒呼叫它 assert_eq!(my_vec_iter.next(), Some(&'a')); // 用 .next() 呼叫第一個元素 assert_eq!(my_vec_iter.next(), Some(&'b')); // 呼叫下一個 assert_eq!(my_vec_iter.next(), Some(&'거')); // 再一次 assert_eq!(my_vec_iter.next(), Some(&'柳')); // 再一次 assert_eq!(my_vec_iter.next(), None); // 沒有東西留下: 只有 None assert_eq!(my_vec_iter.next(), None); // 你能持續呼叫 .next() 但它會永遠是 None }
為自己的結構體或列舉實作 Iterator 並不太難。首先讓我們建立書庫,思考看看。
#[derive(Debug)] // 我們想用 {:?} 印出它 struct Library { library_type: LibraryType, // 這是我們的列舉 books: Vec<String>, // 書本清單 } #[derive(Debug)] enum LibraryType { // 書庫可以是城市圖書館或國家圖書館 City, Country, } impl Library { fn add_book(&mut self, book: &str) { // 我們用 add_book 來加入新書 self.books.push(book.to_string()); // 我們接受 &str 並回傳為 String, 再加入 Vec 裡 } fn new() -> Self { // 這裡建立新的 Library Self { library_type: LibraryType::City, // 多數是在城市裡所以 // 很多時候我們會選 City books: Vec::new(), } } } fn main() { let mut my_library = Library::new(); // 做新的書庫 my_library.add_book("The Doom of the Darksword"); // 加入一些書 my_library.add_book("Demian - die Geschichte einer Jugend"); my_library.add_book("구운몽"); my_library.add_book("吾輩は猫である"); println!("{:?}", my_library.books); // 我們可以印出我們的書本清單 }
這運作的很好。現在我們想為書庫實作 Iterator,這樣我們就可以在 for 迴圈中使用它。現在如果我們嘗試用 for 迴圈,它肯定不能用:
#![allow(unused)] fn main() { for item in my_library { println!("{}", item); // ⚠️ } }
報出錯誤:
error[E0277]: `Library` is not an iterator
--> src\main.rs:47:16
|
47 | for item in my_library {
| ^^^^^^^^^^ `Library` is not an iterator
|
= help: the trait `std::iter::Iterator` is not implemented for `Library`
= note: required by `std::iter::IntoIterator::into_iter`
但是我們可以用 impl Iterator for Library 把書庫變成疊代器。Iterator 特徵的資訊能在標準函式庫中查看:https://doc.rust-lang.org/std/iter/trait.Iterator.html
在頁面的左上方寫著:Associated Types: Item 和 Required Methods: next。"關聯型別"的意思是"一起使用的型別"。我們的關聯型別將會是 String,因為我們希望疊代器回傳給我們 String。
在頁面中,它有個看起來像這樣的範例。
// 交錯回傳 Some 和 None 的疊代器 struct Alternate { state: i32, } impl Iterator for Alternate { type Item = i32; fn next(&mut self) -> Option<i32> { let val = self.state; self.state = self.state + 1; // 如果是偶數回傳 Some(i32), 不然就是 None if val % 2 == 0 { Some(val) } else { None } } } fn main() {}
你可以看到 impl Iterator for Alternate 下面寫著 type Item = i32。這就是關聯型別。我們的疊代器將會用在型別是 Vec<String> 的書本清單上。當我們呼叫 next 的時候,它要回傳給我們 String。那麼我們就會要寫成 type Item = String;。那就是所謂的關聯型別。
為了實作 Iterator,你需要去寫 fn next() 函式。這是你決定疊代器應該要做什麼的地方。對於我們的 Library,我們希望它先給我們最後一本書。所以我們將會 match 從 .pop() 拿出來的最後一個元素,如果它是 Some 的話。我們還想為每個元素印出 " is found!"。現在它看起來像這樣:
#[derive(Debug, Clone)] struct Library { library_type: LibraryType, books: Vec<String>, } #[derive(Debug, Clone)] enum LibraryType { City, Country, } impl Library { fn add_book(&mut self, book: &str) { self.books.push(book.to_string()); } fn new() -> Self { Self { library_type: LibraryType::City, // 很多時候 books: Vec::new(), } } } impl Iterator for Library { type Item = String; fn next(&mut self) -> Option<String> { match self.books.pop() { Some(book) => Some(book + " is found!"), // Rust 允許 String + &str None => None, } } } fn main() { let mut my_library = Library::new(); my_library.add_book("The Doom of the Darksword"); my_library.add_book("Demian - die Geschichte einer Jugend"); my_library.add_book("구운몽"); my_library.add_book("吾輩は猫である"); for item in my_library.clone() { // 我們現在能用for迴圈. 給它克隆這樣Library就不會被銷毀 println!("{}", item); } }
印出:
吾輩は猫である is found!
구운몽 is found!
Demian - die Geschichte einer Jugend is found!
The Doom of the Darksword is found!
閉包
閉包(Closure)就像不需要名字的快速函式。有時它們被稱為 lambda。閉包很容易辨識,因為它們使用 || 而不是 ()。它們在 Rust 中非常常見,一旦你學會了使用它們,你就會愛不釋手。
你可以將閉包連結到變數上,而當你使用它時,它看起來就像一個函式一樣:
fn main() { let my_closure = || println!("This is a closure"); my_closure(); }
所以這個閉包沒有接受東西:||,並印出訊息。This is a closure。
在 || 之間我們可以加上要輸入的變數和型別,就像在函式的 () 裡面一樣的用法:
fn main() { let my_closure = |x: i32| println!("{}", x); my_closure(5); my_closure(5+5); }
印出:
5
10
當閉包變得更加復雜時,你可以加上程式碼區塊。那你就可以要寫多長就多長。
fn main() { let my_closure = || { let number = 7; let other_number = 10; println!("The two numbers are {} and {}.", number, other_number); // 這個閉包你想要寫多長就能有多長, 就像函式. }; my_closure(); }
但是閉包的特殊在於它可以接受閉包之外的變數,即使你只有寫 ||。所以你可以這樣做:
fn main() { let number_one = 6; let number_two = 10; let my_closure = || println!("{}", number_one + number_two); my_closure(); }
就會印出 16。你不需要在 || 中放入任何東西,因為它可以直接拿到 number_one 和 number_two 並把它們加起來。
順帶一提,這就是 閉包(closure) 這個名字的由來,因為它們會取得變數並將它們"封入(enclose)"在裡面。如果你想要很正確的說法:
||如果不把變數從外面封進來就是"匿名函式(anonymous function)"。匿名的意思是"沒有名字"。它用起來更像個正規函式。||有從外部封入變數的才是"閉包"。它把它周圍的變數"封起來"使用。
但是人們經常會把所有的 || 函式都叫做閉包,所以你不用擔心名字的問題。我們只會對帶有 || 的任何東西叫"閉包",但請記住,它可能意味著一個"匿名函式"。
為什麼知道兩者的區別有益呢?因為匿名函式其實和具名函式產生一樣的機器碼(machine code)。它們給人的感覺是"高層抽象",所以有時候大家會覺得機器碼會很複雜。但是 Rust 用它產生的機器碼其實和正規函式一樣快。
所以讓我們再來看看更多一些閉包能做的事。你也可以這樣做:
fn main() { let number_one = 6; let number_two = 10; let my_closure = |x: i32| println!("{}", number_one + number_two + x); my_closure(5); }
這個閉包取用 number_one 和 number_two。我們還給了它新的變數 x,並且照範例來說 x 是 5。然後它把這三個都加在一起印出 21。
通常在 Rust 中,你會在方法的引數裡面看到閉包,是因為用閉包作為引數是非常方便的事。我們在上個章節中有 .map() 和 .for_each() 的地方看到了閉包。在那個章節中,我們寫了 |x| 來代入疊代器的下一個元素,那就是一個閉包。
這裡是另一個範例:如果 unwrap 不起作用,可以用我們已知的 unwrap_or 方法給出一個值替代。之前我們寫的是:let fourth = my_vec.get(3).unwrap_or(&0);。但還有個引數是用閉包的 unwrap_or_else 方法。所以你可以這樣做:
fn main() { let my_vec = vec![8, 9, 10]; let fourth = my_vec.get(3).unwrap_or_else(|| { // 試著 unwrap. 如果它不能用, if my_vec.get(0).is_some() { // 就看 my_vec 是否有東西在索引 [0] &my_vec[0] // 如果有東西就回傳在索引 [0] 的數值 } else { &0 // 不然就給 &0 } }); println!("{}", fourth); }
當然,閉包也可以很簡單。例如你可以只寫 let fourth = my_vec.get(3).unwrap_or_else(|| &0);。你不必只因為有閉包,就總是需要用 {} 並寫出複雜的程式碼。只要你把 || 放進去,編譯器就知道你放了你需要的閉包。
最常用的閉包方法可能是 .map()。讓我們再來看看它。下面是一種使用方式:
fn main() { let num_vec = vec![2, 4, 6]; let double_vec = num_vec // 拿 num_vec .iter() // 疊代它 .map(|number| number * 2) // 對每個元素乘以二 .collect::<Vec<i32>>(); // 然後從結果做新的 Vec println!("{:?}", double_vec); }
另一個好例子是在 .enumerate() 之後使用 .for_each()。.enumerate() 方法給的是帶有索引號碼和元素的疊代器。例如:[10, 9, 8] 變成 (0, 10), (1, 9), (2, 8)。這裡每個元素的型別是 (usize, i32)。所以你可以這樣做:
fn main() { let num_vec = vec![10, 9, 8]; num_vec .iter() // 疊代 num_vec .enumerate() // 得到 (index, number) .for_each(|(index, number)| println!("Index number {} has number {}", index, number)); // 對每一個做些事 }
印出:
Index number 0 has number 10
Index number 1 has number 9
Index number 2 has number 8
在這種情況下,我們用 for_each 代替 map。map 是用於對每個元素做一些事情,並將其傳遞出去,而 for_each 是當你看到每個元素時做一些事情。另外,map 不會做任何事情,除非你使用像 collect 這樣的方法。
其實,這就是疊代器有趣的地方。如果你試著用 map 之後卻沒用像 collect 這樣的方法,編譯器會告訴你它不會做任何事。它不會恐慌,但編譯器只會告訴你什麼事都沒做。
fn main() { let num_vec = vec![10, 9, 8]; num_vec .iter() .enumerate() .map(|(index, number)| println!("Index number {} has number {}", index, number)); }
它說:
warning: unused `std::iter::Map` that must be used
--> src\main.rs:4:5
|
4 | / num_vec
5 | | .iter()
6 | | .enumerate()
7 | | .map(|(index, number)| println!("Index number {} has number {}", index, number));
| |_________________________________________________________________________________________^
|
= note: `#[warn(unused_must_use)]` on by default
= note: iterators are lazy and do nothing unless consumed
這是個警告,所以不是錯誤:程式有正常執行。但是為什麼 num_vec 沒做任何事呢?我們可以看看型別就知道了。
let num_vec = vec![10, 9, 8];現在是個Vec<i32>。.iter()現在是個Iter<i32>。所以它是個元素為i32的疊代器。.enumerate()現在是個Enumerate<Iter<i32>>。所以它是i32的Iter型別的Enumerate型別。.map()現在是個Map<Enumerate<Iter<i32>>>的型別。所以它是i32的Iter型別的Enumerate型別的Map型別。
我們所做的只是個越來越複雜的結構體。所以這個 Map<Enumerate<Iter<i32>>> 結構體只是準備好,但只有在我們告訴它要做什麼事時才會處理好能用。Rust 這樣做是因為它需要保證足夠快。它不想這樣做:
- 迭代向量中所有的
i32 - 然後列舉出疊代器中所有的
i32 - 然後對映所有列舉出的
i32
Rust 只想做一次計算,所以它建立結構體並等待。之後如果我們講了 .collect::<Vec<i32>>(),它就會知道該怎麼做,並開始動作。這就是 iterators are lazy and do nothing unless consumed 的意思。疊代器在你"消耗(consume)"它們(用完它們)之前不會做任何事情。
你甚至可以用 .collect() 建立像 HashMap 這樣複雜的東西,所以它非常強大。這裡是如何將兩個向量放進 HashMap 的範例。首先我們做兩個向量出來,然後我們會對它們使用 .into_iter() 來得到值的疊代器。接著我們使用 .zip() 方法。這個方法將兩個疊代器就像拉鍊一樣伴隨(attach)在一起,。最後我們使用 .collect() 來做出 HashMap。
這裡是程式碼:
use std::collections::HashMap; fn main() { let some_numbers = vec![0, 1, 2, 3, 4, 5]; // 是 Vec<i32> let some_words = vec!["zero", "one", "two", "three", "four", "five"]; // 是 Vec<&str> let number_word_hashmap = some_numbers .into_iter() // 現在是疊代器 .zip(some_words.into_iter()) // .zip() 裡面我們放入另一個疊代器. 現在它們在一起了. .collect::<HashMap<_, _>>(); println!("For key {} we get {}.", 2, number_word_hashmap.get(&2).unwrap()); }
印出:
For key 2 we get two.
你可以看到我們寫得是 <HashMap<_, _>>,因為那有足夠資訊讓 Rust 判斷出型別是 HashMap<i32, &str>。如果你想要寫成 .collect::<HashMap<i32, &str>>(); 也行,或者你偏好像這樣寫也可以:
use std::collections::HashMap; fn main() { let some_numbers = vec![0, 1, 2, 3, 4, 5]; // 是 Vec<i32> let some_words = vec!["zero", "one", "two", "three", "four", "five"]; // 是 Vec<&str> let number_word_hashmap: HashMap<_, _> = some_numbers // 因為我們在這裡告訴它型別... .into_iter() .zip(some_words.into_iter()) .collect(); // 我們就不用在這裡告訴它 }
還有一種方法,就像 char 的 .enumerate():char_indices()(Indices的意思是"索引")。你用它的方式是一樣的。讓我們假裝有個由許多3位數的數字組成的大字串。
fn main() { let numbers_together = "140399923481800622623218009598281"; for (index, number) in numbers_together.char_indices() { match (index % 3, number) { (0..=1, number) => print!("{}", number), // 在特定餘數時只印出數字 _ => print!("{}\t", number), // 不然就印出帶有定位空白的數字 } } }
印出 140 399 923 481 800 622 623 218 009 598 281。
閉包裡的 |_|
有時你會在閉包裡面看到 |_|。這意味著這個閉包需要一個引數(比如 x),但你不想使用它。所以 |_| 意味著 "好吧,這個閉包接受一個引數,但我不會給它名字是因為我不在乎它"。
這裡的範例是當你不這樣做時會有的錯誤:
fn main() { let my_vec = vec![8, 9, 10]; println!("{:?}", my_vec.iter().for_each(|| println!("We didn't use the variables at all"))); // ⚠️ }
Rust 講說
error[E0593]: closure is expected to take 1 argument, but it takes 0 arguments
--> src\main.rs:28:36
|
28 | println!("{:?}", my_vec.iter().for_each(|| println!("We didn't use the variables at all")));
| ^^^^^^^^ -- takes 0 arguments
| |
| expected closure that takes 1 argument
編譯器其實會給你一些幫助:
help: consider changing the closure to take and ignore the expected argument
|
28 | println!("{:?}", my_vec.iter().for_each(|_| println!("We didn't use the variables at all")));
這是很好的建議。如果你把 || 改成 |_| 就可以運作了。
閉包和疊代器的有用方法
一旦閉包讓你感到自在時,Rust 就會成為一種非常有趣的語言。有了閉包,你可以將方法互相 連結 起來,用很少的程式碼做很多事情。下面是一些我們還沒有見過的閉包和使用閉包的方法。
.filter():讓你保留疊代器中你想保留的元素。讓我們過濾一年之中的月份。
fn main() { let months = vec!["January", "February", "March", "April", "May", "June", "July", "August", "September", "October", "November", "December"]; let filtered_months = months .into_iter() // 做出疊代器 .filter(|month| month.len() < 5) // 我們不想要月份名的長度超過 5 個位元組. // 我們知道每個字母是一個位元組, 所以用 .len() 沒問題 .filter(|month| month.contains("u")) // 還有我們只喜歡字母有 u 的月份 .collect::<Vec<&str>>(); println!("{:?}", filtered_months); }
印出 ["June", "July"]。
.filter_map():這叫做 filter_map() 是因為它做了 .filter() 和 .map()。傳入的閉包必須回傳 Option<T>, 接著 filter_map() 將會從每一個 Option 取出是 Some 的值。所以比如說你套用 .filter_map() 到 vec![Some(2), None, Some(3)],它就會回傳 [2, 3]。
我們將寫一個用到 Company 結構體的範例。每個公司都有個 name,所以這個欄位是 String,但是 CEO 可能最近已經辭職了。所以 ceo 欄位是 Option<String>。我們會 .filter_map() 一些公司,只保留 CEO 的名字。
struct Company { name: String, ceo: Option<String>, } impl Company { fn new(name: &str, ceo: &str) -> Self { let ceo = match ceo { "" => None, ceo => Some(ceo.to_string()), }; // 確定 ceo 了, 那我們現在就回傳 Self Self { name: name.to_string(), ceo, } } fn get_ceo(&self) -> Option<String> { self.ceo.clone() // 只回傳 CEO 的克隆(結構體沒有 Copy 特徵) } } fn main() { let company_vec = vec![ Company::new("Umbrella Corporation", "Unknown"), Company::new("Ovintiv", "Doug Suttles"), Company::new("The Red-Headed League", ""), Company::new("Stark Enterprises", ""), ]; let all_the_ceos = company_vec .into_iter() .filter_map(|company| company.get_ceo()) // filter_map 需要 Option<T> .collect::<Vec<String>>(); println!("{:?}", all_the_ceos); }
印出 ["Unknown", "Doug Suttles"]。
既然 .filter_map() 需要 Option,那麼 Result 呢?沒問題:有一個叫做 .ok() 的方法,可以把 Result 變成 Option。之所以叫 .ok(),是因為它能傳送的只是 Ok 的結果(Err 的資訊沒有了)。你記得Option 完整型別是 Option<T>,而 Result 是 Result<T, E>,同時有 Ok 和 Err 的資訊。所以當你使用 .ok() 時,任何 Err 的資訊都會丟棄,變成 None。
使用 .parse() 就是這種情況的簡單範例,我們嘗試解析一些使用者輸入。.parse() 在這裡接受 &str,並試著把它變成 f32。它回傳了 Result,但我們用的是 filter_map(),所以只要丟掉錯誤就可以。任何 Err 都會變成 None,並且被 .filter_map() 過濾掉。
fn main() { let user_input = vec!["8.9", "Nine point nine five", "8.0", "7.6", "eleventy-twelve"]; let actual_numbers = user_input .into_iter() .filter_map(|input| input.parse::<f32>().ok()) .collect::<Vec<f32>>(); println!("{:?}", actual_numbers); }
印出 [8.9, 8.0, 7.6]。
與 .ok() 相對的是 .ok_or() 和 ok_or_else()。這樣就把 Option 變成了 Result。之所以叫 .ok_or(),是因為 Result 給你 Ok 或 Err,所以你必須讓它知道 Err 的值是多少。這是因為 Option 中的 None 沒有任何資訊。另外,你現在可以看到,這些方法的名稱中帶有 else 的部分意味著它接受閉包。
我們可以把我們的 Option 從 Company 結構體中取出來,然後用這個方式把它變成 Result。對於長期的錯誤處理方式,最好是建立自己的錯誤型別。但在現在我們只給了它錯誤訊息,所以它就變成了 Result<String, &str>。
// 在 main() 之前的一切都完全一樣 struct Company { name: String, ceo: Option<String>, } impl Company { fn new(name: &str, ceo: &str) -> Self { let ceo = match ceo { "" => None, ceo => Some(ceo.to_string()), }; Self { name: name.to_string(), ceo, } } fn get_ceo(&self) -> Option<String> { self.ceo.clone() } } fn main() { let company_vec = vec![ Company::new("Umbrella Corporation", "Unknown"), Company::new("Ovintiv", "Doug Suttles"), Company::new("The Red-Headed League", ""), Company::new("Stark Enterprises", ""), ]; let mut results_vec = vec![]; // 假裝我們也需要收集錯誤的結果 company_vec .iter() .for_each(|company| results_vec.push(company.get_ceo().ok_or("No CEO found"))); for item in results_vec { println!("{:?}", item); } }
最大的變化在這行:
#![allow(unused)] fn main() { // 🚧 .for_each(|company| results_vec.push(company.get_ceo().ok_or("No CEO found"))); }
它的意思是:"每家公司都用 get_ceo(). 如果你拿得到,那就把 Ok 裡面的數值傳給你。如果沒有,就在 Err 裡面傳遞"No CEO found"。然後把它放到 vec 裡。"
所以當我們印出 results_vec 時,會得到這樣的結果:
Ok("Unknown")
Ok("Doug Suttles")
Err("No CEO found")
Err("No CEO found")
所以現在我們有了所有四個元素。現在讓我們使用 .ok_or_else(),這樣我們就能使用閉包,並得到更好的錯誤訊息。現在我們有空間使用 format! 來建立 String,並將公司名稱放在其中。然後我們回傳這個 String。
// 在 main() 之前的一切都完全一樣 struct Company { name: String, ceo: Option<String>, } impl Company { fn new(name: &str, ceo: &str) -> Self { let ceo = match ceo { "" => None, name => Some(name.to_string()), }; Self { name: name.to_string(), ceo, } } fn get_ceo(&self) -> Option<String> { self.ceo.clone() } } fn main() { let company_vec = vec![ Company::new("Umbrella Corporation", "Unknown"), Company::new("Ovintiv", "Doug Suttles"), Company::new("The Red-Headed League", ""), Company::new("Stark Enterprises", ""), ]; let mut results_vec = vec![]; company_vec.iter().for_each(|company| { results_vec.push(company.get_ceo().ok_or_else(|| { let err_message = format!("No CEO found for {}", company.name); err_message })) }); for item in results_vec { println!("{:?}", item); } }
這樣我們就有了:
Ok("Unknown")
Ok("Doug Suttles")
Err("No CEO found for The Red-Headed League")
Err("No CEO found for Stark Enterprises")
.and_then() 是個很有用的方法,它接受 Option,然後讓你對它的值做一些事情,並把它傳遞出去。所以它的輸入是個 Option,輸出也是個 Option。這有點像一個安全的"解包(unwrap),然後做一些事情,然後再包起來"。
一個簡單的例子是,我們使用 .get() 從向量中得到的數字,因為它回傳的是 Option。現在我們可以把它傳給 and_then(),如果它是 Some,我們還可以對它做一些數學運算。如果是 None,那麼 None 就會被傳遞過去。
fn main() { let new_vec = vec![8, 9, 0]; // 只是有數字的向量 let number_to_add = 5; // 後面用這個來運算 let mut empty_vec = vec![]; // 結果放進這裡 for index in 0..5 { empty_vec.push( new_vec .get(index) .and_then(|number| Some(number + 1)) .and_then(|number| Some(number + number_to_add)) ); } println!("{:?}", empty_vec); }
印出了 [Some(14), Some(15), Some(6), None, None]。你可以看到 None 並沒有被過濾掉,只是傳遞過去了。
.and() 有點像是 bool 的 Option。你可以匹配很多個 Option,如果它們都是 Some,那麼它會給出最後一個。而如果其中一個是 None,那麼就會給出 None。
首先這裡有個 bool 的範例來幫助想像。你可以看到,如果你用的是 &&(和),哪怕是一個 false,也會讓一切 false。
fn main() { let one = true; let two = false; let three = true; let four = true; println!("{}", one && three); // 印出 true println!("{}", one && two && three && four); // 印出 false }
現在這裡的 .and() 也是同樣的東西。想像一下,我們做了五次操作,並把結果放在 Vec<Option<&str>> 中。如果我們得到一個值,我們就把 Some("success!") 推到向量中。然後我們再多做兩次這樣的操作。之後我們只用 .and() 顯示每次是得到 Some 時的索引。
fn main() { let first_try = vec![Some("success!"), None, Some("success!"), Some("success!"), None]; let second_try = vec![None, Some("success!"), Some("success!"), Some("success!"), Some("success!")]; let third_try = vec![Some("success!"), Some("success!"), Some("success!"), Some("success!"), None]; for i in 0..first_try.len() { println!("{:?}", first_try[i].and(second_try[i]).and(third_try[i])); } }
印出:
None
None
Some("success!")
Some("success!")
None
第一個(索引 0)None,是因為在 second_try 中索引 0 有 None。第二個 None,是因為在 first_try 中有 None。下一個是 Some("success!"),是因為 first_try、second try、third_try 中都沒有 None。
.any() 和 .all() 在疊代器中非常容易使用。它們根據你的輸入回傳 bool 值。在這個例子中,我們做了一個非常大的向量(大約 20000 個元素),包含了從 'a' 到 '働' 的所有字元。然後我們建立函式來檢查是否有某個字元在其中。
接下來我們做一個比較小的向量,問它是否全部都是字母(用 .is_alphabetic() 方法)。然後我們問它是否所有的字元都小於韓文字 '행'。
還要注意的是你要傳一個參考進去,因為 .iter() 也會給出參考,你需要用傳進去的 & 和另一個 & 進行比較。
fn in_char_vec(char_vec: &Vec<char>, check: char) { println!("Is {} inside? {}", check, char_vec.iter().any(|&char| char == check)); } fn main() { let char_vec = ('a'..'働').collect::<Vec<char>>(); in_char_vec(&char_vec, 'i'); in_char_vec(&char_vec, '뷁'); in_char_vec(&char_vec, '鑿'); let smaller_vec = ('A'..'z').collect::<Vec<char>>(); println!("All alphabetic? {}", smaller_vec.iter().all(|&x| x.is_alphabetic())); println!("All less than the character 행? {}", smaller_vec.iter().all(|&x| x < '행')); }
印出:
Is i inside? true
Is 뷁 inside? false
Is 鑿 inside? false
All alphabetic? false
All less than the character 행? true
順便說,.any() 只檢查到它第一個匹配的元素,然後就停止了。如果它已經找到了匹配結果,它就不會檢查所有的元素。如果你要在向量上使用 .any(),最好把可能會匹配的元素放前面。或者你可以在 .iter() 之後使用 .rev() 來反向疊代。這是這樣的向量:
fn main() { let mut big_vec = vec![6; 1000]; big_vec.push(5); }
所以這個 Vec 有 1000 個 6,後面還有一個 5。讓我們假裝來用 .any() 看看它是否包含 5。首先讓我們確定 .rev() 有效。記住,Iterator 總是有 .next(),能讓你檢查它每次做了什麼。
fn main() { let mut big_vec = vec![6; 1000]; big_vec.push(5); let mut iterator = big_vec.iter().rev(); println!("{:?}", iterator.next()); println!("{:?}", iterator.next()); }
印出:
Some(5)
Some(6)
我們是對的:有一個 Some(5),然後開始 1000 個 Some(6)。所以我們可以這樣寫:
fn main() { let mut big_vec = vec![6; 1000]; big_vec.push(5); println!("{:?}", big_vec.iter().rev().any(|&number| number == 5)); }
而且因為是 .rev(),所以它只呼叫 .next() 一次就停止。如果我們不用 .rev(),那麼它將呼叫 .next() 1001次才停止。這段程式碼秀出這件事:
fn main() { let mut big_vec = vec![6; 1000]; big_vec.push(5); let mut counter = 0; // 開始計數 let mut big_iter = big_vec.into_iter(); // 做出 Iterator loop { counter +=1; if big_iter.next() == Some(5) { // 持續呼叫 .next() 直到我們得到 Some(5) break; } } println!("Final counter is: {}", counter); }
這裡印出 Final counter is: 1001,所以我們知道它必須呼叫 .next() 1001 次才能找到 5。
.find() 告訴你疊代器裡是否有某個東西,而 .position() 則告訴你它在哪裡。.find() 與 .any() 不同是因為它回傳裡面有值的 Option(或 None)。與此同時,.position() 也是帶有位置號碼的 Option,或著 None。換句話說:
.find(): "我會試著找給你".position():"我會試著找看看在哪裡告訴你"
這是簡單的範例:
fn main() { let num_vec = vec![10, 20, 30, 40, 50, 60, 70, 80, 90, 100]; println!("{:?}", num_vec.iter().find(|&number| number % 3 == 0)); // find 接受參考, 所以我們給它 &number println!("{:?}", num_vec.iter().find(|&number| number * 2 == 30)); println!("{:?}", num_vec.iter().position(|&number| number % 3 == 0)); println!("{:?}", num_vec.iter().position(|&number| number * 2 == 30)); }
印出:
Some(30) // This is the number itself
None // No number inside times 2 == 30
Some(2) // This is the position
None
有了 .cycle() 你可以建立無窮迴圈的疊代器。這種型別的疊代器能和 .zip() 很好地結合在一起用來建立新東西,就像建立 Vec<(i32, &str)> 的這個例子:
fn main() { let even_odd = vec!["even", "odd"]; let even_odd_vec = (0..6) .zip(even_odd.into_iter().cycle()) .collect::<Vec<(i32, &str)>>(); println!("{:?}", even_odd_vec); }
所以,即使 .cycle() 可能永遠不會結束,但當把它們 zip 在一起時,另一個疊代器只運作了六次。也就是說,.cycle() 所產生的疊代器不會再被 .next() 呼叫,所以六次之後就完成了。輸出:
[(0, "even"), (1, "odd"), (2, "even"), (3, "odd"), (4, "even"), (5, "odd")]
類似的事情也可以用沒有結尾的範圍來做到。如果你寫 0..,那麼你就建立出永不停止的範圍。你可以很容易地使用這個方法:
fn main() { let ten_chars = ('a'..).take(10).collect::<Vec<char>>(); let skip_then_ten_chars = ('a'..).skip(1300).take(10).collect::<Vec<char>>(); println!("{:?}", ten_chars); println!("{:?}", skip_then_ten_chars); }
兩者都是印出十個字元,但第二個跳過 1300 位置,印出亞美尼亞語的十個字母。
['a', 'b', 'c', 'd', 'e', 'f', 'g', 'h', 'i', 'j']
['յ', 'ն', 'շ', 'ո', 'չ', 'պ', 'ջ', 'ռ', 'ս', 'վ']
另一種流行的方法叫做 .fold()。這個方法經常用於將疊代器中的元素加在一起,但你也可以做更多的事情。它和 .for_each() 有些類似。在 .fold() 中,你首先新增起始值 (如果你要把元素加在一起,那就是 0),再逗號,然後是閉包。閉包給你兩個元素:到目前為止的總和和下一個元素。首先這個簡單的範例秀出 .fold() 怎麼將元素加在一起:
fn main() { let some_numbers = vec![9, 6, 9, 10, 11]; println!("{}", some_numbers .iter() .fold(0, |total_so_far, next_number| total_so_far + next_number) ); }
過程是:
- 第 1 步是從 0 開始,並加上下個數字:9。
- 然後把 9 再加上 6:15。
- 然後把 15 再加上 9: 24。
- 然後把 24,再加上 10:34。
- 最後把 34,再加上 11:45。所以它印出了
45。
但是你不是只能用它來加上東西。在這裡的範例我們把每一個字元上加一個 '-',來做出 String。
fn main() { let a_string = "I don't have any dashes in me."; println!( "{}", a_string .chars() // 現在是個疊代器了 .fold("-".to_string(), |mut string_so_far, next_char| { // 從字串 "-" 開始. 每次把它代入成為可變的字串並跟著下個字元 string_so_far.push(next_char); // 把字完推進去, 再來是 '-' string_so_far.push('-'); string_so_far} // 別忘記傳到下一個迴圈 )); }
印出:
-I- -d-o-n-'-t- -h-a-v-e- -a-n-y- -d-a-s-h-e-s- -i-n- -m-e-.-
還有許多其他方便的方法,比如:
.take_while()只要一直從閉包得到true,就會帶元素到新的疊代器 (例如take while x > 5).cloned()會對疊代器內的元素做克隆。這將會把參考傳換成值。.by_ref()會讓疊代器取得參考。這很好的保證你在使用Vec或類似的東西來做疊代器後還可以使用它。- 許多其他名稱中有
_while的方法:.skip_while()、.map_while()等等。 .sum():就是把所有的東西加在一起。
.chunks() 和 .windows() 是將向量切割成你想要的尺寸的兩種方式。你把想要的尺寸放在括號裡。比如說你有個 10 個元素的向量,你想要 3 個的尺寸,它的工作原理是這樣:
-
.chunks()會給你 4 個切片(slice):[0, 1, 2], 然後是[3, 4, 5], 再來是[6, 7, 8], 最後是[9]。所以它會嘗試用三個元素做一個切片,但如果它沒有三個元素,那麼它也不會恐慌。它只會給你剩下的東西。 -
.windows()會先給你一個[0, 1, 2]的切片。然後它將會移過去下一個元素,給你[1, 2, 3]。它會一直這樣做到終於到達最後三個元素的切片時才停止。
所以讓我們在簡單的數字向量上使用它們。看起來像這樣:
fn main() { let num_vec = vec![1, 2, 3, 4, 5, 6, 7, 8, 9, 0]; for chunk in num_vec.chunks(3) { println!("{:?}", chunk); } println!(); for window in num_vec.windows(3) { println!("{:?}", window); } }
印出:
[1, 2, 3]
[4, 5, 6]
[7, 8, 9]
[0]
[1, 2, 3]
[2, 3, 4]
[3, 4, 5]
[4, 5, 6]
[5, 6, 7]
[6, 7, 8]
[7, 8, 9]
[8, 9, 0]
順便說一下,如果你什麼都不給它,.chunks() 會恐慌。你可以寫 .chunks(1000) 給只有一個元素的向量,但你不能寫 .chunks() 給任何長度為 0 的東西。 如果你點選了文件裡的 [src] 你可以看到它就在函式原始碼之中,因為它說 assert!(chunk_size != 0);。
.match_indices() 讓你把 String 或 &str 裡面所有符合你的輸入的東西都拿出來,並給你索引。它與 .enumerate() 類似,因為它回傳包含兩個元素的元組。
fn main() { let rules = "Rule number 1: No fighting. Rule number 2: Go to bed at 8 pm. Rule number 3: Wake up at 6 am."; let rule_locations = rules.match_indices("Rule").collect::<Vec<(_, _)>>(); // 這是 Vec<usize, &str> 但我們只告訴 Rust 去決定 println!("{:?}", rule_locations); }
This prints:
[(0, "Rule"), (28, "Rule"), (62, "Rule")]
.peekable() 讓你建立可以偷看到 (peek at) 下一個元素的疊代器。除了疊代器不會移動外,它就像呼叫 .next() (它給你 Option),所以你可以隨意使用它。實際上你可以把 peekable 想成是 "可停止"的,因為你可以想停多久就停多久。這裡的範例是我們對每個元素都使用 .peek() 三次。我們可以永遠使用 .peek(),直到我們使用 .next() 移動到下一個元素。
fn main() { let just_numbers = vec![1, 5, 100]; let mut number_iter = just_numbers.iter().peekable(); // 這裡實際上建立了一種叫作 Peekable 的疊代器 for _ in 0..3 { println!("I love the number {}", number_iter.peek().unwrap()); println!("I really love the number {}", number_iter.peek().unwrap()); println!("{} is such a nice number", number_iter.peek().unwrap()); number_iter.next(); } }
印出:
I love the number 1
I really love the number 1
1 is such a nice number
I love the number 5
I really love the number 5
5 is such a nice number
I love the number 100
I really love the number 100
100 is such a nice number
這是另一個範例,我們使用 .peek() 匹配一個元素。使用完後,我們呼叫 .next()。
fn main() { let locations = vec![ ("Nevis", 25), ("Taber", 8428), ("Markerville", 45), ("Cardston", 3585), ]; let mut location_iter = locations.iter().peekable(); while location_iter.peek().is_some() { match location_iter.peek() { Some((name, number)) if *number < 100 => { // .peek() 給我們的是參考所以需要 * println!("Found a hamlet: {} with {} people", name, number) } Some((name, number)) => println!("Found a town: {} with {} people", name, number), None => break, } location_iter.next(); } }
印出:
Found a hamlet: Nevis with 25 people
Found a town: Taber with 8428 people
Found a hamlet: Markerville with 45 people
Found a town: Cardston with 3585 people
最後,這個範例我們也有用 .match_indices()。在這個例子中,我們根據 &str 中的空格數,將名字放入 struct 中。
#[derive(Debug)] struct Names { one_word: Vec<String>, two_words: Vec<String>, three_words: Vec<String>, } fn main() { let vec_of_names = vec![ "Caesar", "Frodo Baggins", "Bilbo Baggins", "Jean-Luc Picard", "Data", "Rand Al'Thor", "Paul Atreides", "Barack Hussein Obama", "Bill Jefferson Clinton", ]; let mut iter_of_names = vec_of_names.iter().peekable(); let mut all_names = Names { // 開始空的 Names 結構體 one_word: vec![], two_words: vec![], three_words: vec![], }; while iter_of_names.peek().is_some() { let next_item = iter_of_names.next().unwrap(); // 我們可以用 .unwrap() 因為我們知道寫它是 Some match next_item.match_indices(' ').collect::<Vec<_>>().len() { // 用 .match_indices 建立快速向量並檢查長度 0 => all_names.one_word.push(next_item.to_string()), 1 => all_names.two_words.push(next_item.to_string()), _ => all_names.three_words.push(next_item.to_string()), } } println!("{:?}", all_names); }
會印出:
Names { one_word: ["Caesar", "Data"], two_words: ["Frodo Baggins", "Bilbo Baggins", "Jean-Luc Picard", "Rand Al\'Thor", "Paul Atreides"], three_words:
["Barack Hussein Obama", "Bill Jefferson Clinton"] }
dbg! 巨集和 .inspect
dbg! 是個非常有用的巨集,用來印出快速資訊。它是代替 println! 的好選擇,因為它輸入的速度更快,提供的資訊更多:
fn main() { let my_number = 8; dbg!(my_number); }
印出 [src\main.rs:4] my_number = 8。
但實際上,你可以把 dbg! 放在其他許多地方,甚至可以把程式碼包在裡面。查看以此為例的程式碼:
fn main() { let mut my_number = 9; my_number += 10; let new_vec = vec![8, 9, 10]; let double_vec = new_vec.iter().map(|x| x * 2).collect::<Vec<i32>>(); }
這段程式碼建立新的可變數字,並且改變了它。然後再建立向量,並使用 iter、map 和 collect 建立新的向量。我們可以把 dbg! 放在幾乎是這段程式碼的任何地方。dbg! 問編譯器:"這個當下你在做什麼?",並且告訴你:
fn main() { let mut my_number = dbg!(9); dbg!(my_number += 10); let new_vec = dbg!(vec![8, 9, 10]); let double_vec = dbg!(new_vec.iter().map(|x| x * 2).collect::<Vec<i32>>()); dbg!(double_vec); }
所以會印出:
[src\main.rs:3] 9 = 9
和:
[src\main.rs:4] my_number += 10 = ()
和:
[src\main.rs:6] vec![8, 9, 10] = [
8,
9,
10,
]
還有這個,甚至可以秀出表示式的值:
[src\main.rs:8] new_vec.iter().map(|x| x * 2).collect::<Vec<i32>>() = [
16,
18,
20,
]
和:
[src\main.rs:10] double_vec = [
16,
18,
20,
]
.inspect 與 dbg! 有點類似,用起來就像在疊代器中用 map 一樣。它給你疊代的元素,你可以印出來或者做任何你想做的事情。例如,讓我們再來看看 double_vec。
fn main() { let new_vec = vec![8, 9, 10]; let double_vec = new_vec .iter() .map(|x| x * 2) .collect::<Vec<i32>>(); }
我們想知道更多關於程式碼做了什麼的資訊。所以我們在兩個地方新增 inspect():
fn main() { let new_vec = vec![8, 9, 10]; let double_vec = new_vec .iter() .inspect(|first_item| println!("The item is: {}", first_item)) .map(|x| x * 2) .inspect(|next_item| println!("Then it is: {}", next_item)) .collect::<Vec<i32>>(); }
印出:
The item is: 8
Then it is: 16
The item is: 9
Then it is: 18
The item is: 10
Then it is: 20
而且因為 .inspect 接受的是閉包,所以我們可以隨意寫:
fn main() { let new_vec = vec![8, 9, 10]; let double_vec = new_vec .iter() .inspect(|first_item| { println!("The item is: {}", first_item); match **first_item % 2 { // 第一個元素是 &&i32 所以我們用 ** 0 => println!("It is even."), _ => println!("It is odd."), } println!("In binary it is {:b}.", first_item); }) .map(|x| x * 2) .collect::<Vec<i32>>(); }
印出:
The item is: 8
It is even.
In binary it is 1000.
The item is: 9
It is odd.
In binary it is 1001.
The item is: 10
It is even.
In binary it is 1010.
&str 的種類
&str 的種類不止一個。我們有:
- 字串字面常數 (String literal):當你寫
let my_str = "I am a &str"的時候,就會產生這種字串。它們在整個程式中持續存在,因為它們是直接寫進二進位檔案中的,它們的型別是&'static str。'是表示它的生命週期 (lifetime),字串字面常數有著稱為static的生命週期。 - 借用字串 (Borrowed str):這是沒有
static生命週期的&str的常規形式。如果你建立String並得到了它的參考,Rust 會在你需要它時把它轉換為&str。例如:
fn prints_str(my_str: &str) { // 可以像 &str 般使用 &String println!("{}", my_str); } fn main() { let my_string = String::from("I am a string"); prints_str(&my_string); // 我們傳給 prints_str 的型別是 &String }
那什麼是生命週期呢?我們馬上會學到。
生命週期
生命週期的意思是"變數存活得有多久"。你只需要思考參考的生命週期。這是因為參考不能存活得比它們所來自的物件更久。例如說這個函式就不能執行:
fn returns_reference() -> &str { let my_string = String::from("I am a string"); &my_string // ⚠️ } fn main() {}
問題在於 my_string 只存活在 returns_reference 的範圍裡。我們試著回傳 &my_string,但是 &my_string 不能存在於沒有 my_string 的地方。所以編譯器會說不行。
這段程式碼也不能執行。
fn returns_str() -> &str { let my_string = String::from("I am a string"); "I am a str" // ⚠️ } fn main() { let my_str = returns_str(); println!("{}", my_str); }
但是幾乎要成功了。編譯器卻說:
error[E0106]: missing lifetime specifier
--> src\main.rs:6:21
|
6 | fn returns_str() -> &str {
| ^ expected named lifetime parameter
|
= help: this function's return type contains a borrowed value, but there is no value for it to be borrowed from
help: consider using the `'static` lifetime
|
6 | fn returns_str() -> &'static str {
| ^^^^^^^^
missing lifetime specifier 的意思是,我們需要加上表示生命週期的 '。然後它說 contains a borrowed value, but there is no value for it to be borrowed from。也就是說,I am a str 不是借來的。它說 consider using the 'static lifetime 要寫成 &'static str。因此它認為我們應該嘗試說這是個字串字面常數。
現在可以執行了:
fn returns_str() -> &'static str { let my_string = String::from("I am a string"); "I am a str" } fn main() { let my_str = returns_str(); println!("{}", my_str); }
這是因為我們回傳了生命週期是 static 的 &str。同時,my_string 只能以 String 的型別回傳:我們不能回傳對它的參考,因為它將在下一行死亡。
所以現在 fn returns_str() -> &'static str 告訴Rust,"別擔心,我們只會回傳字串字面常數"。字串字面常數存活在整個程式中,所以 Rust 很高興。你會注意到,這與泛型類似。當我們告訴編譯器像似 <T: Display> 的東西時,我們承諾的是我們將只會使用有 Display 特徵的輸入。生命週期也類似:我們並沒有改變任何變數的生命週期。我們只是告訴編譯器輸入的生命週期會是什麼。
但是 'static 並不是唯一的生命週期。實際上,每個變數都有一個生命週期,但通常我們不必寫出來。編譯器很聰明,通常都能自己想出來。只有在編譯器不知道的時候,我們才需要去寫出生命週期。
這是另一個生命週期的範例。想像一下,我們想建立 City 結構體,並給它 &str 的名字。我們可能想這樣做是因為效能比用 String 還快。所以我們寫成這樣,但還不能執行:
#[derive(Debug)] struct City { name: &str, // ⚠️ date_founded: u32, } fn main() { let my_city = City { name: "Ichinomiya", date_founded: 1921, }; }
編譯器說:
error[E0106]: missing lifetime specifier
--> src\main.rs:3:11
|
3 | name: &str,
| ^ expected named lifetime parameter
|
help: consider introducing a named lifetime parameter
|
2 | struct City<'a> {
3 | name: &'a str,
|
Rust 需要 &str 的生命週期,因為 &str 是個參考。如果 name 指向的值被丟棄 (drop) 了會怎樣?那就不安全 (unsafe) 了。
那麼 'static 呢,能用嗎?我們以前用過。讓我們試試吧:
#[derive(Debug)] struct City { name: &'static str, // 把 &str 改成 &'static str date_founded: u32, } fn main() { let my_city = City { name: "Ichinomiya", date_founded: 1921, }; println!("{} was founded in {}", my_city.name, my_city.date_founded); }
好的,這就可以了。也許這就是你想要的結構體。不過,要注意我們只能接受"字串字面常數",所以不能接受對其他東西的參考。所以這將無法執行:
#[derive(Debug)] struct City { name: &'static str, // 一定要在整個程式裡存活 date_founded: u32, } fn main() { let city_names = vec!["Ichinomiya".to_string(), "Kurume".to_string()]; // city_names 沒有存活在整個程式 let my_city = City { name: &city_names[0], // ⚠️ 這是個 &str, 但不是 &'static str. 這是對 city_names 裡面的值的參考 date_founded: 1921, }; println!("{} was founded in {}", my_city.name, my_city.date_founded); }
編譯器說:
error[E0597]: `city_names` does not live long enough
--> src\main.rs:12:16
|
12 | name: &city_names[0],
| ^^^^^^^^^^
| |
| borrowed value does not live long enough
| requires that `city_names` is borrowed for `'static`
...
18 | }
| - `city_names` dropped here while still borrowed
這一點很重要,因為我們給它的參考其實活得夠久了。但是我們承諾的只有給它 &'static str,這就是問題所在。
所以現在我們就試試之前編譯器的建議。它說嘗試寫成 struct City<'a> 和 name: &'a str。這就意味著,只有當 name 活得和 City 一樣久的情況下,它才會接受 name 的參考。
#[derive(Debug)] struct City<'a> { // City 的生命週期是 'a name: &'a str, // 且 name 的生命週期也是 'a. date_founded: u32, } fn main() { let city_names = vec!["Ichinomiya".to_string(), "Kurume".to_string()]; let my_city = City { name: &city_names[0], date_founded: 1921, }; println!("{} was founded in {}", my_city.name, my_city.date_founded); }
另外要記住,如果你願意你可以寫任何東西來代替 'a。這也和在泛型裡我們寫 T 和 U 時類似,但實際上可以寫任何東西。
#[derive(Debug)] struct City<'city> { // 這裡的生命週期名稱叫做 'city name: &'city str, // 並且 name 有著 'city 生命週期 date_founded: u32, } fn main() {}
所以通常都會寫做 'a, 'b, 'c 等等,因為這是快速且常用的寫法。但如果你想的話,你永遠都可以更改。有個好建議是,把生命週期名稱改成 "人類可讀(human-readable)" 的名字有助於閱讀理解程式碼,尤其是程式碼非常複雜時。
讓我們再來看看與用在泛型的特徵的比較。比如說:
use std::fmt::Display; fn prints<T: Display>(input: T) { println!("T is {}", input); } fn main() {}
當你寫 T: Display 的時候,它的意思是"只有在 T 有 Display 時,才接受 T"。
而不是說:"我把 Display 給予 T"。
對於生命週期也是如此。當你在這裡寫 'a:
#[derive(Debug)] struct City<'a> { name: &'a str, date_founded: u32, } fn main() {}
意思是"如果 name 的生命週期至少與 City 一樣久,才接受 name 的輸入"。
它的意思不是說:"我會讓 name 的輸入與 City 活得一樣久"。
現在我們可以學到有關先前見過的 <'_>。這被稱為"匿名生命週期",它是參考被使用時的指示器。例如,當你在實現結構時,Rust 會向你建議使用。這裡有個幾乎可以但還不能用的結構體:
// ⚠️ struct Adventurer<'a> { name: &'a str, hit_points: u32, } impl Adventurer { fn take_damage(&mut self) { self.hit_points -= 20; println!("{} has {} hit points left!", self.name, self.hit_points); } } fn main() {}
所以我們對 struct 做了我們需要做的事情:首先我們說 name 來自於 &str。這就意味著我們需要生命週期,所以我們給了它 <'a>。然後我們必須對 struct 做同樣的處理,以證明它們至少和這個生命週期一樣久。但是 Rust 卻告訴我們要這樣做:
error[E0726]: implicit elided lifetime not allowed here
--> src\main.rs:6:6
|
6 | impl Adventurer {
| ^^^^^^^^^^- help: indicate the anonymous lifetime: `<'_>`
它想讓我們加上那個匿名生命週期,以表明有個參考被使用。所以如果我們這樣寫,它就會很高興:
struct Adventurer<'a> { name: &'a str, hit_points: u32, } impl Adventurer<'_> { fn take_damage(&mut self) { self.hit_points -= 20; println!("{} has {} hit points left!", self.name, self.hit_points); } } fn main() {}
這個生命週期是為了讓你不必總是寫諸如 impl<'a> Adventurer<'a> 這樣的東西,因為結構體已經寫出了生命週期。
在 Rust 中,生命週期是可以很困難的,但這裡有一些技巧可以在面對它們時避免感到太大的壓力:
- 如果你想在當下避免它們,你可以繼續使用擁有所有權的型別,使用克隆等。
- 很多時候,當編譯器想要生命週期的時候,到頭來你只要在這裡和那裡寫上
<'a>就可以用了。這只是一種"別擔心,我不會給你任何活得不夠久的東西"的說法。 - 你可以每次只探索生命週期一些些。寫一些擁有所有權的數值的程式碼,然後把其中一個變成參考。編譯器會開始抱怨,但也會給出一些建議。如果它變得太複雜,你可以撤銷它,下次再試。
讓我們用我們的程式碼來這麼做,看看編譯器會怎麼說。首先我們回去把生命週期去掉,同時也實作 Display。Display 就會印出 Adventurer 的名字。
// ⚠️ struct Adventurer { name: &str, hit_points: u32, } impl Adventurer { fn take_damage(&mut self) { self.hit_points -= 20; println!("{} has {} hit points left!", self.name, self.hit_points); } } impl std::fmt::Display for Adventurer { fn fmt(&self, f: &mut std::fmt::Formatter<'_>) -> std::fmt::Result { write!(f, "{} has {} hit points.", self.name, self.hit_points) } } fn main() {}
第一個抱怨就是這個:
error[E0106]: missing lifetime specifier
--> src\main.rs:2:11
|
2 | name: &str,
| ^ expected named lifetime parameter
|
help: consider introducing a named lifetime parameter
|
1 | struct Adventurer<'a> {
2 | name: &'a str,
|
它建議這麼做:在 Adventurer 後面加上 <'a>,以及 &'a str。所以我們照著做:
// ⚠️ struct Adventurer<'a> { name: &'a str, hit_points: u32, } impl Adventurer { fn take_damage(&mut self) { self.hit_points -= 20; println!("{} has {} hit points left!", self.name, self.hit_points); } } impl std::fmt::Display for Adventurer { fn fmt(&self, f: &mut std::fmt::Formatter<'_>) -> std::fmt::Result { write!(f, "{} has {} hit points.", self.name, self.hit_points) } } fn main() {}
現在它對那些部分很滿意了,但對 impl 區塊不太確定。它想要我們提示正在使用參考:
error[E0726]: implicit elided lifetime not allowed here
--> src\main.rs:6:6
|
6 | impl Adventurer {
| ^^^^^^^^^^- help: indicate the anonymous lifetime: `<'_>`
error[E0726]: implicit elided lifetime not allowed here
--> src\main.rs:12:28
|
12 | impl std::fmt::Display for Adventurer {
| ^^^^^^^^^^- help: indicate the anonymous lifetime: `<'_>`
好了,我們將這些寫進去......現在它通過編譯了!現在我們可以做出 Adventurer,然後用它做些事。
struct Adventurer<'a> { name: &'a str, hit_points: u32, } impl Adventurer<'_> { fn take_damage(&mut self) { self.hit_points -= 20; println!("{} has {} hit points left!", self.name, self.hit_points); } } impl std::fmt::Display for Adventurer<'_> { fn fmt(&self, f: &mut std::fmt::Formatter<'_>) -> std::fmt::Result { write!(f, "{} has {} hit points.", self.name, self.hit_points) } } fn main() { let mut billy = Adventurer { name: "Billy", hit_points: 100_000, }; println!("{}", billy); billy.take_damage(); }
印出:
Billy has 100000 hit points.
Billy has 99980 hit points left!
所以你可以看到,編譯器往往只是想要確定生命週期。而且它通常很聰明,幾乎可以猜到你想要的生命週期,只是需要你告訴它,它就可以確定了。
內部可變性
Cell
內部可變性(Interior mutability) 的意思是在內部有一點可變性。還記得在 Rust 中,你需要用 mut 來改變變數嗎?也有一些方式能在不用 mut 這個詞時來改變它們。這是因為 Rust 有一些方式可以讓你安全地改變在不可變的結構體裡面的值。每一種方式都遵循一些規則,確保改變值時仍然是安全的。
首先,讓我們看看我們會想要這樣做的簡單範例。想像有個有很多欄位叫做 PhoneModel 的結構體:
struct PhoneModel { company_name: String, model_name: String, screen_size: f32, memory: usize, date_issued: u32, on_sale: bool, } fn main() { let super_phone_3000 = PhoneModel { company_name: "YY Electronics".to_string(), model_name: "Super Phone 3000".to_string(), screen_size: 7.5, memory: 4_000_000, date_issued: 2020, on_sale: true, }; }
PhoneModel 中的欄位最好是不可變的,因為我們不希望資料改變。比如說 date_issued 和 screen_size 永遠不會變。
但是裡面有個欄位叫 on_sale。一個手機型號會先是銷售中 (on sale, true),但是後來公司會停賣它。我們能不能只讓這個欄位可變?因為我們不想寫 let mut super_phone_3000。如果我們這樣做,那麼每個欄位都會變得可變。
Rust 有很多方式可以讓一些不可變的東西裡面允許有一些安全的可變性,最簡單的方式叫做 Cell。首先我們宣告 use std::cell::Cell,這樣我們就可以每次只寫 Cell 而不是 std::cell::Cell。
然後我們把 on_sale: bool 改成 on_sale: Cell<bool>。現在它不是 bool:它是個容納了 bool 的 Cell。
Cell 有個叫做 .set() 的方法,可以用來改變值。我們用 .set() 把 on_sale: true 改為 on_sale: Cell::new(true)。
use std::cell::Cell; struct PhoneModel { company_name: String, model_name: String, screen_size: f32, memory: usize, date_issued: u32, on_sale: Cell<bool>, } fn main() { let super_phone_3000 = PhoneModel { company_name: "YY Electronics".to_string(), model_name: "Super Phone 3000".to_string(), screen_size: 7.5, memory: 4_000_000, date_issued: 2020, on_sale: Cell::new(true), }; // 10 年後, super_phone_3000 不再銷售了 super_phone_3000.on_sale.set(false); }
Cell 適用於所有型別,但對簡單的 Copy 型別效果最好,因為它給出的是值,而不是參考。Cell 有個叫做 get() 的方法,它只對 Copy 型別有效。
另一個你可以使用的型別是 RefCell。
RefCell
RefCell 是另一種無需宣告 mut 而改變值的方式。它的意思是 "reference cell",就像 Cell,但使用的是參考而不是拷貝 (copy)。
我們將建立 User 結構。到目前為止,你可以看到它與 Cell 類似:
use std::cell::RefCell; #[derive(Debug)] struct User { id: u32, year_registered: u32, username: String, active: RefCell<bool>, // 許多其它欄位 } fn main() { let user_1 = User { id: 1, year_registered: 2020, username: "User 1".to_string(), active: RefCell::new(true), }; println!("{:?}", user_1.active); }
印出 RefCell { value: true }。
RefCell 的方法有很多。其中兩種是 .borrow() 和 .borrow_mut()。使用這些方法,你可以做到與 & 和 &mut 相同的事情。規則都是一樣的:
- 可以有多個不可變借用,
- 可以有一個可變的借用,
- 但不行一起用可變和不可變借用。
所以改變 RefCell 中的值是非常容易的:
#![allow(unused)] fn main() { // 🚧 user_1.active.replace(false); println!("{:?}", user_1.active); }
而且還有很多其他的方法,比如 replace_with 使用的是閉包:
#![allow(unused)] fn main() { // 🚧 let date = 2020; user_1 .active .replace_with(|_| if date < 2000 { true } else { false }); println!("{:?}", user_1.active); }
但是你要小心使用 RefCell,因為它是在執行時期而不是編譯時檢查借用。執行時期是指程式實際執行的時候(在編譯之後)。所以這將會被編譯,即使它是錯誤的:
use std::cell::RefCell; #[derive(Debug)] struct User { id: u32, year_registered: u32, username: String, active: RefCell<bool>, // 許多其它欄位 } fn main() { let user_1 = User { id: 1, year_registered: 2020, username: "User 1".to_string(), active: RefCell::new(true), }; let borrow_one = user_1.active.borrow_mut(); // 第一個可變借用 - okay let borrow_two = user_1.active.borrow_mut(); // 第二個可變借用 - 不 okay }
但如果你執行它,它就會立即恐慌。
thread 'main' panicked at 'already borrowed: BorrowMutError', C:\Users\mithr\.rustup\toolchains\stable-x86_64-pc-windows-msvc\lib/rustlib/src/rust\src\libcore\cell.rs:877:9
note: run with `RUST_BACKTRACE=1` environment variable to display a backtrace
error: process didn't exit successfully: `target\debug\rust_book.exe` (exit code: 101)
already borrowed: BorrowMutError 是重點。所以當你使用 RefCell 時,最好去編譯並執行來檢查。
Mutex
Mutex(互斥鎖) 是另一種不需要宣告 mut 就能改變數值的方式。互斥鎖的意思是 mutual exclusion,也就是"一次只能改一個"。這就是為什麼 Mutex 是安全的,因為它每次只讓一個執行緒改變它。為了做到這一點,它使用了 .lock()。Lock 就像從裡面鎖上門。你進入房間,鎖上門,現在你可以在房間裡面改變東西。別人不能進來阻止你,因為你把門鎖上了。
透過範例更容易理解 Mutex:
use std::sync::Mutex; fn main() { let my_mutex = Mutex::new(5); // 新的 Mutex<i32>. 我們不需要加 mut let mut mutex_changer = my_mutex.lock().unwrap(); // mutex_changer 是個 MutexGuard // 它必須是 mut 因為我們將會改變它 // 現在它能存取 Mutex 了 // 讓我們印 my_mutex 來看: println!("{:?}", my_mutex); // 印出 "Mutex { data: <locked> }" // 因此我們現在不能用 my_mutex 存取資料, // 只能用 mutex_changer println!("{:?}", mutex_changer); // 印出 5. 讓我們改成 6. *mutex_changer = 6; // mutex_changer 是個 MutexGuard<i32> 所以我們用 * 來改變 i32 println!("{:?}", mutex_changer); // 現在它說是 6 }
但是 mutex_changer 做完後還是持有著鎖。我們該如何停止呢?Mutex 在 MutexGuard 超出範圍 (out of scope) 時就會被解鎖。"超出範圍"表示該程式碼區塊已經結束執行。比如說:
use std::sync::Mutex; fn main() { let my_mutex = Mutex::new(5); { let mut mutex_changer = my_mutex.lock().unwrap(); *mutex_changer = 6; } // mutex_changer 已經超出範圍 - 現在它不見了. 不再鎖著了 println!("{:?}", my_mutex); // 現在它會說: Mutex { data: 6 } }
如果你不想用不同的 {} 程式碼區塊,你可以使用 std::mem::drop(mutex_changer)。std::mem::drop 的意思是"讓這個超出範圍"。
use std::sync::Mutex; fn main() { let my_mutex = Mutex::new(5); let mut mutex_changer = my_mutex.lock().unwrap(); *mutex_changer = 6; std::mem::drop(mutex_changer); // 丟棄 mutex_changer ── 現在不見了 // 而且 my_mutex 解鎖了 println!("{:?}", my_mutex); // 現在它會說: Mutex { data: 6 } }
你必須小心使用 Mutex,因為如果有另一個變數試圖 lock 它,它將會等待:
use std::sync::Mutex; fn main() { let my_mutex = Mutex::new(5); let mut mutex_changer = my_mutex.lock().unwrap(); // mutex_changer 拿到鎖 let mut other_mutex_changer = my_mutex.lock().unwrap(); // other_mutex_changer 想拿鎖 // 程式正在等 // 還在等 // 又會等到永遠. println!("This will never print..."); }
還有一種方法是 try_lock()。然後它會試一次,如果沒能鎖上就會放棄。try_lock().unwrap() 就不做了,因為如果不成功它就會恐慌。if let 或 match 比較好:
use std::sync::Mutex; fn main() { let my_mutex = Mutex::new(5); let mut mutex_changer = my_mutex.lock().unwrap(); let mut other_mutex_changer = my_mutex.try_lock(); // 試著拿到鎖 if let Ok(value) = other_mutex_changer { println!("The MutexGuard has: {}", value) } else { println!("Didn't get the lock") } }
另外,你不需要做出變數來改變 Mutex。你可以直接這樣做:
use std::sync::Mutex; fn main() { let my_mutex = Mutex::new(5); *my_mutex.lock().unwrap() = 6; println!("{:?}", my_mutex); }
*my_mutex.lock().unwrap() = 6; 的意思是"解鎖 my_mutex 並使其成為 6"。沒有任何變數來儲存它,所以你不需要呼叫 std::mem::drop。如果你願意,你可以做 100 次──這不要緊:
use std::sync::Mutex; fn main() { let my_mutex = Mutex::new(5); for _ in 0..100 { *my_mutex.lock().unwrap() += 1; // 上鎖又解鎖 100 次 } println!("{:?}", my_mutex); }
RwLock
RwLock 的意思是"讀寫鎖"。它像 Mutex,但也像 RefCell。你用 .write().unwrap() 代替 .lock().unwrap() 來改變它。但你也可以用 .read().unwrap() 來獲得讀取許可權。它像是 RefCell 一樣遵循這些規則:
- 可以有很多
.read()變數, - 可以有一個
.write()變數, - 但不能有多個
.write()或同時有.read()與.write()。
如果在無法存取的情況下嘗試 .write()時,程式將會永遠執行:
use std::sync::RwLock; fn main() { let my_rwlock = RwLock::new(5); let read1 = my_rwlock.read().unwrap(); // 一個 .read() 很好 let read2 = my_rwlock.read().unwrap(); // 二個 .read() 也很好 println!("{:?}, {:?}", read1, read2); let write1 = my_rwlock.write().unwrap(); // 噢哦, 現在程式會永遠等待 }
所以我們用 std::mem::drop,就像用 Mutex 一樣。
use std::sync::RwLock; use std::mem::drop; // 我們將會使用 drop() 許多次 fn main() { let my_rwlock = RwLock::new(5); let read1 = my_rwlock.read().unwrap(); let read2 = my_rwlock.read().unwrap(); println!("{:?}, {:?}", read1, read2); drop(read1); drop(read2); // 一起丟棄, 那現在我們才能使用 .write() let mut write1 = my_rwlock.write().unwrap(); *write1 = 6; drop(write1); println!("{:?}", my_rwlock); }
而且你也可以使用 try_read() 和 try_write()。
use std::sync::RwLock; fn main() { let my_rwlock = RwLock::new(5); let read1 = my_rwlock.read().unwrap(); let read2 = my_rwlock.read().unwrap(); if let Ok(mut number) = my_rwlock.try_write() { *number += 10; println!("Now the number is {}", number); } else { println!("Couldn't get write access, sorry!") }; }
Cow
Cow 是一種非常方便的列舉。它的意思是"寫時克隆",如果你不需要 String,可以回傳 &str,如果你需要就回傳 String。(它也可以對陣列與向量等等做同樣的處理)。
為了理解它,我們看一下簽名。它說:
pub enum Cow<'a, B> where B: 'a + ToOwned + ?Sized, { Borrowed(&'a B), Owned(<B as ToOwned>::Owned), } fn main() {}
你馬上就知道,'a 意味著它可以和參考一起用。ToOwned 特徵意味著它是個可以轉換成具有擁有權的型別。例如,str 通常是參考(&str),你可以把它轉換成具有擁有權的 String。
接下來是 ?Sized。這意味著"也許是 Sized,但也許不是"。Rust 中幾乎每個型別都是 Sized 的,但像 str 這樣的型別卻不是。這就是為什麼我們需要附帶 & 給 str,因為編譯器不知道大小。所以如果你想要可以用像是 str 的特徵,你可以加上 ?Sized。
接下來是 enum 的變體。它們是 Borrowed 和 Owned。
想像你有個回傳 Cow<'static, str> 的函式。如果你告訴函式回傳 "My message".into(),它就會檢視型別:"My message"是 str。這是個 Borrowed 型別,所以它選擇 Borrowed(&'a B)。那它就變成了 Cow::Borrowed(&'static str)。
而如果你給它 format!("{}", "My message").into(),那麼它就會檢視型別。這次是個 String,因為 format! 做出 String。那這次就會選擇 "Owned"。
這是個測試 Cow 的範例。我們將把數字放入會回傳 Cow<'static, str> 的函式中。根據這個數字,它會建立 &str 或 String。然後用 .into() 將其變成 Cow。這樣做的時候,它就會選擇 Cow::Borrowed 或者 Cow::Owned 其中之一。那我們就匹配看看它選的是哪一個。
use std::borrow::Cow; fn modulo_3(input: u8) -> Cow<'static, str> { match input % 3 { 0 => "Remainder is 0".into(), 1 => "Remainder is 1".into(), remainder => format!("Remainder is {}", remainder).into(), } } fn main() { for number in 1..=6 { match modulo_3(number) { Cow::Borrowed(message) => println!("{} went in. The Cow is borrowed with this message: {}", number, message), Cow::Owned(message) => println!("{} went in. The Cow is owned with this message: {}", number, message), } } }
印出:
1 went in. The Cow is borrowed with this message: Remainder is 1
2 went in. The Cow is owned with this message: Remainder is 2
3 went in. The Cow is borrowed with this message: Remainder is 0
4 went in. The Cow is borrowed with this message: Remainder is 1
5 went in. The Cow is owned with this message: Remainder is 2
6 went in. The Cow is borrowed with this message: Remainder is 0
Cow 還有一些其他方法,像是 into_owned 或者 into_borrowed,如果你需要就可以改變它。
類型別名
類型別名 (Type alias) 的意思是"給某個型別新名字"。類型別名非常簡單。通常你會使用在有個很長的型別,而又不想每次都寫它時。或是當你想給型別取個更好的名字方便記憶時,也可以使用它。這裡有兩個類型別名的範例。
這裡的型別不難,但是你想讓你的程式碼更容易被其他人(或者你自己)理解:
type CharacterVec = Vec<char>; fn main() {}
這裡是種非常難以閱讀的型別:
// 這個回傳型別超長 fn returns<'a>(input: &'a Vec<char>) -> std::iter::Take<std::iter::Skip<std::slice::Iter<'a, char>>> { input.iter().skip(4).take(5) } fn main() {}
所以你可以改成這樣:
type SkipFourTakeFive<'a> = std::iter::Take<std::iter::Skip<std::slice::Iter<'a, char>>>; fn returns<'a>(input: &'a Vec<char>) -> SkipFourTakeFive { input.iter().skip(4).take(5) } fn main() {}
當然你也可以匯入型別,讓它更短:
use std::iter::{Take, Skip}; use std::slice::Iter; fn returns<'a>(input: &'a Vec<char>) -> Take<Skip<Iter<'a, char>>> { input.iter().skip(4).take(5) } fn main() {}
所以你可以根據自己的喜好來決定呈現你的程式碼的最佳方式。
請注意這並沒有建立實際的新型別。它只是替代現有型別的名稱。所以如果你寫了 type File = String;,編譯器只會看到 String。所以將會印出 true:
type File = String; fn main() { let my_file = File::from("I am file contents"); let my_string = String::from("I am file contents"); println!("{}", my_file == my_string); }
那麼如果你想要實際的新型別呢?
如果你想要編譯器看到的是 File 的新檔案型別,你可以把它放在結構體中。(這是所謂的 newtype 慣用寫法)
struct File(String); // File 是個對 String 的封裝 fn main() { let my_file = File(String::from("I am file contents")); let my_string = String::from("I am file contents"); }
現在這樣就不能執行了,因為它們是兩種不同的型別:
struct File(String); // File 是個對 String 的封裝 fn main() { let my_file = File(String::from("I am file contents")); let my_string = String::from("I am file contents"); println!("{}", my_file == my_string); // ⚠️ 無法比較 File 和 String }
如果你想比較裡面的 String,可以用 my_file.0:
struct File(String); fn main() { let my_file = File(String::from("I am file contents")); let my_string = String::from("I am file contents"); println!("{}", my_file.0 == my_string); // my_file.0 是個 String, 因此印出 true }
並且現在這個型別沒有任何特徵,所以你自己可以實作它們。這並不會太意外:
#![allow(unused)] fn main() { #[derive(Clone, Debug)] struct File(String); }
那麼當你使用這裡的 File 型別時,你可以克隆它和用 Debug 印出它,但它不會有 String 的特徵,除非你用 .0 來取得它裡面的 String。但是在其他人的程式碼中,如果它被標記為 pub 公開使用時,你就只能用 .0。而且那也是為什麼這些不同種類的型別會用 Deref 特徵用得相當多。我們會在之後都學到 pub 和 Deref。
在函式中匯入和重新命名
通常你會在程式的頂端寫 use,像這樣:
use std::cell::{Cell, RefCell}; fn main() {}
但我們會看到,你可以在任何地方這樣做,特別是在函式中使用名稱較長的例舉。像這裡的範例:
enum MapDirection { North, NorthEast, East, SouthEast, South, SouthWest, West, NorthWest, } fn main() {} fn give_direction(direction: &MapDirection) { match direction { MapDirection::North => println!("You are heading north."), MapDirection::NorthEast => println!("You are heading northeast."), // 還剩下相當多要打字... // ⚠️ 因為我們沒寫出每個可能出現的變體 } }
所以現在我們要在函數裡面匯入 MapDirection。也就是說,在函數里面你可以直接寫 North 等變體名稱。
enum MapDirection { North, NorthEast, East, SouthEast, South, SouthWest, West, NorthWest, } fn main() {} fn give_direction(direction: &MapDirection) { use MapDirection::*; // 匯入 MapDirection 裡的所有東西 let m = "You are heading"; match direction { North => println!("{} north.", m), NorthEast => println!("{} northeast.", m), // 這比較好一點 // ⚠️ } }
我們已經看到 ::* 的意思是"匯入在 :: 之後的所有內容"。在我們的例子中,這意味著匯入 North、NorthEast、......一直到 NorthWest。你也可以在你匯入別人的程式碼時這樣做,但如果程式碼非常大,你可能會遇到問題。要是它有一些元素和你的程式碼是一樣的呢?所以一般情況下,除非你有把握最好是不要一直使用::*。很多時候你在別人的程式碼裡看到一個叫 prelude 的部分,裡面有你可能需要的所有主要元素。那麼你通常會這樣使用:name::prelude::*。我們將會在 modules 和 crates 的章節中講到更多。
您也可以使用 as 來更改名稱。例如,也許你正在使用別人的程式碼,而你不能改變列舉中的名稱:
enum FileState { CannotAccessFile, FileOpenedAndReady, NoSuchFileExists, SimilarFileNameInNextDirectory, } fn main() {}
那麼你就能 1) 匯入所有東西 並且 2) 更改名稱:
enum FileState { CannotAccessFile, FileOpenedAndReady, NoSuchFileExists, SimilarFileNameInNextDirectory, } fn give_filestate(input: &FileState) { use FileState::{ CannotAccessFile as NoAccess, FileOpenedAndReady as Good, NoSuchFileExists as NoFile, SimilarFileNameInNextDirectory as OtherDirectory }; match input { NoAccess => println!("Can't access file."), Good => println!("Here is your file"), NoFile => println!("Sorry, there is no file by that name."), OtherDirectory => println!("Please check the other directory."), } } fn main() {}
所以現在你可以寫成 OtherDirectory 而不是FileState::SimilarFileNameInNextDirectory。
todo! 巨集
有時你通常想寫點程式碼幫助你想像你的專案。例如,想像一個簡單的專案,會用書籍來做一些事情。這裡是你思考寫下的想法:
struct Book {} // Okay, 首先我需要書籍的結構體. // 還沒有東西在那 - 之後會加入 enum BookType { // 一本書可以是精裝或平裝, 所以加入這個例舉 HardCover, SoftCover, } fn get_book(book: &Book) -> Option<String> {} // ⚠️ get_book 應該要接受 &Book 並回傳 Option<String> fn delete_book(book: Book) -> Result<(), String> {} // delete_book 應該要接受 Book 並回傳 Result... // TODO: impl 區塊和寫出這些函式方法... fn check_book_type(book_type: &BookType) { // 讓我們確定來匹配有成功 match book_type { BookType::HardCover => println!("It's hardcover"), BookType::SoftCover => println!("It's softcover"), } } fn main() { let book_type = BookType::HardCover; check_book_type(&book_type); // Okay, 讓我們來檢查這個函式! }
但 Rust 對 get_book 和 delete_book 不滿意。它說:
error[E0308]: mismatched types
--> src\main.rs:32:29
|
32 | fn get_book(book: &Book) -> Option<String> {}
| -------- ^^^^^^^^^^^^^^ expected enum `std::option::Option`, found `()`
| |
| implicitly returns `()` as its body has no tail or `return` expression
|
= note: expected enum `std::option::Option<std::string::String>`
found unit type `()`
error[E0308]: mismatched types
--> src\main.rs:34:31
|
34 | fn delete_book(book: Book) -> Result<(), String> {}
| ----------- ^^^^^^^^^^^^^^^^^^ expected enum `std::result::Result`, found `()`
| |
| implicitly returns `()` as its body has no tail or `return` expression
|
= note: expected enum `std::result::Result<(), std::string::String>`
found unit type `()`
但是你這時並不關心 get_book 和 delete_book。這就是你能使用 todo!() 的地方。如果你把它加到函式中,Rust 不會抱怨,而且會編譯好。
struct Book {} fn get_book(book: &Book) -> Option<String> { todo!() // todo 的意思是 "我之後會做, 請安靜" } fn delete_book(book: Book) -> Result<(), String> { todo!() } fn main() {}
所以現在程式碼能編譯,你可以看到 check_book_type 的結果:It's hardcover。
但是要小心,因為它只是能編譯--你不能使用函式。如果你呼叫裡面有 todo!() 的函式,它就會恐慌。
另外,todo!() 函式仍然需要真實的輸入和輸出型別。如果你只寫這樣,它將無法編譯:
struct Book {} fn get_book(book: &Book) -> WorldsBestType { // ⚠️ todo!() } fn main() {}
它會說:
error[E0412]: cannot find type `WorldsBestType` in this scope
--> src\main.rs:32:29
|
32 | fn get_book(book: &Book) -> WorldsBestType {
| ^^^^^^^^^^^^^^ not found in this scope
todo!() 其實和另一個巨集一樣:unimplemented!()。程式設計師們經常使用 unimplemented!(),但打字時太長了,所以他們建立了比較短的 todo!()。
Rc
Rc 的意思是 "參考計數器(reference counter)"。你知道在 Rust 中,每個變數只能有一個所有者(owner)。這就是為什麼這個不能執行的原因:
fn takes_a_string(input: String) { println!("It is: {}", input) } fn also_takes_a_string(input: String) { println!("It is: {}", input) } fn main() { let user_name = String::from("User MacUserson"); takes_a_string(user_name); also_takes_a_string(user_name); // ⚠️ }
takes_a_string 拿走 user_name 之後,你就不能再用它了。這樣也沒問題:你可以直接給它 user_name.clone()。但有時變數是某個結構體的一部分,也許你不能克隆這個結構。或者也許 String 真的很長,你不想克隆它。這些都是會有 Rc 的一些原因,它讓你可以有多個所有者。Rc 就像個優秀的辦公人員:Rc 寫下誰擁有所有權,以及有多少個。然後一旦所有者的數量下降到 0,這個變數就可以消失不要了。
這裡告訴你如何使用 Rc。首先想像兩個結構體:一個叫 City,另一個叫 CityData。City 有關於一個城市的資訊,而 CityData 把所有的城市都一起放在 Vec 中。
#[derive(Debug)] struct City { name: String, population: u32, city_history: String, } #[derive(Debug)] struct CityData { names: Vec<String>, histories: Vec<String>, } fn main() { let calgary = City { name: "Calgary".to_string(), population: 1_200_000, // 假裝這個字串非常非常長 city_history: "Calgary began as a fort called Fort Calgary that...".to_string(), }; let canada_cities = CityData { names: vec![calgary.name], // 用 calgary.name 比較短 histories: vec![calgary.city_history], // 但這個字串非常長 }; println!("Calgary's history is: {}", calgary.city_history); // ⚠️ }
當然這是不可能執行的,因為現在 canada_cities 擁有了資料,而 calgary 沒有。它說:
error[E0382]: borrow of moved value: `calgary.city_history`
--> src\main.rs:27:42
|
24 | histories: vec![calgary.city_history], // But this String is very long
| -------------------- value moved here
...
27 | println!("Calgary's history is: {}", calgary.city_history); // ⚠️
| ^^^^^^^^^^^^^^^^^^^^ value borrowed here after move
|
= note: move occurs because `calgary.city_history` has type `std::string::String`, which does not implement the `Copy` trait
我們可以克隆名稱:names: vec![calgary.name.clone()],但是我們不想克隆很長的 city_history。所以我們可以用 Rc。
加上 use 的宣告:
use std::rc::Rc; fn main() {}
用 Rc 把 String 包起來:
use std::rc::Rc; #[derive(Debug)] struct City { name: String, population: u32, city_history: Rc<String>, } #[derive(Debug)] struct CityData { names: Vec<String>, histories: Vec<Rc<String>>, } fn main() {}
要增加新的參考,你必須克隆 Rc。但是等一下,我們不是想避免使用 .clone() 嗎?不完全是:我們只是不想克隆整個 String。但是 Rc 的克隆只是克隆了指標(pointer)--它基本上是沒有開銷的。這就像在一盒書上貼上名字貼紙,證明有兩個人擁有它,而不是做一盒全新的書。
你可以用 item.clone() 或者用 Rc::clone(&item) 來克隆叫做 item 的 Rc。所以 calgary.city_history 有兩個所有者。我們可以用 Rc::strong_count(&item) 查詢所有者的數量。另外我們再增加一個新的所有者。現在我們的程式碼看起來像這樣:
use std::rc::Rc; #[derive(Debug)] struct City { name: String, population: u32, city_history: Rc<String>, // 包在 Rc 裡的 String } #[derive(Debug)] struct CityData { names: Vec<String>, histories: Vec<Rc<String>>, // 有包在 Rc 裡的 String 的向量 } fn main() { let calgary = City { name: "Calgary".to_string(), population: 1_200_000, // 假裝這個字串非常非常長 city_history: Rc::new("Calgary began as a fort called Fort Calgary that...".to_string()), // 用 Rc::new() 做出 Rc }; let canada_cities = CityData { names: vec![calgary.name], histories: vec![calgary.city_history.clone()], // 用 .clone() 來增加計數 }; println!("Calgary's history is: {}", calgary.city_history); println!("{}", Rc::strong_count(&calgary.city_history)); let new_owner = calgary.city_history.clone(); }
印出 2。而 new_owner 現在是 Rc<String>。現在如果我們用 println!("{}", Rc::strong_count(&calgary.city_history));,我們得到 3。
那麼,如果有強指標,是否有弱指標(weak references)呢?是的,有。弱指標蠻有用的,因為如果有兩個 Rc 互相指向對方,它們就不會死掉。這就是所謂的"循環參考(reference cycle)"。如果第 1 項有 Rc 指向第 2 項,而第 2 項有 Rc 指向第 1 項,計數就不會降到 0,在這種情況下,你會想要使用弱參考。那麼 Rc 就會對參考計數,但如果只有弱參考它就可以死掉。你要使用 Rc::downgrade(&item) 而不是 Rc::clone(&item) 來做出弱參考。另外,你需要用 Rc::weak_count(&item) 來檢視弱參考的數量。
多執行緒
如果你使用多個執行緒 (Thread),你可以同時做很多事情。現代電腦有一個以上的核心 (Core),所以它們可以同時做多件事情,Rust 讓你能運用它們。Rust 使用的執行緒被稱為"OS 執行緒"。OS 執行緒的意思是作業系統在不同的核心上建立執行緒。(其他一些語言使用功能沒那麼強大的"green threads")
你要用 std::thread::spawn 建立執行緒,以及用閉包來告訴它該怎麼做。執行緒很有趣,因為它們同時執行,你可以測試它看看會發生什麼。這裡是個簡單的範例:
fn main() { std::thread::spawn(|| { println!("I am printing something"); }); }
如果你執行它,每次結果都會不同。有時會印出來,有時不會(這也取決於你的電腦速度)。這是因為有時 main() 比執行緒還早結束。而當 main() 完成後,程式就終結了。這在 for 迴圈中更容易觀察到:
fn main() { for _ in 0..10 { // 設置十個執行緒 std::thread::spawn(|| { println!("I am printing something"); }); } // 現在執行緒啟動了. } // 有多少能在這裡的 main() 結束之前完成?
在 main 結束之前,通常大約會有四條執行緒印出來,但總是不一樣。如果你的電腦速度比較快,那麼可能就印不出來了。另外,有時執行緒會恐慌:
thread 'thread 'I am printing something
thread '<unnamed><unnamed>thread '' panicked at '<unnamed>I am printing something
' panicked at 'thread '<unnamed>cannot access stdout during shutdown' panicked at '<unnamed>thread 'cannot access stdout during
shutdown
這是程式正在關閉時,執行緒試圖做一些事情時會出現的錯誤。
你可以給電腦做些事,這樣它就不會馬上關閉了:
fn main() { for _ in 0..10 { std::thread::spawn(|| { println!("I am printing something"); }); } for _ in 0..1_000_000 { // 讓電腦宣告 "let x = 9" 一百萬次 // 它要在它可以離開 main 函式前完成這件事 let _x = 9; } }
但這是個讓執行緒有時間完成的蠢方法。更好的方式是將執行緒繫結到變數上。如果你加上 let,你就能建立 JoinHandle。你可以在 spawn 的簽名中看到這一點:
pub fn spawn<F, T>(f: F) -> JoinHandle<T>
where
F: FnOnce() -> T,
F: Send + 'static,
T: Send + 'static,
f是閉包──我們將在後面學到如何將閉包放入我們的函式中
所以現在我們每次都有 JoinHandle。
fn main() { for _ in 0..10 { let handle = std::thread::spawn(|| { println!("I am printing something"); }); } }
handle 現在是個 JoinHandle。我們怎麼處理它呢?我們要使用叫做 .join() 的方法。這個方法的意思是"等待所有執行緒完成"(它等待執行緒加入它)。所以現在只要寫 handle.join(),它就會等待每個執行緒完成。
fn main() { for _ in 0..10 { let handle = std::thread::spawn(|| { println!("I am printing something"); }); handle.join(); // 等待執行緒完成 } }
現在我們就來了解一下閉包的三種類型。這三種類型是
FnOnce:接受整個值FnMut:接受可變參考Fn:接受常規參考
如果可以閉包會盡量試著使用 Fn。但如果它需要改變值,它將使用 FnMut,而如果它需要接受整個值,它將使用 FnOnce。FnOnce 是個好名字,因為這解釋了它做了什麼:它接受一次值,然後就不能再拿了。
這裡是範例:
fn main() { let my_string = String::from("I will go into the closure"); let my_closure = || println!("{}", my_string); my_closure(); my_closure(); }
String 不能 Copy,所以 my_closure() 是個 Fn:它拿到參考。
如果我們改變 my_string,它會變成 FnMut。
fn main() { let mut my_string = String::from("I will go into the closure"); let mut my_closure = || { my_string.push_str(" now"); println!("{}", my_string); }; my_closure(); my_closure(); }
印出:
I will go into the closure now
I will go into the closure now now
而如果拿值來用,則會是 FnOnce。
fn main() { let my_vec: Vec<i32> = vec![8, 9, 10]; let my_closure = || { my_vec .into_iter() // into_iter takes ownership .map(|x| x as u8) // turn it into u8 .map(|x| x * 2) // multiply by 2 .collect::<Vec<u8>>() // collect into a Vec }; let new_vec = my_closure(); println!("{:?}", new_vec); }
我們拿值來用,所以我們無法再執行一次 my_closure()。就是這個名字的由來。
那麼現在回到執行緒。讓我們試著使用外面的值:
fn main() { let mut my_string = String::from("Can I go inside the thread?"); let handle = std::thread::spawn(|| { println!("{}", my_string); // ⚠️ }); handle.join(); }
編譯器說這樣不行。
error[E0373]: closure may outlive the current function, but it borrows `my_string`, which is owned by the current function
--> src\main.rs:28:37
|
28 | let handle = std::thread::spawn(|| {
| ^^ may outlive borrowed value `my_string`
29 | println!("{}", my_string);
| --------- `my_string` is borrowed here
|
note: function requires argument type to outlive `'static`
--> src\main.rs:28:18
|
28 | let handle = std::thread::spawn(|| {
| __________________^
29 | | println!("{}", my_string);
30 | | });
| |______^
help: to force the closure to take ownership of `my_string` (and any other referenced variables), use the `move` keyword
|
28 | let handle = std::thread::spawn(move || {
| ^^^^^^^
這條訊息很長,但很有用:它說到 use the `move` keyword。問題是我們雖然可以在執行緒裡使用 my_string 時對它做任何事情,但執行緒卻不擁有它。因為那樣會不安全。
讓我們試試其他行不通的方式:
fn main() { let mut my_string = String::from("Can I go inside the thread?"); let handle = std::thread::spawn(|| { println!("{}", my_string); // 現在 my_string 被拿來當參考使用 }); std::mem::drop(my_string); // ⚠️ 我們嘗試在這丟棄它. 但執行緒仍然需要它. handle.join(); }
所以你要用 move 來拿走值。現在安全了:
fn main() { let mut my_string = String::from("Can I go inside the thread?"); let handle = std::thread::spawn(move|| { println!("{}", my_string); }); std::mem::drop(my_string); // ⚠️ 我們無法丟棄, 因為 handle 擁有它. 因此這將會無法執行 handle.join(); }
所以當我們把 std::mem::drop 刪掉,現在就可以用了。在 handle 拿走 my_string 後,我們的程式碼就安全了。
fn main() { let my_string = String::from("Can I go inside the thread?"); let handle = std::thread::spawn(move|| { println!("{}", my_string); }); handle.join().unwrap(); }
所以只要記住:如果你需要從外面取得某個執行緒裡面的值,你需要使用 move。
函式中的閉包
閉包超棒的。那麼我們要如何把它們放到我們擁有的函式中呢?
你可以寫你自己的函式來接受閉包,但是在它裡面就沒那麼自由了,你必須決定型別。在函式外的閉包可以在 Fn、FnMut 和 FnOnce 之間自行決定,但在函式內部你必須選擇其中一種。最好的理解方式是多看幾個函式簽名。這裡是其中的 .all()。我們記得它會檢查疊代器,看看所有的東西是否是 true(取決於你怎麼決定是 true 還是 false)。它的部分簽名是這樣說的:
#![allow(unused)] fn main() { fn all<F>(&mut self, f: F) -> bool // 🚧 where F: FnMut(Self::Item) -> bool, }
fn all<F>:這告訴你有個泛型 F。閉包永遠是泛型的,因為每次都是不同的型別。
(&mut self, f: F):&mut self 告訴你這是方法。你通常看到 f: F 就是閉包:這是變數名和型別。當然,f 和 F 並沒有什麼特別之處,它們可以是不同的名字。如果想要你也可以寫成 my_closure: Closure──這並不要緊。但在簽名中,你幾乎總是會看到 f: F。
接下來是關於閉包的部分:F: FnMut(Self::Item) -> bool。在這裡它決定閉包型別是 FnMut,所以它可以改變值。它改變了它所接受的疊代器 Self::Item 的值。而且它必須回傳 true 或 false。
這裡是個更簡單帶有閉包的簽名:
#![allow(unused)] fn main() { fn do_something<F>(f: F) // 🚧 where F: FnOnce(), { f(); } }
這只是說它接受閉包,取得值(FnOnce = 取值),且不回傳任何東西。所以現在我們可以呼叫這個什麼都不拿的閉包,做我們想要做的事情。現在我們將會建立 Vec,然後對它進行疊代,只是展示我們可以做些什麼。
fn do_something<F>(f: F) where F: FnOnce(), { f(); } fn main() { let some_vec = vec![9, 8, 10]; do_something(|| { some_vec .into_iter() .for_each(|x| println!("The number is: {}", x)); }) }
看個更真實的例子,我們將再次建立 City 結構體。這次 City 結構體有更多關於年份和人口的資料。它有個 Vec<u32> 來表示所有的年份,還有另一個 Vec<u32> 來表示所有的人口。
City 有兩個函式:new() 用於建立新的 City, .city_data() 有個閉包引數。當我們使用 .city_data() 時,它給我們提供了年份和人口以及閉包,所以我們可以對資料做我們想做的事情。閉包型別是 FnMut,所以我們可以改變資料。它看起來像這樣:
#[derive(Debug)] struct City { name: String, years: Vec<u32>, populations: Vec<u32>, } impl City { fn new(name: &str, years: Vec<u32>, populations: Vec<u32>) -> Self { Self { name: name.to_string(), years, populations, } } fn city_data<F>(&mut self, mut f: F) // 我們帶入 self, 但只有 f 是泛型的 F. f 是閉包 where F: FnMut(&mut Vec<u32>, &mut Vec<u32>), // 閉包接受 u32 的可變向量 // 那些是年份和人口資料 { f(&mut self.years, &mut self.populations) // 最後這是實際的函式. 它說 // "把 self.years 和 self.populations 用在閉包上" // 我們可以用閉包做我們想要做的事 } } fn main() { let years = vec![ 1372, 1834, 1851, 1881, 1897, 1925, 1959, 1989, 2000, 2005, 2010, 2020, ]; let populations = vec![ 3_250, 15_300, 24_000, 45_900, 58_800, 119_800, 283_071, 478_974, 400_378, 401_694, 406_703, 437_619, ]; // 現在我們可以建立我們的城市 let mut tallinn = City::new("Tallinn", years, populations); // 現在我們有 .city_data() 方法能傳入閉包. 我們可以做我們想做的任何事. // 首先讓我們一起放入 5 年的資料並印出來. tallinn.city_data(|city_years, city_populations| { // 我們可以任意稱呼輸入名稱 let new_vec = city_years .into_iter() .zip(city_populations.into_iter()) // 兩個 Zip 在一起 .take(5) // 但只有拿前 5 個 .collect::<Vec<(_, _)>>(); // 叫 Rust 決定元組內部的型別 println!("{:?}", new_vec); }); // 現在讓我們給 2030 年份加上一些資料 tallinn.city_data(|x, y| { // 這次我們只稱呼輸入為 x 和 y x.push(2030); y.push(500_000); }); // 我們不再想要 1834 的資料 tallinn.city_data(|x, y| { let position_option = x.iter().position(|x| *x == 1834); if let Some(position) = position_option { println!( "Going to delete {} at position {:?} now.", x[position], position ); // 確認我們刪除了對的元素 x.remove(position); y.remove(position); } }); println!( "Years left are {:?}\nPopulations left are {:?}", tallinn.years, tallinn.populations ); }
印出一直以來我們呼叫 .city_data() 的結果。就是:
[(1372, 3250), (1834, 15300), (1851, 24000), (1881, 45900), (1897, 58800)]
Going to delete 1834 at position 1 now.
Years left are [1372, 1851, 1881, 1897, 1925, 1959, 1989, 2000, 2005, 2010, 2020, 2030]
Populations left are [3250, 24000, 45900, 58800, 119800, 283071, 478974, 400378, 401694, 406703, 437619, 500000]
impl 特徵
impl 特徵 與泛型類似。你還記得,泛型使用型別 T(或任何其他名稱),來表示在程式編譯時才決定的型別。首先讓我們來看個具體的型別:
fn gives_higher_i32(one: i32, two: i32) { let higher = if one > two { one } else { two }; println!("{} is higher.", higher); } fn main() { gives_higher_i32(8, 10); }
印出:10 is higher.。
但是這個只接受 i32,所以現在我們要把它做成泛型的。我們需要比較,我們還需要用 {} 列印,所以我們的型別 T 需要具有 PartialOrd 和 Display 特徵。記住,這意味著"只接受已經具有 PartialOrd 和 Display 的型別"。
use std::fmt::Display; fn gives_higher_i32<T: PartialOrd + Display>(one: T, two: T) { let higher = if one > two { one } else { two }; println!("{} is higher.", higher); } fn main() { gives_higher_i32(8, 10); }
現在我們來看看類似的 impl 特徵。我們可以帶入 impl 特徵 型別,而不是 T 型別。然後它將接受實作該特徵的型別。這幾乎是一樣的:
fn prints_it(input: impl Into<String> + std::fmt::Display) { // 接受能轉換成 String 且具有 Display 的任意型別 println!("You can print many things, including {}", input); } fn main() { let name = "Tuon"; let string_name = String::from("Tuon"); prints_it(name); prints_it(string_name); }
然而,更有趣的是我們可以回傳 impl 特徵,這讓我們可以回傳閉包,因為它們的函式簽名是特徵。你可以在有使用它們的方法的簽名中見到這點。例如,這是 .map() 的簽名:
#![allow(unused)] fn main() { fn map<B, F>(self, f: F) -> Map<Self, F> // 🚧 where Self: Sized, F: FnMut(Self::Item) -> B, { Map::new(self, f) } }
fn map<B, F>(self, f: F) 的意思是,它接受兩個泛型型別。F 是個從實作 .map() 的容器中取一個元素的函式,B 是該函式的回傳型別。然後在where 之後,我們看到的是特徵界限 (trait bound)。("特徵界限"的意思是"它必須有這個特徵"。)一個是 Sized,接下來是個閉包簽名。它必須是個 FnMut,並在 Self::Item 上做閉包,也就是你給它的疊代器。然後它回傳 B。
所以我們可以做同樣的事來回傳閉包。要回傳閉包時,使用 impl,然後是閉包簽名。一旦你回傳它,你就可以像使用函式一樣使用它。這裡的小例子是會根據你輸入的文字給出閉包的函式。如果你輸入 "double" 或 "triple",那麼它就會把它乘以 2 或 3,否則就會給你相同的數字。因為它是閉包,我們可以做任何我們想做的事情,所以我們也印出一段訊息。
fn returns_a_closure(input: &str) -> impl FnMut(i32) -> i32 { match input { "double" => |mut number| { number *= 2; println!("Doubling number. Now it is {}", number); number }, "triple" => |mut number| { number *= 40; println!("Tripling number. Now it is {}", number); number }, _ => |number| { println!("Sorry, it's the same: {}.", number); number }, } } fn main() { let my_number = 10; // 做出三個閉包 let mut doubles = returns_a_closure("double"); let mut triples = returns_a_closure("triple"); let mut quadruples = returns_a_closure("quadruple"); doubles(my_number); triples(my_number); quadruples(my_number); }
下面是個有點長的範例。讓我們想像在遊戲中,你的角色面對的是晚上比較強的怪物。我們可以做出叫 TimeOfDay 的列舉來記錄一天的情況。你的角色叫西蒙,有個叫 character_fear 是 f64 的數字。它晚上上升、白天下降。我們將寫個叫 change_fear 的函式來改變他的恐懼,但也會做其他事情,如寫訊息。它大概會是這樣:
enum TimeOfDay { // 只是單純的列舉 Dawn, Day, Sunset, Night, } fn change_fear(input: TimeOfDay) -> impl FnMut(f64) -> f64 { // 這個函式接受 TimeOfDay. 回傳閉包. // 我們用 impl FnMut(64) -> f64 來說明它需要 // 改變值, 並且也給回一樣的型別. use TimeOfDay::*; // 所以我們只要寫 Dawn、Day、Sunset、Night // 而不是 TimeOfDay::Dawn、TimeOfDay::Day 等等. match input { Dawn => |x| { // 這就是我們之後會給予的變數 character_fear println!("The morning sun has vanquished the horrible night. You no longer feel afraid."); println!("Your fear is now {}", x * 0.5); x * 0.5 }, Day => |x| { println!("What a nice day. Maybe put your feet up and rest a bit."); println!("Your fear is now {}", x * 0.2); x * 0.2 }, Sunset => |x| { println!("The sun is almost down! This is no good."); println!("Your fear is now {}", x * 1.4); x * 1.4 }, Night => |x| { println!("What a horrible night to have a curse."); println!("Your fear is now {}", x * 5.0); x * 5.0 }, } } fn main() { use TimeOfDay::*; let mut character_fear = 10.0; // 西蒙從 10 開始 let mut daytime = change_fear(Day); // 這裡做四個閉包在每次我們想改變西蒙的恐懼時去呼叫. let mut sunset = change_fear(Sunset); let mut night = change_fear(Night); let mut morning = change_fear(Dawn); character_fear = daytime(character_fear); // 對西蒙的恐懼呼叫閉包. 它們給出訊息並改變恐懼數值. // 在現實生活我們會有 Character 結構體並把它當方法用, // 像這樣: character_fear.daytime() character_fear = sunset(character_fear); character_fear = night(character_fear); character_fear = morning(character_fear); }
印出:
What a nice day. Maybe put your feet up and rest a bit.
Your fear is now 2
The sun is almost down! This is no good.
Your fear is now 2.8
What a horrible night to have a curse.
Your fear is now 14
The morning sun has vanquished the horrible night. You no longer feel afraid.
Your fear is now 7
Arc
你還記得我們用 Rc 來給予變數一個以上的所有者。如果我們執行緒中做一樣的事情,我們則需要 Arc。Arc 的意思是 "原子參考計數器(atomic reference counter)"。原子的意思是它使用計算機的處理器,所以資料每回只會被寫入一次。這點很重要,因為如果兩個執行緒同時寫入資料,你會得到錯誤的結果。例如,想像如果你能在 Rust 中做到這一點:
#![allow(unused)] fn main() { // 🚧 let mut x = 10; for i in 0..10 { // 執行緒 1 x += 1 } for i in 0..10 { // 執行緒 2 x += 1 } }
如果執行緒 1 和執行緒 2 一起啟動,也許就會出現這種情況:
- 執行緒 1 看到 10,寫入 11,接著執行緒 2 看到 11,寫入 12。到目前為止沒有問題。
- 執行緒 1 看到 12。同時,執行緒 2 看到 12。執行緒 1,寫入 13。執行緒 2 也寫入 13。現在我們有 13,但應該要是 14。這是個大問題。
Arc 使用處理器來確保這種情況不會發生,所以當你有多個執行緒時這個方法你就必須使用。然而你不會想在單執行緒上用 Arc,因為 Rc 更快一些。
不過你不能只用 Arc 來改變資料。所以你要用 Mutex 把資料包起來,然後再用 Arc 把 Mutex 包起來。
所以讓我們用 Mutex 來在 Arc 裡面改變數字的值。首先讓我們設定一個執行緒:
fn main() { let handle = std::thread::spawn(|| { println!("The thread is working!") // 只測試執行緒 }); handle.join().unwrap(); // 讓執行緒在這等待直到完成 println!("Exiting the program"); }
目前為止只印出:
The thread is working!
Exiting the program
很好。現在讓我們把它放在 for 迴圈中,跑 0..5。
fn main() { let handle = std::thread::spawn(|| { for _ in 0..5 { println!("The thread is working!") } }); handle.join().unwrap(); println!("Exiting the program"); }
這也是可行的。我們得到以下結果:
The thread is working!
The thread is working!
The thread is working!
The thread is working!
The thread is working!
Exiting the program
現在讓我們再多加一個執行緒。每個執行緒都會做同樣的事情。你可以看到這些執行緒是同時工作的。有時會先印出 Thread 1 is working!,但其他時候是 Thread 2 is working! 先印出。這就是所謂的並行(concurrency),也就是 "一起執行"的意思。
fn main() { let thread1 = std::thread::spawn(|| { for _ in 0..5 { println!("Thread 1 is working!") } }); let thread2 = std::thread::spawn(|| { for _ in 0..5 { println!("Thread 2 is working!") } }); thread1.join().unwrap(); thread2.join().unwrap(); println!("Exiting the program"); }
會列印:
Thread 1 is working!
Thread 1 is working!
Thread 1 is working!
Thread 1 is working!
Thread 1 is working!
Thread 2 is working!
Thread 2 is working!
Thread 2 is working!
Thread 2 is working!
Thread 2 is working!
Exiting the program
現在我們要改變 my_number 的數值。現在它是 i32。我們將把它改為 Arc<Mutex<i32>>:由 Arc 保護可以改變的 i32。
#![allow(unused)] fn main() { // 🚧 let my_number = Arc::new(Mutex::new(0)); }
現在我們有了這個,我們可以克隆它。每個克隆可以進入不同的執行緒。我們有兩個執行緒,所以我們將做兩個克隆:
#![allow(unused)] fn main() { // 🚧 let my_number = Arc::new(Mutex::new(0)); let my_number1 = Arc::clone(&my_number); // 這個克隆去到執行緒 1 let my_number2 = Arc::clone(&my_number); // 這個克隆去到執行緒 2 }
現在,我們已把安全的克隆附加到 my_number,我們可以將它們 move 到其它執行緒中沒問題。
use std::sync::{Arc, Mutex}; fn main() { let my_number = Arc::new(Mutex::new(0)); let my_number1 = Arc::clone(&my_number); let my_number2 = Arc::clone(&my_number); let thread1 = std::thread::spawn(move || { // 只有克隆去到執行緒 1 for _ in 0..10 { *my_number1.lock().unwrap() +=1; // 鎖住 Mutex, 改值 } }); let thread2 = std::thread::spawn(move || { // 只有克隆去到執行緒 2 for _ in 0..10 { *my_number2.lock().unwrap() += 1; } }); thread1.join().unwrap(); thread2.join().unwrap(); println!("Value is: {:?}", my_number); println!("Exiting the program"); }
程式印出:
Value is: Mutex { data: 20 }
Exiting the program
所以它成功了。
接著我們可以將兩個執行緒一起合併(join)到一個 for 迴圈裡,並使程式碼更短。
我們需要儲存控制碼(handle),這樣我們就可以在迴圈外對每個執行緒呼叫 .join()。如果我們在迴圈內這樣做,它將等待第一個執行緒完成後再啟動新的執行緒。
use std::sync::{Arc, Mutex}; fn main() { let my_number = Arc::new(Mutex::new(0)); let mut handle_vec = vec![]; // JoinHandles 將會放在這 for _ in 0..2 { // 做兩次 let my_number_clone = Arc::clone(&my_number); // 在啟動執行緒前做出克隆 let handle = std::thread::spawn(move || { // 移入克隆 for _ in 0..10 { *my_number_clone.lock().unwrap() += 1; } }); handle_vec.push(handle); // 儲存控制碼我們才能在迴圈外對它呼叫 join // 如果我們不把它推入向量, 它將會直接死在這 } handle_vec.into_iter().for_each(|handle| handle.join().unwrap()); // 對所有控制碼呼叫 join println!("{:?}", my_number); }
最後印出 Mutex { data: 20 }。
這看起來很複雜,但 Arc<Mutex<SomeType>>> 在 Rust 中非常頻繁的被使用,所以它變得很自然。另外,你也可以隨時把你的程式碼寫得更乾淨。這裡是同樣的程式碼,多了一行 use 敘述和兩個函式。這些函式並沒有做任何新的事情,但是它們把一些程式碼從 main() 中移出。如果很難讀懂的話,你可以嘗試重寫這樣的程式碼。
use std::sync::{Arc, Mutex}; use std::thread::spawn; // 現在我們只需要寫 spawn fn make_arc(number: i32) -> Arc<Mutex<i32>> { // 只是用來做 Arc 裡有 Mutex 的函式 Arc::new(Mutex::new(number)) } fn new_clone(input: &Arc<Mutex<i32>>) -> Arc<Mutex<i32>> { // 只是讓我們可以寫成 new_clone 的函式 Arc::clone(&input) } // 現在 main() 更容易閱讀了 fn main() { let mut handle_vec = vec![]; // 每個控制碼將會放到這裡 let my_number = make_arc(0); for _ in 0..2 { let my_number_clone = new_clone(&my_number); let handle = spawn(move || { for _ in 0..10 { let mut value_inside = my_number_clone.lock().unwrap(); *value_inside += 1; } }); handle_vec.push(handle); // 拿到控制碼了, 所以放進向量裡 } handle_vec.into_iter().for_each(|handle| handle.join().unwrap()); // 讓每一個等待 println!("{:?}", my_number); }
通道
通道(Channel)是一種容易讓使用許多執行緒能寄送(send)資料到某個地方的方式。它們相當流行,因為它們能相當簡單得和其它東西放在一起用。你可以在 Rust 中用 std::sync::mpsc 建立通道。mpsc 的意思是"多個生產者,單個消費者"(Multiple Producer, Single Consumer),也就是"許多執行緒寄送一個地方"。要啟動通道,你可以使用 channel()。這會建立被束縛在一起的 Sender 和 Receiver。你可以在函式簽名中看到這一點:
#![allow(unused)] fn main() { // 🚧 pub fn channel<T>() -> (Sender<T>, Receiver<T>) }
所以你要選擇一個名字給傳送者、另一個給接收者。通常你會看到像 let (sender, receiver) = channel(); 這樣的開頭。因為它是泛型的,如果你只寫這樣,Rust 會不知道型別:
use std::sync::mpsc::channel; fn main() { let (sender, receiver) = channel(); // ⚠️ }
編譯器說:
error[E0282]: type annotations needed for `(std::sync::mpsc::Sender<T>, std::sync::mpsc::Receiver<T>)`
--> src\main.rs:30:30
|
30 | let (sender, receiver) = channel();
| ------------------ ^^^^^^^ cannot infer type for type parameter `T` declared on the function `channel`
| |
| consider giving this pattern the explicit type `(std::sync::mpsc::Sender<T>, std::sync::mpsc::Receiver<T>)`, where
the type parameter `T` is specified
它建議為 Sender 和 Receiver 加上型別。如果你想可以這樣做:
use std::sync::mpsc::{channel, Sender, Receiver}; // 在這加上 Sender 和 Receiver fn main() { let (sender, receiver): (Sender<i32>, Receiver<i32>) = channel(); }
但你不必這樣做:一旦你開始使用 Sender 和 Receiver,Rust 就能猜到型別。
所以讓我們來看一下使用通道最簡單的方式。
use std::sync::mpsc::channel; fn main() { let (sender, receiver) = channel(); sender.send(5); receiver.recv(); // recv = receive, 不是 "rec v" }
現在編譯器知道型別了。sender 的是 Result<(), SendError<i32>>,receiver 的是 Result<i32, RecvError>。所以你可以用 .unwrap() 來看看是否有寄送到,或者用更好的錯誤處理。讓我們加上 .unwrap() 還有 println!,看看得到什麼:
use std::sync::mpsc::channel; fn main() { let (sender, receiver) = channel(); sender.send(5).unwrap(); println!("{}", receiver.recv().unwrap()); }
印出 5。
channel 就像 Arc 一樣,因為你可以克隆它,並將克隆的內容寄送到其他執行緒中。讓我們做兩個執行緒,並將值寄送到 receiver。這段程式碼可以執行,但它並不是我們明確想要的那樣。
use std::sync::mpsc::channel; fn main() { let (sender, receiver) = channel(); let sender_clone = sender.clone(); std::thread::spawn(move|| { // 移入 sender sender.send("Send a &str this time").unwrap(); }); std::thread::spawn(move|| { // 移入 sender_clone sender_clone.send("And here is another &str").unwrap(); }); println!("{}", receiver.recv().unwrap()); }
讓兩個執行緒開始寄送,然後我們用 println!。它可能會印出 Send a &str this time 或者 And here is another &str,這取決於哪個執行緒先完成。讓我們做出會合控制碼(join handle)來讓它們等待。
use std::sync::mpsc::channel; fn main() { let (sender, receiver) = channel(); let sender_clone = sender.clone(); let mut handle_vec = vec![]; // 把我們的控制碼放在這 handle_vec.push(std::thread::spawn(move|| { // 把它推進向量裡 sender.send("Send a &str this time").unwrap(); })); handle_vec.push(std::thread::spawn(move|| { // 還有把這個推進向量 sender_clone.send("And here is another &str").unwrap(); })); for _ in handle_vec { // 現在 handle_vec 裡有 2 個元素. 讓我們把它們印出來 println!("{:?}", receiver.recv().unwrap()); } }
印出:
"Send a &str this time"
"And here is another &str"
現在讓我們做出 results_vec,而不是列印。
use std::sync::mpsc::channel; fn main() { let (sender, receiver) = channel(); let sender_clone = sender.clone(); let mut handle_vec = vec![]; let mut results_vec = vec![]; handle_vec.push(std::thread::spawn(move|| { sender.send("Send a &str this time").unwrap(); })); handle_vec.push(std::thread::spawn(move|| { sender_clone.send("And here is another &str").unwrap(); })); for _ in handle_vec { results_vec.push(receiver.recv().unwrap()); } println!("{:?}", results_vec); }
現在結果在我們的向量中:["Send a &str this time", "And here is another &str"]。
現在讓我們假設我們有很多工作要做,並且想要使用執行緒。我們有一百萬個元素的大向量,全部是 0,我們想把每個 0 都變成 1,我們將使用十個執行緒,每一個將負責十分之一的工作。我們還將建立新向量,並使用 .extend() 來收集結果。
use std::sync::mpsc::channel; use std::thread::spawn; fn main() { let (sender, receiver) = channel(); let hugevec = vec![0; 1_000_000]; let mut newvec = vec![]; let mut handle_vec = vec![]; for i in 0..10 { let sender_clone = sender.clone(); let mut work: Vec<u8> = Vec::with_capacity(hugevec.len() / 10); // 新向量來收集結果. 1/10 的大小 work.extend(&hugevec[i*100_000..(i+1)*100_000]); // 第一部份拿 0..100_000, 下一次拿 100_000..200_000, 以此類推. let handle =spawn(move || { // 做出控制碼 for number in work.iter_mut() { // 做實際的工作 *number += 1; }; sender_clone.send(work).unwrap(); // 用 sender_clone 來寄送工作到 receiver }); handle_vec.push(handle); } for handle in handle_vec { // 停止直到執行緒都完成工作 handle.join().unwrap(); } while let Ok(results) = receiver.try_recv() { newvec.push(results); // 從 receiver.recv() 推送結果進向量 } // 現在我們有了 Vec<Vec<u8>>. 我們可以用 .flatten() 全部放在一起 let newvec = newvec.into_iter().flatten().collect::<Vec<u8>>(); // 現在它是個有 1_000_000 個 u8 數字的向量 println!("{:?}, {:?}, total length: {}", // 讓我們印出一些數字來確定它們全部都是 1 &newvec[0..10], &newvec[newvec.len()-10..newvec.len()], newvec.len() // 以及證明大小是 1_000_000 個元素 ); for number in newvec { // 並且讓我們告訴 Rust 它可以恐慌, 如果有任何一個數字不是 1 的話 if number != 1 { panic!(); } } }
閱讀 Rust 文件
知道如何閱讀 Rust 文件是很重要的,這樣你才能理解其他人寫的東西。這裡有一些 Rust 文件中需要知道的事情:
assert_eq!
你會看到 assert_eq! 被用在做測試的時候。你把兩個元素放進函數裡面,如果它們不相等程式就會恐慌。這裡是我們需要偶數的簡單範例:
fn main() { prints_number(56); } fn prints_number(input: i32) { assert_eq!(input % 2, 0); // 數字必須相等. // 如果數字 % 2 不是 0 就恐慌 println!("The number is not odd. It is {}", input); }
也許你沒有任何計劃要在你的程式碼中使用 assert_eq!,但它在 Rust 文件中隨處可見。這是因為在文件中,你需要非常大的空間來 println! 所有東西。另外,對於你想印的東西也要具備 Display 或 Debug 才行。這就是為什麼文件中到處都有 assert_eq! 的原因。這裡的範例來自https://doc.rust-lang.org/std/vec/struct.Vec.html,展示如何使用向量:
fn main() { let mut vec = Vec::new(); vec.push(1); vec.push(2); assert_eq!(vec.len(), 2); assert_eq!(vec[0], 1); assert_eq!(vec.pop(), Some(2)); assert_eq!(vec.len(), 1); vec[0] = 7; assert_eq!(vec[0], 7); vec.extend([1, 2, 3].iter().copied()); for x in &vec { println!("{}", x); } assert_eq!(vec, [7, 1, 2, 3]); }
在這些範例中,你可以只把 assert_eq!(a, b) 想成是在說 "a 是 b"。現在來看看右邊帶有註解的相同範例。註解顯示了它的實際含義。
fn main() { let mut vec = Vec::new(); vec.push(1); vec.push(2); assert_eq!(vec.len(), 2); // "向量長度是 2" assert_eq!(vec[0], 1); // "vec[0] 是 1" assert_eq!(vec.pop(), Some(2)); // "當你使用 .pop(), 你得到 Some()" assert_eq!(vec.len(), 1); // "向量長度現在是 1" vec[0] = 7; assert_eq!(vec[0], 7); // "Vec[0] 是 7" vec.extend([1, 2, 3].iter().copied()); for x in &vec { println!("{}", x); } assert_eq!(vec, [7, 1, 2, 3]); // "向量現在有 [7, 1, 2, 3]" }
搜尋
Rust 文件的頂端是搜尋欄。它在你一邊輸入時一邊顯示結果。當你往下翻頁時,你沒辨法再看到搜尋欄,但如果你按鍵盤上的 s 鍵就可以再次搜尋。所以在任何地方按下 s 鍵可以讓你馬上搜索。
[src] 按鈕
通常方法、結構體等的程式碼不會是完整的。這是因為你通常不需要看到完整的原始碼就能知道它是如何工作的,而完整的程式碼可能會讓人困惑。但如果你想知道更多,你可以點選 [src] 就可以看到所有的內容。例如,在 String 的頁面上,你可以看到 .with_capacity() 的這個簽名:
#![allow(unused)] fn main() { // 🚧 pub fn with_capacity(capacity: usize) -> String }
好了,你輸入數字,它給你 String。這很容易,但也許我們很好奇,想看更多。如果你點選 [src] 你可以看到這個:
#![allow(unused)] fn main() { // 🚧 pub fn with_capacity(capacity: usize) -> String { String { vec: Vec::with_capacity(capacity) } } }
有趣吧!現在你可以看到,字串是一種 Vec。而實際上 String 是 u8 位元組的向量,這很有意思。你不需要知道就可以使用 with_capacity 的方法,你只有點選 [src] 才能看到。所以如果文件沒有太多細節,而你又想知道更多的話,點選 [src] 是個好主意。
特徵資訊
特徵的文件最重要部分在於左邊的 "Required Methods"。如果你有看到 "Required Methods",可能意味著你必須自己寫出方法。例如,對於 Iterator,你需要實作 .next() 方法。而對於 From,你需要實作 .from() 方法。但是有些特徵只需要屬性就可以被實作出來,比如我們見過的 #[derive(Debug)]。Debug 需要 .fmt() 方法,但通常你只需要使用 #[derive(Debug)],除非你想自己動手做。這就是為什麼在 std::fmt::Debug 的頁面上有說"一般來說,你應該只需要推導出 Debug 的實作"。
屬性
你之前有見過 #[derive(Debug)] 這樣的程式碼:這種類型的程式碼叫做 屬性(Attribute)。這些屬性是能提供資訊給編譯器的小塊程式碼。它們雖然不容易建立,但使用起來非常方便。如果你只用 # 來寫屬性,那麼它將影響下一行的程式碼。但如果你是用 #! 來寫,那麼將影響它自己空間裡的一切。
這裡是一些你會經常見到的屬性:
#[allow(dead_code)] 和 #[allow(unused_variables)]。如果你寫了用不到的程式碼,Rust 仍然會編譯,但會讓你知道。例如這裡是裡面什麼都沒有結構體和一個變數。它們任何一個我們都沒有用。
struct JustAStruct {} fn main() { let some_char = 'ん'; }
如果你這樣寫,Rust 會提醒你你沒有使用它們:
warning: unused variable: `some_char`
--> src\main.rs:4:9
|
4 | let some_char = 'ん';
| ^^^^^^^^^ help: if this is intentional, prefix it with an underscore: `_some_char`
|
= note: `#[warn(unused_variables)]` on by default
warning: struct is never constructed: `JustAStruct`
--> src\main.rs:1:8
|
1 | struct JustAStruct {}
| ^^^^^^^^^^^
|
= note: `#[warn(dead_code)]` on by default
我們知道可以在名字前面寫 _,讓編譯器安靜下來:
struct _JustAStruct {} fn main() { let _some_char = 'ん'; }
但你也可以使用屬性。你會注意到在訊息中,它使用了 #[warn(unused_variables)] 和 #[warn(dead_code)]。在我們的程式碼中,JustAStruct 是死程式碼(dead code),而 some_char 是個未使用的變數。warn 的反面是 allow,所以我們可以這樣寫,它就不會再說什麼了:
#![allow(dead_code)] #![allow(unused_variables)] struct Struct1 {} // 做五個結構體 struct Struct2 {} struct Struct3 {} struct Struct4 {} struct Struct5 {} fn main() { let char1 = 'ん'; // 還有四個變數. 我們不使用它們任何一個但編譯器安靜了 let char2 = ';'; let some_str = "I'm just a regular &str"; let some_vec = vec!["I", "am", "just", "a", "vec"]; }
當然,處理死程式碼和未使用的變數是很重要的。但有時你希望編譯器安靜一段時間。或者是你可能需要展示一些程式碼或教人們 Rust,但又不想讓編譯器訊息來迷惑他們的時候。
#[derive(TraitName)] 讓你可以給你建立的結構和列舉推導出一些特徵。這適用於許多可以被自動推導的常見特徵。有些像 Display 這樣的特徵不能自動推導,因為對於 Display,你必須選擇如何去顯示:
// ⚠️ #[derive(Display)] struct HoldsAString { the_string: String, } fn main() { let my_string = HoldsAString { the_string: "Here I am!".to_string(), }; }
錯誤訊息會告訴你:
error: cannot find derive macro `Display` in this scope
--> src\main.rs:2:10
|
2 | #[derive(Display)]
|
但是對於可以自動推匯出的特徵,你可以隨心所欲的放進去。讓我們在一行裡加入七個特徵給 HoldsAString,當然只是為了好玩,儘管它只需要一個。
#[derive(Debug, PartialEq, Eq, Ord, PartialOrd, Hash, Clone)] struct HoldsAString { the_string: String, } fn main() { let my_string = HoldsAString { the_string: "Here I am!".to_string(), }; println!("{:?}", my_string); }
另外,如果(也只有在)結構體的所有欄位都實作了 Copy 的情況下,你才可以讓結構體是 Copy 的。HoldsAString 裡的 String 不是 Copy,所以你不能對它使用 #[derive(Copy)]。但是對下面這個結構是可以的:
#[derive(Clone, Copy)] // 你也需要 Clone 來使用 Copy struct NumberAndBool { number: i32, // i32 是 Copy true_or_false: bool // bool 也是 Copy. 所以沒問題 } fn does_nothing(input: NumberAndBool) { } fn main() { let number_and_bool = NumberAndBool { number: 8, true_or_false: true }; does_nothing(number_and_bool); does_nothing(number_and_bool); // 如果它不能拷貝, 這裡會造成錯誤 }
#[cfg()] 的意思是組態,告訴編譯器是否執行程式碼。它通常是像這樣的:#[cfg(test)]。你會在寫測試函式的時候用到,這樣它就知道不要執行它們除非你在跑測試。那麼你可以在你的程式碼附近寫測試,但編譯器不會執行它們,除非你告訴它這麼做。
另一個會使用 cfg 的例子是 #[cfg(target_os = "windows")]。有了它,你可以告訴編譯器只能在 Windows 上執行程式碼,Linux 或其他平臺則不能。
#![no_std] 是個有趣的屬性,它告訴 Rust 不要引入標準函式庫。這表示你沒有 Vec、String 以及標準函式庫中的其他任何東西可以用。你會在那些沒有多少記憶體或空間的小型裝置的程式碼中看到這個。
你可以在這裡看到更多的屬性。
Box
Box 是 Rust 中非常方便的型別。當你使用 Box 時,你可以把型別放在堆積上而不是堆疊上。要做出新的 Box,只要用 Box::new() 並把元素放在裡面即可。
fn just_takes_a_variable<T>(item: T) {} // 接受任何東西並丟棄. fn main() { let my_number = 1; // 這是 i32 just_takes_a_variable(my_number); just_takes_a_variable(my_number); // 使用這個函式兩次也沒問題, 因為它是 Copy let my_box = Box::new(1); // 這是 Box<i32> just_takes_a_variable(my_box.clone()); // 沒有 .clone() 時第二個函式會造成錯誤 just_takes_a_variable(my_box); // 因為 Box 不是 Copy }
一開始很難想像能在哪裡使用它,但你會在 Rust 中經常使用它。你記得 & 被用在 str 是因為編譯器不知道 str 的大小:它可以是任何長度。但是用 & 的參考永遠是相同的長度,所以編譯器可以使用它。Box 也類似。另外你也可以在 Box 上使用 * 來獲得值,就像使用 & 一樣:
fn main() { let my_box = Box::new(1); // 這是 Box<i32> let an_integer = *my_box; // 這是 i32 println!("{:?}", my_box); println!("{:?}", an_integer); }
這就是為什麼 Box 被稱為"智慧指標(smart pointer)"的原因,因為它就像 & 的參考(一種指標),但可以做更多的事情。
你也可以使用 Box 來建立裡面有相同結構的結構體。這些是被稱為 遞迴 的結構,這意味著在 Struct A 裡面也許是另一個 Struct A,有時你可以使用 Box 來建立連結串列,儘管這在 Rust 中並不十分流行。但如果你想建立遞迴結構體,你可以使用 Box。如果你試著不用 Box 會發生什麼:
#![allow(unused)] fn main() { struct List { item: Option<List>, // ⚠️ } }
這個簡單的 List 有一個元素,可能是個 Some<List> (另一個列表),也可能是 None。因為你可以選擇 None,所以它不會永遠遞迴。但是編譯器還是不知道大小:
error[E0072]: recursive type `List` has infinite size
--> src\main.rs:16:1
|
16 | struct List {
| ^^^^^^^^^^^ recursive type has infinite size
17 | item: Option<List>,
| ------------------ recursive without indirection
|
= help: insert indirection (e.g., a `Box`, `Rc`, or `&`) at some point to make `List` representable
你可以看到它甚至建議嘗試 Box。所以讓我們用 Box 把 List 包起來:
struct List { item: Option<Box<List>>, } fn main() {}
現在編譯器就可以用 List 了,因為所有的東西都在 Box 後面,而且它知道 Box 的大小。那麼一個非常簡單的列表可能像這樣:
struct List { item: Option<Box<List>>, } impl List { fn new() -> List { List { item: Some(Box::new(List { item: None })), } } } fn main() { let mut my_list = List::new(); }
即使沒有資料也有點複雜,Rust 並不怎麼常用這種類型的模式(pattern)。這是因為 Rust 如你所知的對借用(borrowing)和所有權(ownership)有嚴格的規定。但如果你想開始寫這樣的列表(連結串列)時,Box 能幫上忙。
Box 還可以讓你對它使用 std::mem::drop,因為它放在堆積上。這有時候會很方便。
Box 包裹的特徵
Box 對於回傳特徵非常有用。你知道你可以把特徵用在泛型函式就像這個範例:
use std::fmt::Display; struct DoesntImplementDisplay {} fn displays_it<T: Display>(input: T) { println!("{}", input); } fn main() {}
這個函式只能接受是 Display 的東西,所以它不能接納我們的 DoesntImplementDisplay 結構體。但是它可以接受很多其他的東西,比如 String。
你也看到了,我們可以使用 impl 特徵 來回傳其他的特徵或閉包。Box 也可以用類似的方式來使用。你可以使用 Box 是因為不這樣編譯器將不會知道值的大小。這個範例證明特徵可以用在任何大小的東西上:
#![allow(dead_code)] // 告訴編譯器要安靜 use std::mem::size_of; // 這會給出型別的大小 trait JustATrait {} // 我們將會實作這個在所有東西上 enum EnumOfNumbers { I8(i8), AnotherI8(i8), OneMoreI8(i8), } impl JustATrait for EnumOfNumbers {} struct StructOfNumbers { an_i8: i8, another_i8: i8, one_more_i8: i8, } impl JustATrait for StructOfNumbers {} enum EnumOfOtherTypes { I8(i8), AnotherI8(i8), Collection(Vec<String>), } impl JustATrait for EnumOfOtherTypes {} struct StructOfOtherTypes { an_i8: i8, another_i8: i8, a_collection: Vec<String>, } impl JustATrait for StructOfOtherTypes {} struct ArrayAndI8 { array: [i8; 1000], // 這一個將會非常大 an_i8: i8, in_u8: u8, } impl JustATrait for ArrayAndI8 {} fn main() { println!( "{}, {}, {}, {}, {}", size_of::<EnumOfNumbers>(), size_of::<StructOfNumbers>(), size_of::<EnumOfOtherTypes>(), size_of::<StructOfOtherTypes>(), size_of::<ArrayAndI8>(), ); }
當我們列印這些東西大小的時候,我們得到 2, 3, 32, 32, 1002。所以如果你像下面這樣做的話會造成錯誤:
#![allow(unused)] fn main() { // ⚠️ fn returns_just_a_trait() -> JustATrait { let some_enum = EnumOfNumbers::I8(8); some_enum } }
它說:
error[E0746]: return type cannot have an unboxed trait object
--> src\main.rs:53:30
|
53 | fn returns_just_a_trait() -> JustATrait {
| ^^^^^^^^^^ doesn't have a size known at compile-time
而這是真的,因為大小可以是 2、3、32、1002,或者其他任何東西。所以我們把它放在 Box 中。在這裡我們還加上了 dyn 這個關鍵詞。dyn 這個詞告訴你,你說的是個特徵,而不是結構體或其他任何東西。
所以你可以把函式改成這樣:
#![allow(unused)] fn main() { // 🚧 fn returns_just_a_trait() -> Box<dyn JustATrait> { let some_enum = EnumOfNumbers::I8(8); Box::new(some_enum) } }
現在它能執行了,因為在堆疊上只是個 Box,而我們也知道 Box 的大小。
你會經常看到 Box<dyn Error> 這種形式,因為有時你可能會有多個可能的錯誤。
我們可以快速建立兩個錯誤型別來顯示這一點。要建立正式的錯誤型別,你必須為它實作 std::error::Error。這部分很容易:只要寫出 impl std::error::Error {}。但錯誤型別還需要 Debug 和 Display,這樣才能給出問題的資訊。Debug 很容易,只要加上 #[derive(Debug)] 就行,但 Display 需要 .fmt() 方法。我們之前做過一次。
程式碼像這樣:
use std::error::Error; use std::fmt; #[derive(Debug)] struct ErrorOne; impl Error for ErrorOne {} // 現在錯誤型別有 Debug 了. 換 Display: impl fmt::Display for ErrorOne { fn fmt(&self, f: &mut fmt::Formatter) -> fmt::Result { write!(f, "You got the first error!") // 所有要做的就是寫這段訊息 } } #[derive(Debug)] // 對 ErrorTwo 做一樣的事 struct ErrorTwo; impl Error for ErrorTwo {} impl fmt::Display for ErrorTwo { fn fmt(&self, f: &mut fmt::Formatter) -> fmt::Result { write!(f, "You got the second error!") } } // 做出只回傳 String 或錯誤的函式 fn returns_errors(input: u8) -> Result<String, Box<dyn Error>> { // 有了 Box<dyn Error> 你就能回傳任何有 Error 特徵的東西 match input { 0 => Err(Box::new(ErrorOne)), // 不要忘記放進 Box 裡 1 => Err(Box::new(ErrorTwo)), _ => Ok("Looks fine to me".to_string()), // 這是成功的型別 } } fn main() { let vec_of_u8s = vec![0_u8, 1, 80]; // 用來嘗試的三個數字 for number in vec_of_u8s { match returns_errors(number) { Ok(input) => println!("{}", input), Err(message) => println!("{}", message), } } }
將會印出:
You got the first error!
You got the second error!
Looks fine to me
如果我們在沒有 Box<dyn Error> 時寫成這樣,我們就會有問題了:
#![allow(unused)] fn main() { // ⚠️ fn returns_errors(input: u8) -> Result<String, Error> { match input { 0 => Err(ErrorOne), 1 => Err(ErrorTwo), _ => Ok("Looks fine to me".to_string()), } } }
它會告訴你:
21 | fn returns_errors(input: u8) -> Result<String, Error> {
| ^^^^^^^^^^^^^^^^^^^^^ doesn't have a size known at compile-time
這並不是很意外,因為我們知道特徵可以用在很多東西上,而且它們各自有不同的大小。
Default 和生成器模式
你可以實作 Default 特徵在你認為最常見的 struct 或 enum 上用來賦值。生成器模式可以很好地和它配合,來讓使用者在需要時輕鬆地進行修改。首先我們來看看 Default。實際上,在 Rust 大多數的通用型別已經有 Default。它們並不另人意外:像是 0、""(空字串)、false, 等等。
fn main() { let default_i8: i8 = Default::default(); let default_str: String = Default::default(); let default_bool: bool = Default::default(); println!("'{}', '{}', '{}'", default_i8, default_str, default_bool); }
印出 '0', '', 'false'。
所以 Default 就像 new 函式一樣,除了你不需要輸入任何東西。首先我們將要建立還沒有實現 Default 的 struct。它有個 new 函式是我們用來做出名為比利 (Billy) 的角色並附帶一些角色個人資訊。
struct Character { name: String, age: u8, height: u32, weight: u32, lifestate: LifeState, } enum LifeState { Alive, Dead, NeverAlive, Uncertain } impl Character { fn new(name: String, age: u8, height: u32, weight: u32, alive: bool) -> Self { Self { name, age, height, weight, lifestate: if alive { LifeState::Alive } else { LifeState::Dead }, } } } fn main() { let character_1 = Character::new("Billy".to_string(), 15, 170, 70, true); }
但也許在我們的世界裡,我們希望大部分角色都叫比利,年齡 15 歲、身高 170、體重 70,還活著。我們可以實作 Default,這樣我們就可以只寫 Character::default()。它看起來像這樣:
#[derive(Debug)] struct Character { name: String, age: u8, height: u32, weight: u32, lifestate: LifeState, } #[derive(Debug)] enum LifeState { Alive, Dead, NeverAlive, Uncertain, } impl Character { fn new(name: String, age: u8, height: u32, weight: u32, alive: bool) -> Self { Self { name, age, height, weight, lifestate: if alive { LifeState::Alive } else { LifeState::Dead }, } } } impl Default for Character { fn default() -> Self { Self { name: "Billy".to_string(), age: 15, height: 170, weight: 70, lifestate: LifeState::Alive, } } } fn main() { let character_1 = Character::default(); println!( "The character {:?} is {:?} years old.", character_1.name, character_1.age ); }
印出 The character "Billy" is 15 years old. 簡單多了!
現在我們來看生成器模式。我們會有很多比利,所以我們會保留預設的。但是很多其他角色只會有一點點不同。生成器模式讓我們可以把小方法連結起來,每次改變一個值。在 Character 裡這就是一個這樣的方法:
#![allow(unused)] fn main() { fn height(mut self, height: u32) -> Self { // 🚧 self.height = height; self } }
一定要注意,它接受的是 mut self。我們之前看到過一次,它不是可變引用(&mut self)。它取得了 Self 的所有權,並且有了 mut,它將是可變的,即使它先前不是可變的。這是因為 .height() 擁有完整的所有權,沒人能接觸它,所以它能安全的作為可變變數來用。接著它只是改變 self.height,並回傳 Self(也就是 Character)。
所以我們有三個這樣的生成器方法。它們幾乎是一樣的:
#![allow(unused)] fn main() { fn height(mut self, height: u32) -> Self { // 🚧 self.height = height; self } fn weight(mut self, weight: u32) -> Self { self.weight = weight; self } fn name(mut self, name: &str) -> Self { self.name = name.to_string(); self } }
這些每一個都會改變其中一個變數,並給出 Self 回傳:這就是你在生成器模式中會看到的。所以現在我們類似這樣寫些東西來做出角色:let character_1 = Character::default().height(180).weight(60).name("Bobby");。如果你正在建造函式庫給別人使用,這可以讓他們很容易使用。對終端使用者來說很容易,因為它看起來幾乎像是自然的英語:"給我預設的角色,但身高為 180、體重為 60、名字是 Bobby。" 到目前為止,我們的程式碼看起來像這樣:
#[derive(Debug)] struct Character { name: String, age: u8, height: u32, weight: u32, lifestate: LifeState, } #[derive(Debug)] enum LifeState { Alive, Dead, NeverAlive, Uncertain, } impl Character { fn new(name: String, age: u8, height: u32, weight: u32, alive: bool) -> Self { Self { name, age, height, weight, lifestate: if alive { LifeState::Alive } else { LifeState::Dead }, } } fn height(mut self, height: u32) -> Self { self.height = height; self } fn weight(mut self, weight: u32) -> Self { self.weight = weight; self } fn name(mut self, name: &str) -> Self { self.name = name.to_string(); self } } impl Default for Character { fn default() -> Self { Self { name: "Billy".to_string(), age: 15, height: 170, weight: 70, lifestate: LifeState::Alive, } } } fn main() { let character_1 = Character::default().height(180).weight(60).name("Bobby"); println!("{:?}", character_1); }
最後一個要新增的方法通常叫 .build()。這個方法是某種最終檢查。當你給使用者提供像是 .height() 這樣的方法時,你可以確保他們只輸入 u32(),但是如果他們輸入身高為 5000 時怎麼辦?在你正在製作的遊戲中那可能就不對了。我們將使用名為 .build() 的最後方法去回傳 Result。在它裡面我們將檢查使用者輸入是否正常,如果正常的話我們將回傳 Ok(Self)。
不過首先讓我們更改 .new() 方法。我們不希望使用者再自由建立任何一種角色。所以我們將把 impl Default 的值移到 .new()。而現在 .new() 不再接受任何輸入。
#![allow(unused)] fn main() { fn new() -> Self { // 🚧 Self { name: "Billy".to_string(), age: 15, height: 170, weight: 70, lifestate: LifeState::Alive, } } }
這意味著我們不再需要 impl Default 了,因為 .new() 有所有的預設值。所以我們可以刪除 impl Default。
現在我們的程式碼像這樣:
#[derive(Debug)] struct Character { name: String, age: u8, height: u32, weight: u32, lifestate: LifeState, } #[derive(Debug)] enum LifeState { Alive, Dead, NeverAlive, Uncertain, } impl Character { fn new() -> Self { Self { name: "Billy".to_string(), age: 15, height: 170, weight: 70, lifestate: LifeState::Alive, } } fn height(mut self, height: u32) -> Self { self.height = height; self } fn weight(mut self, weight: u32) -> Self { self.weight = weight; self } fn name(mut self, name: &str) -> Self { self.name = name.to_string(); self } } fn main() { let character_1 = Character::new().height(180).weight(60).name("Bobby"); println!("{:?}", character_1); }
印出來的結果一樣:Character { name: "Bobby", age: 15, height: 180, weight: 60, lifestate: Alive }。
我們幾乎已經準備好寫 .build() 方法了,但是還有個問題:要如何讓使用者使用它?現在使用者可以寫 let x = Character::new().height(76767);,然後得到 Character。有很多方式可以做到這一點,也許你能想出自己的方法。但是我們會在 Character 中加上 can_use: bool 的值。
#![allow(unused)] fn main() { #[derive(Debug)] // 🚧 struct Character { name: String, age: u8, height: u32, weight: u32, lifestate: LifeState, can_use: bool, // 設定使用者是否能使用角色 } // Cut other code fn new() -> Self { Self { name: "Billy".to_string(), age: 15, height: 170, weight: 70, lifestate: LifeState::Alive, can_use: true, // .new() 永遠給出好的角色, 所以是 true } } }
而對於其他的方法,比如 .height(),我們會將 can_use 設定為 false。只有 .build() 會再次設定為 true,所以現在使用者要用 .build() 做最後的檢查。我們要確保 height 不高於 200,weight 不寬於 300。另外,在我們的遊戲中,有個不好的字叫 smurf,我們不希望任何角色使用它。
我們的 .build() 方法像這樣:
#![allow(unused)] fn main() { fn build(mut self) -> Result<Character, String> { // 🚧 if self.height < 200 && self.weight < 300 && !self.name.to_lowercase().contains("smurf") { self.can_use = true; Ok(self) } else { Err("Could not create character. Characters must have: 1) Height below 200 2) Weight below 300 3) A name that is not Smurf (that is a bad word)" .to_string()) } } }
!self.name.to_lowercase().contains("smurf") 確保使用者不會寫出類似 "SMURF" 或 "IamSmurf" 的字樣。它讓整個 String 都變成小寫字母,並檢查 .contains() 而不是 ==。而前面的 ! 表示"不是"(邏輯運算補數)。
如果一切正常,我們就把 can_use 設定為 true,然後把角色包在 Ok 裡面回傳給使用者。
現在我們的程式碼已經完成了,我們將建立三個不能使用的角色,及一個能使用的角色。最後的程式碼像這樣:
#[derive(Debug)] struct Character { name: String, age: u8, height: u32, weight: u32, lifestate: LifeState, can_use: bool, // 這裡是新的值 } #[derive(Debug)] enum LifeState { Alive, Dead, NeverAlive, Uncertain, } impl Character { fn new() -> Self { Self { name: "Billy".to_string(), age: 15, height: 170, weight: 70, lifestate: LifeState::Alive, can_use: true, // .new() 做出可用的角色, 所以是 true } } fn height(mut self, height: u32) -> Self { self.height = height; self.can_use = false; // 現在使用者還不能使用角色 self } fn weight(mut self, weight: u32) -> Self { self.weight = weight; self.can_use = false; self } fn name(mut self, name: &str) -> Self { self.name = name.to_string(); self.can_use = false; self } fn build(mut self) -> Result<Character, String> { if self.height < 200 && self.weight < 300 && !self.name.to_lowercase().contains("smurf") { self.can_use = true; // 一切都沒問題, 所以設定為 true Ok(self) // 並回傳角色 } else { Err("Could not create character. Characters must have: 1) Height below 200 2) Weight below 300 3) A name that is not Smurf (that is a bad word)" .to_string()) } } } fn main() { let character_with_smurf = Character::new().name("Lol I am Smurf!!").build(); // 這一個包含 "smurf" - 不行 let character_too_tall = Character::new().height(400).build(); // 太高 - 不行 let character_too_heavy = Character::new().weight(500).build(); // 太重 - 不行 let okay_character = Character::new() .name("Billybrobby") .height(180) .weight(100) .build(); // 這個角色沒問題. 名字很好、身高體重也都很好 // 現在它們還不是 Character, 它們是 Result<Character, String>. 所以讓我們把它們放進 Vec 裡,那樣我們就能一起處理它們: let character_vec = vec![character_with_smurf, character_too_tall, character_too_heavy, okay_character]; for character in character_vec { // 現在我們會印出角色如果是 Ok, 以及印出錯誤如果是 Err match character { Ok(character_info) => println!("{:?}", character_info), Err(err_info) => println!("{}", err_info), } println!(); // 再多加上一個換行 } }
將會印出:
Could not create character. Characters must have:
1) Height below 200
2) Weight below 300
3) A name that is not Smurf (that is a bad word)
Could not create character. Characters must have:
1) Height below 200
2) Weight below 300
3) A name that is not Smurf (that is a bad word)
Could not create character. Characters must have:
1) Height below 200
2) Weight below 300
3) A name that is not Smurf (that is a bad word)
Character { name: "Billybrobby", age: 15, height: 180, weight: 100, lifestate: Alive, can_use: true }
Deref 和 DerefMut
Deref 是讓你用 * 來對某些東西取值(dereference)的特徵。我們之前在使用元組結構體來做出新的型別時見過 Deref 這個字,現在是時候學會它了。
我們知道,參考和值是不一樣的:
// ⚠️ fn main() { let value = 7; // 這是個 i32 let reference = &7; // 這是個 &i32 println!("{}", value == reference); }
而 Rust 連 false 都不給,因為它甚至不會比較兩者。
error[E0277]: can't compare `{integer}` with `&{integer}`
--> src\main.rs:4:26
|
4 | println!("{}", value == reference);
| ^^ no implementation for `{integer} == &{integer}`
當然,這裡的解法是使用 *。所以這將會印出 true:
fn main() { let value = 7; let reference = &7; println!("{}", value == *reference); }
現在讓我們想像一下只容納一個數字的簡單型別。它就像 Box,我們有些想法為它提供一些額外的功能。但如果我們只是給它一個數字,它就不能做那麼多了。
我們不能像使用 Box 那樣使用 *:
// ⚠️ struct HoldsANumber(u8); fn main() { let my_number = HoldsANumber(20); println!("{}", *my_number + 20); }
錯誤訊息是:
error[E0614]: type `HoldsANumber` cannot be dereferenced
--> src\main.rs:24:22
|
24 | println!("{:?}", *my_number + 20);
我們當然可以做到這一點:println!("{:?}", my_number.0 + 20);。但是這樣的話,我們就是在 20 的基礎上再單獨加 u8。如果我們能把它們直接加在一起就更好了。cannot be dereferenced 這個訊息給了我們線索:我們需要實作 Deref。實作 Deref 的簡單東西有時被稱為"智慧指標(smart pointer)"。一個智慧指標可以指向它的元素,有它的資訊,並且可以使用它的方法。因為現在我們可以新增 u8 的 my_number.0,但我們不能用 HoldsANumber 來做其他的事情:到目前為止,它只有 Debug。
有趣的事實是:String 其實是 &str 的智慧指標,Vec 是陣列(或其他型別)的智慧指標。所以我們其實從一開始就在使用智慧指標。
實現 Deref 並不難,標準函式庫中的範例也很簡單。這裡是標準函式庫中的範例程式碼:
use std::ops::Deref; struct DerefExample<T> { value: T } impl<T> Deref for DerefExample<T> { type Target = T; fn deref(&self) -> &Self::Target { &self.value } } fn main() { let x = DerefExample { value: 'a' }; assert_eq!('a', *x); }
所以我們按照這個來,現在我們的 Deref 像這樣:
#![allow(unused)] fn main() { // 🚧 impl Deref for HoldsANumber { type Target = u8; // 記得, 這是"關聯型別(associated type)": 型別會一起寫在這. // 你必須要使用正確的 type Target = (你想回傳的型別) fn deref(&self) -> &Self::Target { // 當你使用 * 時 Rust 會呼叫 .deref(). 我們只定義 Target 為 u8 所以這很容易理解 &self.0 // 我們選擇 &self.0 因為這是元組結構體. 在具名結構體中它就會是像 "&self.number" 之類的東西 } } }
所以現在我們可以用 * 來做:
use std::ops::Deref; #[derive(Debug)] struct HoldsANumber(u8); impl Deref for HoldsANumber { type Target = u8; fn deref(&self) -> &Self::Target { &self.0 } } fn main() { let my_number = HoldsANumber(20); println!("{:?}", *my_number + 20); }
所以會印出 40,我們也不需要寫 my_number.0 了。這意味著我們有 u8 型別的方法可以用,我們可以為 HoldsANumber 寫出我們自己的方法。我們將新增自己寫的簡單方法,並使用我們從 u8 中得到的另一個方法,稱為 .checked_sub()。.checked_sub() 方法是安全的減法,它能回傳 Option。如果它能做減法,那麼它就會在 Some 裡面給你結果,如果它不能做減法,那麼它就會給你 None。記住,u8 不能是負數,所以還是 .checked_sub() 比較安全,這樣就不會恐慌了。
use std::ops::Deref; struct HoldsANumber(u8); impl HoldsANumber { fn prints_the_number_times_two(&self) { println!("{}", self.0 * 2); } } impl Deref for HoldsANumber { type Target = u8; fn deref(&self) -> &Self::Target { &self.0 } } fn main() { let my_number = HoldsANumber(20); println!("{:?}", my_number.checked_sub(100)); // 這是來自 u8 的方法 my_number.prints_the_number_times_two(); // 這是我們自己的方法 }
印出:
None
40
我們也可以實作 DerefMut,這樣我們就能透過 * 來改變數值。它看起來幾乎一樣。在實作 DerefMut 之前,你需要先實作 Deref。
use std::ops::{Deref, DerefMut}; struct HoldsANumber(u8); impl HoldsANumber { fn prints_the_number_times_two(&self) { println!("{}", self.0 * 2); } } impl Deref for HoldsANumber { type Target = u8; fn deref(&self) -> &Self::Target { &self.0 } } impl DerefMut for HoldsANumber { // 這裡你不需要 type Target = u8; 這要感謝 Deref 因為它已經知道了 fn deref_mut(&mut self) -> &mut Self::Target { // 除了到處用 mut 以外,其它一切都一樣 &mut self.0 } } fn main() { let mut my_number = HoldsANumber(20); *my_number = 30; // DerefMut lets us do this println!("{:?}", my_number.checked_sub(100)); my_number.prints_the_number_times_two(); }
所以你可以看到,Deref 給你的型別提供了強大的力量。
這也是為什麼標準函式庫說:Deref should only be implemented for smart pointers to avoid confusion。這是因為對於複雜的型別,你可以用 Deref 做一些奇怪的事情。讓我們想像一個非常混亂的範例來理解它們的含義。我們將從一個遊戲的 Character 結構體開始。新的 Character 需要一些資料,比如智力和力量。所以這裡是我們的第一個角色:
struct Character { name: String, strength: u8, dexterity: u8, health: u8, intelligence: u8, wisdom: u8, charm: u8, hit_points: i8, alignment: Alignment, } impl Character { fn new( name: String, strength: u8, dexterity: u8, health: u8, intelligence: u8, wisdom: u8, charm: u8, hit_points: i8, alignment: Alignment, ) -> Self { Self { name, strength, dexterity, health, intelligence, wisdom, charm, hit_points, alignment, } } } enum Alignment { Good, Neutral, Evil, } fn main() { let billy = Character::new("Billy".to_string(), 9, 8, 7, 10, 19, 19, 5, Alignment::Good); }
現在讓我們想像我們想存放人物的生命值(hit points)在一個大向量裡面。也許我們也會把怪物級資料也放進去,並存放在一起。由於 hit_points 是 i8,我們實作了 Deref,來讓我們可以對它進行各式各樣的數學計算。但是現在看看我們的 main() 函式有多麼奇怪:
use std::ops::Deref; // 直到例舉 Alignment 之後,以外的所有程式碼是一樣的 struct Character { name: String, strength: u8, dexterity: u8, health: u8, intelligence: u8, wisdom: u8, charm: u8, hit_points: i8, alignment: Alignment, } impl Character { fn new( name: String, strength: u8, dexterity: u8, health: u8, intelligence: u8, wisdom: u8, charm: u8, hit_points: i8, alignment: Alignment, ) -> Self { Self { name, strength, dexterity, health, intelligence, wisdom, charm, hit_points, alignment, } } } enum Alignment { Good, Neutral, Evil, } impl Deref for Character { // 給 Character 實作 Deref. 現在我們可以任意做整數計算! type Target = i8; fn deref(&self) -> &Self::Target { &self.hit_points } } fn main() { let billy = Character::new("Billy".to_string(), 9, 8, 7, 10, 19, 19, 5, Alignment::Good); // 建立兩個角色, billy 和 brandy let brandy = Character::new("Brandy".to_string(), 9, 8, 7, 10, 19, 19, 5, Alignment::Good); let mut hit_points_vec = vec![]; // 把我們的生命值資料放在這裡 hit_points_vec.push(*billy); // 推入 *billy? hit_points_vec.push(*brandy); // 推入 *brandy? println!("{:?}", hit_points_vec); }
印出 [5, 5]。我們的程式碼現在讓人讀起來感覺非常奇怪。我們可以讀懂在 main() 上面的 Deref,然後弄清楚 *billy 的意思是 i8,但是如果有很多程式碼呢?可能我們的程式碼長 2000 行,並且突然之間我們要弄清楚為什麼要 .push() *billy。Character 當然不僅僅是 i8 的智慧指標。
當然寫 hit_points_vec.push(*billy) 並不違法,但這讓程式碼看起來非常奇怪。也許簡單的 .get_hp() 方法會好得多,或者另一個存放角色的結構體。然後你可以疊代並推入每個角色的 hit_points。Deref 雖然提供了強大的力量,但最好確保程式碼的邏輯性。
Crates 和模組
每次你用 Rust 寫程式碼時,你都是寫在 crate 裡面。crate 是一或多個檔案,把你的程式碼組織在一起。在你寫的檔案裡面,你也可以做出 mod。mod(module,模組)是存放函式、結構體等等的空間,因為這些原因而被使用:
- 構建你的程式碼:幫助你思考程式碼的一般結構。當你的程式碼愈來愈大時,這會愈重要。
- 閱讀你的程式碼:人們可以更容易理解你的程式碼。例如,
std::collections::HashMap這個名字告訴你,它是在std的collections模組裡面。這給了你提示,也許collections裡面還有更多的集合型別可以讓你嘗試。 - 隱私權:所有的東西一開始都是私有的(private)。這樣可以讓你避免使用者直接使用函式。
要做出 mod,只需要寫 mod,然後用 {} 開始程式碼塊。我們將做出名為 print_things 的模組,裡面有一些列印相關的功能。
mod print_things { use std::fmt::Display; fn prints_one_thing<T: Display>(input: T) { // 印出實作 Display 的任何東西 println!("{}", input) } } fn main() {}
你可以看到,我們把 use std::fmt::Display; 寫在 print_things 裡面,因為它是獨立分開的空間。如果你把 use std::fmt::Display; 寫在 main() 裡面,就沒有用了。而且我們現在也不能從 main() 裡面呼叫。在 fn 前面沒有 pub 這個關鍵字時,它會保持為私有的。讓我們試著在沒有 pub 的情況下呼叫它。這裡是其中一種寫法:
// 🚧 fn main() { crate::print_things::prints_one_thing(6); }
crate 的意思是"在這個專案(project)裡",但對於我們的簡單範例來說,它和"在這個檔案裡面"是一樣的。在那裡面是 print_things 這個模組,最後是 prints_one_thing() 函式。你可以每次都這樣寫,也可以寫 use 來匯入。現在我們可以看到錯誤說它是私有的:
// ⚠️ mod print_things { use std::fmt::Display; fn prints_one_thing<T: Display>(input: T) { println!("{}", input) } } fn main() { use crate::print_things::prints_one_thing; prints_one_thing(6); prints_one_thing("Trying to print a string...".to_string()); }
這裡是錯誤訊息:
error[E0603]: function `prints_one_thing` is private
--> src\main.rs:10:30
|
10 | use crate::print_things::prints_one_thing;
| ^^^^^^^^^^^^^^^^ private function
|
note: the function `prints_one_thing` is defined here
--> src\main.rs:4:5
|
4 | fn prints_one_thing<T: Display>(input: T) {
| ^^^^^^^^^^^^^^^^^^^^^^^^^^^^^^^^^^^^^^^^^
print_one_thing 是私有的函式很容易理解。它還用 src\main.rs:4:5 告訴我們在哪裡可以找到這個函式。這很有幫助,因為你不僅可以在一個檔案中寫 mod,還能在很多檔案中寫 mod。
現在我們只要寫 pub fn 而不是 fn,一切就可以執行了。
mod print_things { use std::fmt::Display; pub fn prints_one_thing<T: Display>(input: T) { println!("{}", input) } } fn main() { use crate::print_things::prints_one_thing; prints_one_thing(6); prints_one_thing("Trying to print a string...".to_string()); }
印出:
6
Trying to print a string...
pub 對結構體、列舉、特徵或模組有什麼作用?pub 對它們來說用起來像這樣:
pub對於結構體:它使結構體公開,但裡面的成員不是公開的。要想讓成員公開,你也要為每個成員分別寫pub。pub對於列舉或特徵:所有的東西都變成了公開的。這是合理的,因為特徵是關於賦予事物相同的行為。而列舉是關於值之間的選擇,而且你需要看到所有的列舉值才能做選擇。pub對於模組來說:頂層的模組會是pub的,因為如果它不是那就沒有人可以使用裡面的任何東西。但是模組裡面的模組需要使用pub才能成為公開的。
那讓我們在 print_things 裡面放個名為 Billy 的結構體。這個結構體幾乎全部會是公開的,但也不盡然。這個結構體是公開的,所以它寫做:pub struct Billy。裡面將會有 name 和 times_to_print。name 不會是公開的,因為我們只想讓使用者建立命名為 "Billy".to_string() 的結構體。但是使用者可以選擇印出的次數,所以那將會是公開的。它看起來像這樣:
mod print_things { use std::fmt::{Display, Debug}; #[derive(Debug)] pub struct Billy { // Billy 是公開的 name: String, // 但 name 是私有的. pub times_to_print: u32, } impl Billy { pub fn new(times_to_print: u32) -> Self { // 這表示使用者需要去用 new 來建立 Billy. 使用者只能改變 times_to_print 的次數 Self { name: "Billy".to_string(), // 我們選擇的名字 - 使用者不能選 times_to_print, } } pub fn print_billy(&self) { // 這個函式印出 Billy for _ in 0..self.times_to_print { println!("{:?}", self.name); } } } pub fn prints_one_thing<T: Display>(input: T) { println!("{}", input) } } fn main() { use crate::print_things::*; // 現在我們使用 *. 這會匯入所有來自 print_things 的東西 let my_billy = Billy::new(3); my_billy.print_billy(); }
印出:
"Billy"
"Billy"
"Billy"
對了,匯入一切的 * 叫做"glob 運算子"。Glob 的意思是"全域性(global)",所以它意味著一切事物。
在 mod 裡面你可以建立其他模組。一個子模組(模組裡的模組)總是可以使用上層模組內部的任何東西。你可以在下一個範例中看到這一點,在那裡我們會有個在 mod country 裡面的 mod province 裡面的 mod city。
你可以把這個結構想成這樣:即使你在一個國家,你可能不在一個省。而即使你在一個省,你也可能不在一個城市。但如果你在一個城市,你就肯定在這個城市的省份和國家裡。
mod country { // 頂層模組不需要寫 pub fn print_country(country: &str) { // 注意: 這個函式不是公開的 println!("We are in the country of {}", country); } pub mod province { // 讓這個模組是公開的 fn print_province(province: &str) { // 注意: 這個函式不是公開的 println!("in the province of {}", province); } pub mod city { // 讓這個模組是公開的 pub fn print_city(country: &str, province: &str, city: &str) { // 然而這個函式是公開的 crate::country::print_country(country); crate::country::province::print_province(province); println!("in the city of {}", city); } } } } fn main() { crate::country::province::city::print_city("Canada", "New Brunswick", "Moncton"); }
有趣的是,print_city 可以存取 print_province 和 print_country。這是因為 mod city 在其他模組裡面。它不需要在 print_province 前面加上 pub 之後才能使用。這也合理:城市不需要做什麼,它本來就在一個省裡,在一個國家裡。
你可能有注意到,crate::country::province::print_province(province); 非常長。當我們在模組裡面的時候,我們可以用 super 從上層模組存取成員。其實 super 這個字本身就是"上面(above)"的意思,比如"上級(superior)"。在我們的簵例中,我們只用了函式一次,但是如果你用的比較多的話,那麼最好是匯入它。如果它能讓你的程式碼更容易閱讀,那也是個好主意,即使你只用了函式一次。程式碼現在幾乎是一樣的,但更容易閱讀一些:
mod country { fn print_country(country: &str) { println!("We are in the country of {}", country); } pub mod province { fn print_province(province: &str) { println!("in the province of {}", province); } pub mod city { use super::super::*; // 使用 "上面的上面" 的一切: 那表示 country 模組 use super::*; // 使用 "上面" 的一切: 那表示 province 模組 pub fn print_city(country: &str, province: &str, city: &str) { print_country(country); print_province(province); println!("in the city of {}", city); } } } } fn main() { use crate::country::province::city::print_city; // 帶入函式使用 print_city("Canada", "New Brunswick", "Moncton"); print_city("Korea", "Gyeonggi-do", "Gwangju"); // 現在再用一次也沒負擔 }
測試
在我們瞭解模組後,測試正是現在學習的好主題。在 Rust 中測試你的程式碼是非常容易的,因為你可以立刻在你的程式碼旁寫測試。
開始測試最簡單的方法就是在函式上面加上 #[test]。這裡是個簡單的範例:
#![allow(unused)] fn main() { #[test] fn two_is_two() { assert_eq!(2, 2); } }
但如果你試圖在 Playground 中執行它,它會給出錯誤:error[E0601]: `main` function not found in crate `playground。這是因為你不使用 Run 來進行測試,你要使用的是 Test。另外,你不使用 main() 函式進行測試 - 它們在外面執行。要在 Playground 中執行這個,點選 RUN 旁邊的 ···,然後把它改為 Test。現在如果你點選它,它將會跑測試。(如果你已經安裝了 Rust,你將輸入 cargo test 來做測試)
這裡是輸出內容:
running 1 test
test two_is_two ... ok
test result: ok. 1 passed; 0 failed; 0 ignored; 0 measured; 0 filtered out
讓我們把 assert_eq!(2, 2) 改成 assert_eq!(2, 3),看看會有什麼結果。當測試失敗時,你會得到更多的資訊:
running 1 test
test two_is_two ... FAILED
failures:
---- two_is_two stdout ----
thread 'two_is_two' panicked at 'assertion failed: `(left == right)`
left: `2`,
right: `3`', src/lib.rs:3:5
note: run with `RUST_BACKTRACE=1` environment variable to display a backtrace
failures:
two_is_two
test result: FAILED. 0 passed; 1 failed; 0 ignored; 0 measured; 0 filtered out
assert_eq!(left, right) 是 Rust 中測試函式的主要方法。如果它不成功,它將會顯示值的不同:左邊有 2,但右邊有 3。
RUST_BACKTRACE=1 是什麼意思?這是電腦上的設定,可以提供更多關於錯誤的資訊。幸好 Playground 也有:點選 STABLE 旁邊的 ···,然後設定 Backtrace 為 ENABLED。如果你這樣做,它會給你 很多 的資訊:
running 1 test
test two_is_two ... FAILED
failures:
---- two_is_two stdout ----
thread 'two_is_two' panicked at 'assertion failed: 2 == 3', src/lib.rs:3:5
stack backtrace:
0: backtrace::backtrace::libunwind::trace
at /cargo/registry/src/github.com-1ecc6299db9ec823/backtrace-0.3.46/src/backtrace/libunwind.rs:86
1: backtrace::backtrace::trace_unsynchronized
at /cargo/registry/src/github.com-1ecc6299db9ec823/backtrace-0.3.46/src/backtrace/mod.rs:66
2: std::sys_common::backtrace::_print_fmt
at src/libstd/sys_common/backtrace.rs:78
3: <std::sys_common::backtrace::_print::DisplayBacktrace as core::fmt::Display>::fmt
at src/libstd/sys_common/backtrace.rs:59
4: core::fmt::write
at src/libcore/fmt/mod.rs:1076
5: std::io::Write::write_fmt
at /rustc/c367798cfd3817ca6ae908ce675d1d99242af148/src/libstd/io/mod.rs:1537
6: std::io::impls::<impl std::io::Write for alloc::boxed::Box<W>>::write_fmt
at src/libstd/io/impls.rs:176
7: std::sys_common::backtrace::_print
at src/libstd/sys_common/backtrace.rs:62
8: std::sys_common::backtrace::print
at src/libstd/sys_common/backtrace.rs:49
9: std::panicking::default_hook::{{closure}}
at src/libstd/panicking.rs:198
10: std::panicking::default_hook
at src/libstd/panicking.rs:215
11: std::panicking::rust_panic_with_hook
at src/libstd/panicking.rs:486
12: std::panicking::begin_panic
at /rustc/c367798cfd3817ca6ae908ce675d1d99242af148/src/libstd/panicking.rs:410
13: playground::two_is_two
at src/lib.rs:3
14: playground::two_is_two::{{closure}}
at src/lib.rs:2
15: core::ops::function::FnOnce::call_once
at /rustc/c367798cfd3817ca6ae908ce675d1d99242af148/src/libcore/ops/function.rs:232
16: <alloc::boxed::Box<F> as core::ops::function::FnOnce<A>>::call_once
at /rustc/c367798cfd3817ca6ae908ce675d1d99242af148/src/liballoc/boxed.rs:1076
17: <std::panic::AssertUnwindSafe<F> as core::ops::function::FnOnce<()>>::call_once
at /rustc/c367798cfd3817ca6ae908ce675d1d99242af148/src/libstd/panic.rs:318
18: std::panicking::try::do_call
at /rustc/c367798cfd3817ca6ae908ce675d1d99242af148/src/libstd/panicking.rs:297
19: std::panicking::try
at /rustc/c367798cfd3817ca6ae908ce675d1d99242af148/src/libstd/panicking.rs:274
20: std::panic::catch_unwind
at /rustc/c367798cfd3817ca6ae908ce675d1d99242af148/src/libstd/panic.rs:394
21: test::run_test_in_process
at src/libtest/lib.rs:541
22: test::run_test::run_test_inner::{{closure}}
at src/libtest/lib.rs:450
note: Some details are omitted, run with `RUST_BACKTRACE=full` for a verbose backtrace.
failures:
two_is_two
test result: FAILED. 0 passed; 1 failed; 0 ignored; 0 measured; 0 filtered out
除非你真的找不到問題所在,否則你不需要使用回溯(Backtrace)。但幸運的是你也不需要全部理解。如果你繼續閱讀,你最終會看到第 13 行,那裡寫著 playground──那是它提到的你的程式碼的位置。其它的一切都是關於 Rust 為了執行你的程式,在其他函式庫中所做的事情。但是這兩行告訴你,它看的是 playground 的第 2 行和第 3 行,這是個要檢查那裡的提示。這裡重複那個部分:
13: playground::two_is_two
at src/lib.rs:3
14: playground::two_is_two::{{closure}}
at src/lib.rs:2
編輯:Rust 在 2021 年初改進了它的回溯訊息,只顯示最有意義的資訊。現在更容易閱讀了:
failures:
---- two_is_two stdout ----
thread 'two_is_two' panicked at 'assertion failed: `(left == right)`
left: `2`,
right: `3`', src/lib.rs:3:5
stack backtrace:
0: rust_begin_unwind
at /rustc/cb75ad5db02783e8b0222fee363c5f63f7e2cf5b/library/std/src/panicking.rs:493:5
1: core::panicking::panic_fmt
at /rustc/cb75ad5db02783e8b0222fee363c5f63f7e2cf5b/library/core/src/panicking.rs:92:14
2: playground::two_is_two
at ./src/lib.rs:3:5
3: playground::two_is_two::{{closure}}
at ./src/lib.rs:2:1
4: core::ops::function::FnOnce::call_once
at /rustc/cb75ad5db02783e8b0222fee363c5f63f7e2cf5b/library/core/src/ops/function.rs:227:5
5: core::ops::function::FnOnce::call_once
at /rustc/cb75ad5db02783e8b0222fee363c5f63f7e2cf5b/library/core/src/ops/function.rs:227:5
note: Some details are omitted, run with `RUST_BACKTRACE=full` for a verbose backtrace.
failures:
two_is_two
test result: FAILED. 0 passed; 1 failed; 0 ignored; 0 measured; 0 filtered out; finished in 0.02s
現在讓我們再把回溯關閉,回到常規的測試。現在我們將會寫一些其他函式,並使用測試函式來測試它們。這裡有幾個範例:
#![allow(unused)] fn main() { fn return_two() -> i8 { 2 } #[test] fn it_returns_two() { assert_eq!(return_two(), 2); } fn return_six() -> i8 { 4 + return_two() } #[test] fn it_returns_six() { assert_eq!(return_six(), 6) } }
現在都能執行成功:
running 2 tests
test it_returns_two ... ok
test it_returns_six ... ok
test result: ok. 2 passed; 0 failed; 0 ignored; 0 measured; 0 filtered out
這不是太難。
通常你會想把你的測試放在它們自己的模組中。要做到這一點,需要使用相同的 mod 關鍵字,並在它前面加上 #[cfg(test)](記住:cfg 的意思是"組態")。你還想要繼續在每一個測試前面寫 #[test]。這是因為以後當你安裝 Rust 時,你可以做更復雜的測試。你將可以執行一個測試、全部測試、或者其中一些測試。另外別忘了要寫 use super::*;,因為測試模組需要使用它上層的函式。現在它看起來會像這樣:
#![allow(unused)] fn main() { fn return_two() -> i8 { 2 } fn return_six() -> i8 { 4 + return_two() } #[cfg(test)] mod tests { use super::*; #[test] fn it_returns_six() { assert_eq!(return_six(), 6) } #[test] fn it_returns_two() { assert_eq!(return_two(), 2); } } }
測試驅動開發
在閱讀 Rust 或其他語言時,你可能會看到"測試驅動開發(Test-driven development)"這個詞。這是編寫程式的一種方式,有些人喜歡它,而有些人則喜歡其他的方式。"測試驅動開發"的意思是"先寫測試,再寫程式碼"。當你這樣做的時候,你將會有很多測試程式碼給所有你想要你的程式碼去做的事情。然後你才開始寫程式碼,並執行測試來看你是否做對了。接著當你加入和重寫你的程式碼時,測試程式碼會一直在那裡告訴你是否有什麼東西出了問題。這在 Rust 中相當容易,因為編譯器給出了很多關於待修復內容的資訊。讓我們寫個測試驅動開發的小範例,來看看它像什麼樣子。
讓我們想像可以接受使用者輸入的計算機。它可以加 (+),也可以減 (-)。如果使用者寫 "5 + 6",它應該回傳 11,如果使用者寫 "5 + 6 - 7",它應該回傳 4,以此類推。所以我們將先從測試函式開始。你也可以看到,測試中的函式名通常都相當長。這是因為你可能會執行很多的測試,並且你想瞭解哪些測試失敗了。
我們將想像有個名為 math() 的單獨函式會做完所有工作。它將回傳 i32(我們將不會使用浮點數)。因為它需要回傳一些東西,我們每次都將只會回傳 6。然後我們將寫三個測試函式。當然它們都會失敗。現在的程式碼像這樣:
#![allow(unused)] fn main() { fn math(input: &str) -> i32 { 6 } #[cfg(test)] mod tests { use super::*; #[test] fn one_plus_one_is_two() { assert_eq!(math("1 + 1"), 2); } #[test] fn one_minus_two_is_minus_one() { assert_eq!(math("1 - 2"), -1); } #[test] fn one_minus_minus_one_is_two() { assert_eq!(math("1 - -1"), 2); } } }
它給我們這些資訊:
running 3 tests
test tests::one_minus_minus_one_is_two ... FAILED
test tests::one_minus_two_is_minus_one ... FAILED
test tests::one_plus_one_is_two ... FAILED
以及關於 thread 'tests::one_plus_one_is_two' panicked at 'assertion failed: `(left == right)` 的所有資訊。我們不需要在這裡全部印出來。
現在來思考如何做出計算機。我們將接受任何數字,以及 +- 符號。我們將允許空格,但不允許其他任何東西。所以讓我們從帶有 const 並包含以上所有字元的字串開始。然後我們將使用 .chars() 按字元進行疊代,並使用 .all() 確保它們都在裡面。
然後,我們將新增一個會恐慌的測試。要做到這一點,要加上 #[should_panic] 屬性:現在如果它恐慌了測試就會成功。
現在程式碼看起來像這樣:
#![allow(unused)] fn main() { const OKAY_CHARACTERS: &str = "1234567890+- "; // 別忘記結尾的空白 fn math(input: &str) -> i32 { if !input.chars().all(|character| OKAY_CHARACTERS.contains(character)) { panic!("Please only input numbers, +-, or spaces"); } 6 // 現在我們仍然還是回傳 6 } #[cfg(test)] mod tests { use super::*; #[test] fn one_plus_one_is_two() { assert_eq!(math("1 + 1"), 2); } #[test] fn one_minus_two_is_minus_one() { assert_eq!(math("1 - 2"), -1); } #[test] fn one_minus_minus_one_is_two() { assert_eq!(math("1 - -1"), 2); } #[test] #[should_panic] // 這裡是我們的新測試 - 它應該要恐慌 fn panics_when_characters_not_right() { math("7 + seven"); } } }
現在當我們執行測試時,我們得到這樣的結果:
running 4 tests
test tests::one_minus_two_is_minus_one ... FAILED
test tests::one_minus_minus_one_is_two ... FAILED
test tests::panics_when_characters_not_right ... ok
test tests::one_plus_one_is_two ... FAILED
有一個成功了!我們的 math() 函式現在只能接受設定好的輸入了。
下一步是編寫實際的計算機。這就是先有測試的有趣之處:實際的程式碼要晚很多才開始出現。首先我們將把計算機的邏輯放在一起。我們要做到以下幾點:
- 所有的空白都應該被移除。這很容易用
.filter()實作。 - 所有輸入容應該變成
Vec中的元素。+不需要成為輸入,但是當程式看到+時,應該知道數字已經完成處理了。例如,輸入11+1應該像這樣做:1) 看到1,把它推到一個空字串中。1) 看到另一個 1,把它推到字串中(現在是 "11")。3) 看到+,知道數字已經結束,把字串推到向量裡,然後清空字串。 - 程式必須計算出
-的數量。奇數(1、3、5...)表示減法,偶數(2、4、6...)表示加法。所以 "1--9" 應該是 10,而不是 -8。 - 程式應該移除最後一個數字後面的任何東西。
5+5+++++----都是由出現在OKAY_CHARACTERS中的所有字元組成,但它應該清理變成5+5。這很容易用.trim_end_matches()做到,它能讓你把符合&str結尾的東西都去掉。
順便說一下,
.trim_end_matches()和.trim_start_matches()曾經是trim_right_matches()和trim_left_matches()。但後來人們注意到有些語言是從右到左(波斯語、希伯來語等),所以左右都是錯的。你可能還能在一些程式碼中看到舊名字,但它們是一樣的。
首先我們只想通過所有的測試。通過測試後,我們就可以"重構(Refactor)"了。重構的意思是讓程式碼變得更好,通常是透過像結構體、列舉和方法等方式。這裡是我們使測試通過的程式碼:
#![allow(unused)] fn main() { const OKAY_CHARACTERS: &str = "1234567890+- "; fn math(input: &str) -> i32 { if !input.chars().all(|character| OKAY_CHARACTERS.contains(character)) || !input.chars().take(2).any(|character| character.is_numeric()) { panic!("Please only input numbers, +-, or spaces."); } let input = input.trim_end_matches(|x| "+- ".contains(x)).chars().filter(|x| *x != ' ').collect::<String>(); // 移除結尾的 + 和 -, 和全部空白 let mut result_vec = vec![]; // Results 放在這裡 let mut push_string = String::new(); // 這是我們每次推送資料的字串. 我們將會在迴圈裡持續重複使用它. for character in input.chars() { match character { '+' => { if !push_string.is_empty() { // 如果字串是空的, 我們不想把 "" 推到 result_vec 裡 result_vec.push(push_string.clone()); // 但如果不是空的, 它就會是數字. 把它推到向量裡 push_string.clear(); // 接著清除字串 } }, '-' => { // 如果我們得到的是 -, if push_string.contains('-') || push_string.is_empty() { // 檢查看看是否為空或有 - push_string.push(character) // 如果是如此, 那麼把它推到字串裡 } else { // 不然, 它將會包含數字 result_vec.push(push_string.clone()); // 那麼把數字推到 result_vec 裡, 清除字串後再把 - 推進去 push_string.clear(); push_string.push(character); } }, number => { // number 在這裡的意思是 "其它任何匹配到的東西". 也是我們所選擇的名字 if push_string.contains('-') { // 我們可能有一些 - 字元要先推進去 result_vec.push(push_string.clone()); push_string.clear(); push_string.push(number); } else { // 但如果沒有, 那就表示我們可以把數字推進去 push_string.push(number); } }, } } result_vec.push(push_string); // 迴圈結束後把字串推進去. 沒有 .clone() 的必要因為我們不會再使用它了 let mut total = 0; // 現在是時候算數學了. 從總合開始 let mut adds = true; // true = 加法, false = 減法 let mut math_iter = result_vec.into_iter(); while let Some(entry) = math_iter.next() { // 疊代元素過去 if entry.contains('-') { // 如果有 - 字元, 檢查奇數或偶數 if entry.chars().count() % 2 == 1 { adds = match adds { true => false, false => true }; continue; // 繼續處理下一個元素 } else { continue; } } if adds == true { total += entry.parse::<i32>().unwrap(); // 如果沒有 '-', 肯定是數字. 那我們解包很安全 } else { total -= entry.parse::<i32>().unwrap(); adds = true; // 減完後, 重設 adds 為 true. } } total // 終於要回傳總合 } /// 我們將多加上一些測試來確認行為 #[cfg(test)] mod tests { use super::*; #[test] fn one_plus_one_is_two() { assert_eq!(math("1 + 1"), 2); } #[test] fn one_minus_two_is_minus_one() { assert_eq!(math("1 - 2"), -1); } #[test] fn one_minus_minus_one_is_two() { assert_eq!(math("1 - -1"), 2); } #[test] fn nine_plus_nine_minus_nine_minus_nine_is_zero() { assert_eq!(math("9+9-9-9"), 0); // 這是新測試 } #[test] fn eight_minus_nine_plus_nine_is_eight_even_with_characters_on_the_end() { assert_eq!(math("8 - 9 +9-----+++++"), 8); // 這是新測試 } #[test] #[should_panic] fn panics_when_characters_not_right() { math("7 + seven"); } } }
現在測試都通過了!
running 6 tests
test tests::one_minus_minus_one_is_two ... ok
test tests::nine_plus_nine_minus_nine_minus_nine_is_zero ... ok
test tests::one_minus_two_is_minus_one ... ok
test tests::eight_minus_nine_plus_nine_is_eight_even_with_characters_on_the_end ... ok
test tests::one_plus_one_is_two ... ok
test tests::panics_when_characters_not_right ... ok
test result: ok. 6 passed; 0 failed; 0 ignored; 0 measured; 0 filtered out
你可以看到,在測試驅動的開發中有來回的過程。它是像這樣的:
- 首先你要寫出所有你能想得到的測試。
- 然後你開始寫程式碼。
- 當你寫程式碼的時候,你會得到其他測試的想法。
- 你新增測試,你的測試隨著你的進展而成長。你有的測試越多,你的程式碼被檢查的次數就越多。
當然測試並不能檢查所有的東西,認為"通過所有測試 = 完美的程式碼"是錯誤的。但是測試對於修改程式碼是很棒的。如果你以後修改了程式碼並執行測試,如果其中有一個測試不成功,你就會知道什麼該修復。
現在我們可以重寫(重構)一點程式碼。一個好方式是用 Clippy 開始。如果你安裝了 Rust,那麼你可以輸入 cargo clippy。如果你使用的是 Playground,那麼點選 TOOLS,選擇 Clippy。Clippy 會檢閱你的程式碼,並給出能讓你的程式碼更精簡的提示。我們的程式碼沒有任何錯誤,但它能更好。
Clippy 告訴我們兩件事:
warning: this loop could be written as a `for` loop
--> src/lib.rs:44:5
|
44 | while let Some(entry) = math_iter.next() { // Iter through the items
| ^^^^^^^^^^^^^^^^^^^^^^^^^^^^^^^^^^^^^^^^ help: try: `for entry in math_iter`
|
= note: `#[warn(clippy::while_let_on_iterator)]` on by default
= help: for further information visit https://rust-lang.github.io/rust-clippy/master/index.html#while_let_on_iterator
warning: equality checks against true are unnecessary
--> src/lib.rs:53:12
|
53 | if adds == true {
| ^^^^^^^^^^^^ help: try simplifying it as shown: `adds`
|
= note: `#[warn(clippy::bool_comparison)]` on by default
= help: for further information visit https://rust-lang.github.io/rust-clippy/master/index.html#bool_comparison
這是真的:for entry in math_iter 比 while let Some(entry) = math_iter.next() 簡單得多。而 for 迴圈實際上是個疊代器,所以我們沒有任何理由要寫 .iter()。謝謝 clippy!而且我們也不需要做 math_iter:我們可以只要寫 for entry in result_vec。
現在我們將開始做些真正的重構。我們將建立 Calculator 結構體,而不是單獨的變數。這將擁有我們使用的所有變數。我們將改變兩個名字來讓它更清楚。result_vec 將變成 results,push_string 將變成 current_input(currenㄙㄨ的意思是 "現在")。而到目前為止,它只有一種方法:new。
#![allow(unused)] fn main() { // 🚧 #[derive(Clone)] struct Calculator { results: Vec<String>, current_input: String, total: i32, adds: bool, } impl Calculator { fn new() -> Self { Self { results: vec![], current_input: String::new(), total: 0, adds: true, } } } }
現在我們的程式碼實際上更長了一點,但也更容易讀懂。比如 if adds 現在是 if calculator.adds,這就跟讀英文完全一樣。看起來像這樣:
#![allow(unused)] fn main() { #[derive(Clone)] struct Calculator { results: Vec<String>, current_input: String, total: i32, adds: bool, } impl Calculator { fn new() -> Self { Self { results: vec![], current_input: String::new(), total: 0, adds: true, } } } const OKAY_CHARACTERS: &str = "1234567890+- "; fn math(input: &str) -> i32 { if !input.chars().all(|character| OKAY_CHARACTERS.contains(character)) || !input.chars().take(2).any(|character| character.is_numeric()) { panic!("Please only input numbers, +-, or spaces"); } let input = input.trim_end_matches(|x| "+- ".contains(x)).chars().filter(|x| *x != ' ').collect::<String>(); let mut calculator = Calculator::new(); for character in input.chars() { match character { '+' => { if !calculator.current_input.is_empty() { calculator.results.push(calculator.current_input.clone()); calculator.current_input.clear(); } }, '-' => { if calculator.current_input.contains('-') || calculator.current_input.is_empty() { calculator.current_input.push(character) } else { calculator.results.push(calculator.current_input.clone()); calculator.current_input.clear(); calculator.current_input.push(character); } }, number => { if calculator.current_input.contains('-') { calculator.results.push(calculator.current_input.clone()); calculator.current_input.clear(); calculator.current_input.push(number); } else { calculator.current_input.push(number); } }, } } calculator.results.push(calculator.current_input); for entry in calculator.results { if entry.contains('-') { if entry.chars().count() % 2 == 1 { calculator.adds = match calculator.adds { true => false, false => true }; continue; } else { continue; } } if calculator.adds { calculator.total += entry.parse::<i32>().unwrap(); } else { calculator.total -= entry.parse::<i32>().unwrap(); calculator.adds = true; } } calculator.total } #[cfg(test)] mod tests { use super::*; #[test] fn one_plus_one_is_two() { assert_eq!(math("1 + 1"), 2); } #[test] fn one_minus_two_is_minus_one() { assert_eq!(math("1 - 2"), -1); } #[test] fn one_minus_minus_one_is_two() { assert_eq!(math("1 - -1"), 2); } #[test] fn nine_plus_nine_minus_nine_minus_nine_is_zero() { assert_eq!(math("9+9-9-9"), 0); } #[test] fn eight_minus_nine_plus_nine_is_eight_even_with_characters_on_the_end() { assert_eq!(math("8 - 9 +9-----+++++"), 8); } #[test] #[should_panic] fn panics_when_characters_not_right() { math("7 + seven"); } } }
最後我們增加兩個新方法。一個叫做 .clear(),清除 current_input()。另一個叫做 push_char(),把輸入推到 current_input() 上。這裡是我們重構後的程式碼:
#![allow(unused)] fn main() { #[derive(Clone)] struct Calculator { results: Vec<String>, current_input: String, total: i32, adds: bool, } impl Calculator { fn new() -> Self { Self { results: vec![], current_input: String::new(), total: 0, adds: true, } } fn clear(&mut self) { self.current_input.clear(); } fn push_char(&mut self, character: char) { self.current_input.push(character); } } const OKAY_CHARACTERS: &str = "1234567890+- "; fn math(input: &str) -> i32 { if !input.chars().all(|character| OKAY_CHARACTERS.contains(character)) || !input.chars().take(2).any(|character| character.is_numeric()) { panic!("Please only input numbers, +-, or spaces"); } let input = input.trim_end_matches(|x| "+- ".contains(x)).chars().filter(|x| *x != ' ').collect::<String>(); let mut calculator = Calculator::new(); for character in input.chars() { match character { '+' => { if !calculator.current_input.is_empty() { calculator.results.push(calculator.current_input.clone()); calculator.clear(); } }, '-' => { if calculator.current_input.contains('-') || calculator.current_input.is_empty() { calculator.push_char(character) } else { calculator.results.push(calculator.current_input.clone()); calculator.clear(); calculator.push_char(character); } }, number => { if calculator.current_input.contains('-') { calculator.results.push(calculator.current_input.clone()); calculator.clear(); calculator.push_char(number); } else { calculator.push_char(number); } }, } } calculator.results.push(calculator.current_input); for entry in calculator.results { if entry.contains('-') { if entry.chars().count() % 2 == 1 { calculator.adds = match calculator.adds { true => false, false => true }; continue; } else { continue; } } if calculator.adds { calculator.total += entry.parse::<i32>().unwrap(); } else { calculator.total -= entry.parse::<i32>().unwrap(); calculator.adds = true; } } calculator.total } #[cfg(test)] mod tests { use super::*; #[test] fn one_plus_one_is_two() { assert_eq!(math("1 + 1"), 2); } #[test] fn one_minus_two_is_minus_one() { assert_eq!(math("1 - 2"), -1); } #[test] fn one_minus_minus_one_is_two() { assert_eq!(math("1 - -1"), 2); } #[test] fn nine_plus_nine_minus_nine_minus_nine_is_zero() { assert_eq!(math("9+9-9-9"), 0); } #[test] fn eight_minus_nine_plus_nine_is_eight_even_with_characters_on_the_end() { assert_eq!(math("8 - 9 +9-----+++++"), 8); } #[test] #[should_panic] fn panics_when_characters_not_right() { math("7 + seven"); } } }
現在大概已經夠好了。我們可以寫更多的方法,但是很多行像是 calculator.results.push(calculator.current_input.clone()); 已經很清楚了。重構的時機最好是在你的程式碼完成後還能輕鬆閱讀的時候。你不希望只是為了讓程式碼變短而重構:例如,clc.clr() 就比 calculator.clear() 差很多。
外部 crates
外部 crate 的意思是"別人的 crate"。
在本章節中,你 幾乎 需要去安裝 Rust,但我們仍然可以只使用 Playground。現在我們將要學習如何匯入別人所寫的 crate。這在 Rust 中很重要,原因有二:
- 匯入其他的 crate 很容易,
- Rust 標準函式庫也相當小。
這意味著為了很多基本功能引進外部 crate 在 Rust 中很普遍。想法是這樣,如果使用外部 crate 很容易,那你就可以選擇最好的那一個。也許某個人會為某個功能做出 crate,當然之後也會有別的人去做出更好的。
在本書中,我們只看最流行的 crate,也就是每個使用 Rust 的人都知道的那些。
要開始學習外部 Crate,我們將從最常見的開始:rand。
rand
你有沒有注意到,我們還沒有使用過任何隨機數?那是因為隨機數並不在標準函式庫裡。但是有很多 crate "幾乎是函式標準庫",因為大家都在使用它們。在任何情況下,引進 crate 是非常容易的。如果你的電腦上有安裝 Rust,就會有個叫 Cargo.toml 的檔案,裡面有這些資訊。Cargo.toml 檔在你啟動時像這樣:
[package]
name = "rust_book"
version = "0.1.0"
authors = ["David MacLeod"]
edition = "2018"
# See more keys and their definitions at https://doc.rust-lang.org/cargo/reference/manifest.html
[dependencies]
現在,如果你想加上 rand crate 可以在 crates.io 上搜尋它,這是所有 crate 的去處。那會將你帶到 https://crates.io/crates/rand。當你點選那個,你可以看到畫面上寫著 Cargo.toml rand = "0.7.3"。你所要做的就是在 [dependencies] 下新增像這樣的內容:
[package]
name = "rust_book"
version = "0.1.0"
authors = ["David MacLeod"]
edition = "2018"
# See more keys and their definitions at https://doc.rust-lang.org/cargo/reference/manifest.html
[dependencies]
rand = "0.7.3"
然後 Cargo 會幫你完成剩下的工作。然後你就可以在 rand 的文件網站上開始編寫像本例程式碼這樣的程式碼。要想進入文件,你可以點選在 crates.io 的頁面 中的 docs 按鈕。
關於 Cargo 的介紹就到這裡了:我們現在使用的還只是 Playground。幸運的是,Playground 已經安裝了前 100 個 crate。所以你還不需要寫進 Cargo.toml。在 Playground 上,你可以想像,它有個像這樣的長長列表,有 100 個 crate:
[dependencies]
rand = "0.7.3"
some_other_crate = "0.1.0"
another_nice_crate = "1.7"
也就是說,如果要使用 rand,你可以直接這樣做:
use rand; // 這是表示整個 crate rand // 在你的電腦上你無法只寫這樣; // 你需要先寫在 Cargo.toml 檔案裡 fn main() { for _ in 0..5 { let random_u16 = rand::random::<u16>(); print!("{} ", random_u16); } }
每次都會列印不同的 u16 號碼,像是 42266 52873 56528 46927 6867。
rand 中的主要功能是 random 和 thread_rng(rng 的意思是"隨機數產生器")。而實際上如果你看 random,它說:"這只是 thread_rng().gen() 的快捷方式"。所以其實是 thread_rng 基本做完了一切。
這裡是個簡單的範例,從 1 到 10 的數字。為了得到這些數字,我們在 1 到 11 之間使用 .gen_range()。
use rand::{thread_rng, Rng}; // 或是只用 rand::*; 如果我們有些懶散 fn main() { let mut number_maker = thread_rng(); for _ in 0..5 { print!("{} ", number_maker.gen_range(1, 11)); } }
會印出像 7 2 4 8 6 的東西。
我們可以用隨機數做一些有趣的事情,比如為遊戲做角色。我們將使用 rand 和其它一些我們知道的東西來做出它們。在這個遊戲中,我們的角色有六種狀態,用 d6 來表示他們。d6 是個立方體,當你投擲它時,它能給出 1、2、3、4、5 或 6。每個角色都會擲三次 d6,所以每個狀態都在 3 到 18 之間。
但是有時候如果你的角色狀態值有一些低,比如 3 或 4,那就不公平了。比如說你的力量是 3,你就不能背東西。所以還有一種方法是用 d6 四次。你擲四次,然後扔掉最低的數字。所以如果你擲出 3、3、1、6,那麼你保留 3、3、6 = 12。我們也會把這個方法做出來,所以遊戲的主人可以決定要不要用。
這是我們的簡單角色建立器。我們為狀態建立了 Character 結構體,甚至還實作 Display 來按照我們想要的方式印出。
use rand::{thread_rng, Rng}; // 或是只用 rand::*; 如果我們有些懶散 use std::fmt; // 要給我們的角色實作 Display struct Character { strength: u8, dexterity: u8, // 這表示 "身體反應速度" constitution: u8, // 這表示 "健康程度" intelligence: u8, wisdom: u8, charisma: u8, // 這表示 "受人歡迎的程度" } fn three_die_six() -> u8 { // "die" 是讓 你擲出去得到數字的東西 let mut generator = thread_rng(); // 建立我們的隨機數產生器 let mut stat = 0; // 這是總合 for _ in 0..3 { stat += generator.gen_range(1..=6); // 加上每次結果 } stat // 回傳總合 } fn four_die_six() -> u8 { let mut generator = thread_rng(); let mut results = vec![]; // 先把數字放在向量 for _ in 0..4 { results.push(generator.gen_range(1..=6)); } results.sort(); // 現在像是 [4, 3, 2, 6] 的結果會變成 [2, 3, 4, 6] results.remove(0); // 現在就會是 [3, 4, 6] results.iter().sum() // 回傳這個結果 } enum Dice { Three, Four } impl Character { fn new(dice: Dice) -> Self { // true 是三個骰子, false 則是四個 match dice { Dice::Three => Self { strength: three_die_six(), dexterity: three_die_six(), constitution: three_die_six(), intelligence: three_die_six(), wisdom: three_die_six(), charisma: three_die_six(), }, Dice::Four => Self { strength: four_die_six(), dexterity: four_die_six(), constitution: four_die_six(), intelligence: four_die_six(), wisdom: four_die_six(), charisma: four_die_six(), }, } } fn display(&self) { // 我們可以這樣做是因為我們在後面有實作 Display println!("{}", self); println!(); } } impl fmt::Display for Character { // 只是沿用在 https://doc.rust-lang.org/std/fmt/trait.Display.html 的範例程式碼並稍作修改 fn fmt(&self, f: &mut fmt::Formatter<'_>) -> fmt::Result { write!( f, "Your character has these stats: strength: {} dexterity: {} constitution: {} intelligence: {} wisdom: {} charisma: {}", self.strength, self.dexterity, self.constitution, self.intelligence, self.wisdom, self.charisma ) } } fn main() { let weak_billy = Character::new(Dice::Three); let strong_billy = Character::new(Dice::Four); weak_billy.display(); strong_billy.display(); }
會印出像這樣的東西:
#![allow(unused)] fn main() { Your character has these stats: strength: 9 dexterity: 15 constitution: 15 intelligence: 8 wisdom: 11 charisma: 9 Your character has these stats: strength: 9 dexterity: 13 constitution: 14 intelligence: 16 wisdom: 16 charisma: 10 }
有四個骰子的角色通常在大多數事情上都會好一點。
rayon
rayon 是個流行的 crate,能讓你為 Rust 程式碼加速。它受歡迎是因為它不需要像 thread::spawn 這樣的東西就能建立執行緒。換句話說,它受歡迎的原因是它既有效又容易編寫。比如說:
.iter()、.iter_mut()、into_iter()在 rayon 中寫起來像這樣:.par_iter()、.par_iter_mut()、par_into_iter()。所以你只需要加上par_,你的程式碼就會變快很多。(par 表示"並行")
其他方法也一樣:.chars() 就是 .par_chars(),以此類推。
這裡舉例的是一段簡單的程式碼,卻能讓電腦做很多工作:
fn main() { let mut my_vec = vec![0; 200_000]; my_vec.iter_mut().enumerate().for_each(|(index, number)| *number+=index+1); println!("{:?}", &my_vec[5000..5005]); }
這建立有二十萬個元素的向量:每一個都是0,然後呼叫 .enumerate() 來取得每個數字的索引,並將 0 改為索引值。它列印時間太長,所以我們只印出第 5000 到 5004 個元素。這在 Rust 中還是非常快的,但如果你願意,你可以用 Rayon 讓它更快。但程式碼幾乎一樣:
use rayon::prelude::*; // 匯入 rayon fn main() { let mut my_vec = vec![0; 200_000]; my_vec.par_iter_mut().enumerate().for_each(|(index, number)| *number+=index+1); // 加上 par_ 在 iter_mut 前面 println!("{:?}", &my_vec[5000..5005]); }
就這樣。rayon 還有很多其他的方法來訂做你想要的事,但最簡單的就是"加上 _par 來讓你的程式更快"。
serde
serde 是相當流行的 crate,讓你可以在 JSON、YAML 等格式之間相互轉換。最常見的使用方式是透過建立具有兩個屬性在上面的 struct,。看起來像這樣:
#![allow(unused)] fn main() { #[derive(Serialize, Deserialize, Debug)] struct Point { x: i32, y: i32, } }
Serialize 和 Deserialize 特徵讓轉換變得容易。(這也是 serde 這個名字的由來)如果你的結構體上有它們,那麼你只需要呼叫一個方法就可以把它在 JSON 或任意格式間轉換。
regex
regex crate 讓你可以使用 正則表示式(Regular expression) 搜尋文字。有了它,你可以只透過一次搜尋便得到諸如 colour, color, colours 和 colors 的匹配資訊。正則表示式是一門全然不同也需要學習的語言,如果你想使用它們的話。
chrono
chrono 是為給那些需要更多時間功能的人準備的主要 crate。我們會看到標準函式庫現在有時間相關的功能,但是如果你需要更多的功能,那麼這個 crate 是個不錯的選擇。
標準函式庫之旅
現在你已經知道了很多 Rust 的知識,你將能夠理解標準函式庫裡面大多數的東西。它裡面的程式碼已經不再那麼可怕了。讓我們來看看它裡面一些我們還沒有學過的部分。這次旅程將介紹標準函式庫裡不需要安裝 Rust 的絕大多數部分。我們將重溫很多我們已經知道的內容,這樣我們就可以更深入地學習它們。
陣列
在過去的版本 (Rust 1.53 以前) 裡陣列 (Array) 還沒有實作 Iterator,你要在 for 迴圈裡對它們使用像是 .iter() 的方法。(人們以前也常在 for 迴圈裡用 & 來得到切片。)因此這個範例在過去是不能執行的:
fn main() { let my_cities = ["Beirut", "Tel Aviv", "Nicosia"]; for city in my_cities { println!("{}", city); } }
編譯器常常給出這段訊息:
error[E0277]: `[&str; 3]` is not an iterator
--> src\main.rs:5:17
|
| ^^^^^^^^^ borrow the array with `&` or call `.iter()` on it to iterate over it
幸運的是那不再是問題了!所以這三種用法全都能用:
fn main() { let my_cities = ["Beirut", "Tel Aviv", "Nicosia"]; for city in my_cities { println!("{}", city); } for city in &my_cities { println!("{}", city); } for city in my_cities.iter() { println!("{}", city); } }
印出:
Beirut
Tel Aviv
Nicosia
Beirut
Tel Aviv
Nicosia
Beirut
Tel Aviv
Nicosia
如果你想從陣列中得到變數,你可以把它們的變數名放在 [] 中來解構它。這和在 match 陳敘式中使用元組或從結構體中得到變數是一樣的。
fn main() { let my_cities = ["Beirut", "Tel Aviv", "Nicosia"]; let [city1, city2, city3] = my_cities; println!("{}", city1); }
印出 Beirut。
字元
你可以使用 .escape_unicode() 方法來得到字元 (char) 的 Unicode 號碼。
fn main() { let korean_word = "청춘예찬"; for character in korean_word.chars() { print!("{} ", character.escape_unicode()); } }
印出 \u{ccad} \u{cd98} \u{c608} \u{cc2c}。
你可以使用 From 特徵從 u8 中得到字元,但是從 u32 時,你要使用 TryFrom,因為它有可能不成功。u32 可容納的數字比 Unicode 中的字元多很多。我們可以透過簡單的示範來觀察到這件事。
use std::convert::TryFrom; // 你需要引進 TryFrom 來使用它 use rand::prelude::*; // 我們也將會用到隨機數 fn main() { let some_character = char::from(99); // 這個容易 - 不需要 TryFrom println!("{}", some_character); let mut random_generator = rand::thread_rng(); // 這將會嘗試 40,000 次來從 u32 做出字元. // 範圍從 0 (std::u32::MIN) 到 u32 的最大數值 (std::u32::MAX). 如果它不成功, 我們會給它 '-'. for _ in 0..40_000 { let bigger_character = char::try_from(random_generator.gen_range(std::u32::MIN..std::u32::MAX)).unwrap_or('-'); print!("{}", bigger_character) } }
幾乎每次都會產生 -。這是你會看到的那種輸出的一部分:
------------------------------------------------------------------------𤒰---------------------
-----------------------------------------------------------------------------------------------
-----------------------------------------------------------------------------------------------
-----------------------------------------------------------------------------------------------
-----------------------------------------------------------------------------------------------
-----------------------------------------------------------------------------------------------
-----------------------------------------------------------------------------------------------
-----------------------------------------------------------------------------------------------
-------------------------------------------------------------춗--------------------------------
-----------------------------------------------------------------------------------------------
-----------------------------------------------------------------------------------------------
-----------------------------------------------------------------------------------------------
----------------------------------------------------------------
所以你需要使用 TryFrom 其實是件好事。
另外,從 2020 年八月底開始,你現在可以從 char 中得到 String。(String 實作了 From<char>) 只要寫 String::from(),然後把 char 放在裡面。
整數
給這些整數型別用的數學方法有很多,再加上一些其他用途的方法。這裡是一些最有用的:
.checked_add()、.checked_sub()、.checked_mul()、.checked_div()。如果你認為你可能會得到一個不適合型別的數字,這些都是不錯的方法。它們會回傳 Option,這樣你就可以安全地檢查你的數學運算是否正常,而不會讓程式恐慌。
fn main() { let some_number = 200_u8; let other_number = 200_u8; println!("{:?}", some_number.checked_add(other_number)); println!("{:?}", some_number.checked_add(1)); }
印出:
None
Some(201)
你會注意到,在整數的頁面上經常說著 rhs。這意味著"右手邊(right hand side)",也就是你做一些數學運算時右手邊的運算元。比如在 5 + 6 中,5 在左、6 在右,所以 6 就是 rhs。這個不是關鍵詞,但是你會經常看到,所以先知道比較好。
說到這裡,我們來學習一下如何實作 Add。在你實作了 Add 之後,你可以在你建立的型別上使用 +。你需要自己實作 Add,因為 add 可以表達很多意思。這是標準函式庫頁面中的範例:
#![allow(unused)] fn main() { use std::ops::Add; // 首先引進 Add #[derive(Debug, Copy, Clone, PartialEq)] // PartialEq 大概是這裡最重要的部份了. 你會想要讓數字能比較 struct Point { x: i32, y: i32, } impl Add for Point { type Output = Self; // 記得嗎, 這叫做"關聯型別": "一起出現的型別". // 這個情況下這不過是另一個 Point fn add(self, other: Self) -> Self { Self { x: self.x + other.x, y: self.y + other.y, } } } }
現在讓我們為自己的型別實作 Add。讓我們想像我們想把兩個國家加在一起,這樣我們就可以比較它們的經濟。那看起來像這樣:
use std::fmt; use std::ops::Add; #[derive(Clone)] struct Country { name: String, population: u32, gdp: u32, // 這是經濟大小 } impl Country { fn new(name: &str, population: u32, gdp: u32) -> Self { Self { name: name.to_string(), population, gdp, } } } impl Add for Country { type Output = Self; fn add(self, other: Self) -> Self { Self { name: format!("{} and {}", self.name, other.name), // 我們會一起加上名稱, population: self.population + other.population, // 以及人口數, gdp: self.gdp + other.gdp, // 和 GDP } } } impl fmt::Display for Country { fn fmt(&self, f: &mut fmt::Formatter<'_>) -> fmt::Result { write!( f, "In {} are {} people and a GDP of ${}", // 然後我們可以只用 {} 把它們全部印出來 self.name, self.population, self.gdp ) } } fn main() { let nauru = Country::new("Nauru", 10_670, 160_000_000); let vanuatu = Country::new("Vanuatu", 307_815, 820_000_000); let micronesia = Country::new("Micronesia", 104_468, 367_000_000); // 我們可以給予 Country 的 name 是個 &str 而不是 String. 但是我們就需要到處寫上生命週期 // 並且那樣對小範例來說就太多東西了. 比較好的方式是只在我們呼叫 println! 時克隆它們. println!("{}", nauru.clone()); println!("{}", nauru.clone() + vanuatu.clone()); println!("{}", nauru + vanuatu + micronesia); }
印出:
In Nauru are 10670 people and a GDP of $160000000
In Nauru and Vanuatu are 318485 people and a GDP of $980000000
In Nauru and Vanuatu and Micronesia are 422953 people and a GDP of $1347000000
以後在這段程式碼中,我們可以把 .fmt() 改為顯示更容易閱讀的數字。
另外三個叫 Sub、Mul 和 Div,實作起來基本一樣。+=、-=、*= 和 /=,只要加上 Assign:AddAssign、SubAssign、MulAssign 和 DivAssign 即可。你可以在這裡看到完整的列表,因為還有很多。例如 % 被稱為 Rem,- 被稱為 Neg,等等。
浮點數
f32 和 f64 有非常大量的方法讓你在做數學運算時使用。我們不會去看這些東西,但這裡有一些你可能會用到的方法。它們分別是 .floor()、.ceil()、.round() 和 .trunc()。所有這些方法都會回傳像整數的 f32 或者 f64,但小數點後面是 0。它們是這樣做的:
.floor():給你下一個最低的整數。.ceil():給你下一個最高的整數。.round():給你較大的整數,如果小數大於等於 0.5;或是相同的整數,如果小數小於 0.5。這就是所謂的四捨五入,因為它給你"捨去或進位(round)"的數字(數字的精簡形式)。.trunc():只是切除掉小數點號後的部分。截斷(Truncate)是"切除"的意思。
這裡是個簡單的函式來印出它們。
fn four_operations(input: f64) { println!( "For the number {}: floor: {} ceiling: {} rounded: {} truncated: {}\n", input, input.floor(), input.ceil(), input.round(), input.trunc() ); } fn main() { four_operations(9.1); four_operations(100.7); four_operations(-1.1); four_operations(-19.9); }
印出:
For the number 9.1:
floor: 9
ceiling: 10
rounded: 9 // because less than 9.5
truncated: 9
For the number 100.7:
floor: 100
ceiling: 101
rounded: 101 // because more than 100.5
truncated: 100
For the number -1.1:
floor: -2
ceiling: -1
rounded: -1
truncated: -1
For the number -19.9:
floor: -20
ceiling: -19
rounded: -20
truncated: -19
f32 和 f64 有方法叫做 .max() 和 .min(),可以得到兩個數字中較大或較小的數字。(對於其他型別,你可以直接使用 std::cmp::max 和 std::cmp::min。)這裡的範例是用 .fold() 來得到最高或最低數字的方法。你可以再次看到 .fold() 不僅僅是用來加數字的。
fn main() { let my_vec = vec![8.0_f64, 7.6, 9.4, 10.0, 22.0, 77.345, 10.22, 3.2, -7.77, -10.0]; let maximum = my_vec.iter().fold(f64::MIN, |current_number, next_number| current_number.max(*next_number)); // 註: 從 f64 的最低可能的數字開始. let minimum = my_vec.iter().fold(f64::MAX, |current_number, next_number| current_number.min(*next_number)); // 而這裡則從最高可能的數字開始 println!("{}, {}", maximum, minimum); }
布林
在 Rust 中,如果你願意,你可以把 bool 變成整數,因為這樣做是安全的。但你不能反過來做。如你所見,true 變成了 1,false 變成了 0。
fn main() { let true_false = (true, false); println!("{} {}", true_false.0 as u8, true_false.1 as i32); }
印出 1 0。或者是如果你告訴編譯器型別,也可以使用 .into():
fn main() { let true_false: (i128, u16) = (true.into(), false.into()); println!("{} {}", true_false.0, true_false.1); }
印出的是一樣的東西。
從 Rust 1.50 (2021 年 2 月釋出)開始,有個叫做 then() 的方法,它將 bool 變成 Option。使用 then() 時需要接受閉包,如果元素是true,閉包就會被呼叫。另外,無論從閉包中回傳什麼,都會放入 Option 裡。這裡是個小範例:
fn main() { let (tru, fals) = (true.then(|| 8), false.then(|| 8)); println!("{:?}, {:?}", tru, fals); }
只是印出 Some(8), None。
而現在是個長一點的範例:
fn main() { let bool_vec = vec![true, false, true, false, false]; let option_vec = bool_vec .iter() .map(|item| { item.then(|| { // 把這個放在 map 裡面那我們才可以把它傳下去 println!("Got a {}!", item); "It's true, you know" // 如果是 true 就把這個放進 Some 裡 // 不然就只傳 None 下去 }) }) .collect::<Vec<_>>(); println!("Now we have: {:?}", option_vec); // 那也會印出 Nones. 讓我們從 map 過濾它們到新的向量裡. let filtered_vec = option_vec.into_iter().filter_map(|c| c).collect::<Vec<_>>(); println!("And without the Nones: {:?}", filtered_vec); }
這裡是印出的內容:
Got a true!
Got a true!
Now we have: [Some("It\'s true, you know"), None, Some("It\'s true, you know"), None, None]
And without the Nones: ["It\'s true, you know", "It\'s true, you know"]
向量
Vec(向量)有很多方法我們還沒有看過。先來說說 .sort()。.sort() 一點都不意外,使用了 &mut self 來對向量進行排序。
fn main() { let mut my_vec = vec![100, 90, 80, 0, 0, 0, 0, 0]; my_vec.sort(); println!("{:?}", my_vec); }
印出 [0, 0, 0, 0, 0, 80, 90, 100]。但還有一種更有趣的排序方式叫 .sort_unstable(),它通常更快。它之所以更快,是因為它不在乎排序前後相同數字的先後順序。在常規的 .sort() 中,你知道最後的 0, 0, 0, 0, 0 會在 .sort() 之後的順序相同。但是 .sort_unstable() 可能會把最後一個零移到索引 0,然後把倒數第三個零移到索引 2,等等。
.dedup() 的意思是"去重複"(de-duplicate)。它將刪除向量中相同的元素,但只有當它們彼此相鄰時才會刪除。接下來這段程式碼不會只印出 "sun", "moon"。
fn main() { let mut my_vec = vec!["sun", "sun", "moon", "moon", "sun", "moon", "moon"]; my_vec.dedup(); println!("{:?}", my_vec); }
它只是把 "sun" 旁邊的另一個 "sun" 去掉,然後把 "moon" 旁邊的下一個 "moon" 去掉,再把 "moon" 旁邊的另一個 "moon" 去掉。結果是 ["sun", "moon", "sun", "moon"]。
如果你想把每個重複的都去掉,就先 .sort():
fn main() { let mut my_vec = vec!["sun", "sun", "moon", "moon", "sun", "moon", "moon"]; my_vec.sort(); my_vec.dedup(); println!("{:?}", my_vec); }
結果:["moon", "sun"]。
字串
你會記得 String 有點像是一種 Vec。它很像 Vec 讓你可以呼叫很多相同的方法。比如說,你可以用 String::with_capacity() 建立字串,尤其是如果你會需要一直用 .push() 推進 char 多次,或者用 .push_str() 推進 &str。這裡是個對 String 有太多次記憶體分配 (allocation) 的範例。
fn main() { let mut push_string = String::new(); let mut capacity_counter = 0; // 容量從 0 開始 for _ in 0..100_000 { // 做 100,000 次 if push_string.capacity() != capacity_counter { // 首先檢查容量現在是否不同 println!("{}", push_string.capacity()); // 如果是就印出來 capacity_counter = push_string.capacity(); // 再來更新計數器 } push_string.push_str("I'm getting pushed into the string!"); // 並且每次推這個字串進去 } }
印出:
35
70
140
280
560
1120
2240
4480
8960
17920
35840
71680
143360
286720
573440
1146880
2293760
4587520
我們不得不重分配(reallocate,把所有東西複製過來到另一處記憶體位置) 18次。但既然我們知道了最終的容量(capacity),那麼我們將馬上給它容量,就不需要重分配:只要一個 String 容量值就夠了。
fn main() { let mut push_string = String::with_capacity(4587520); // 我們知道明確的數字. 一些不同的大數字也行得通 let mut capacity_counter = 0; for _ in 0..100_000 { if push_string.capacity() != capacity_counter { println!("{}", push_string.capacity()); capacity_counter = push_string.capacity(); } push_string.push_str("I'm getting pushed into the string!"); } }
印出 4587520。完美!我們永遠不再需要分配了。
當然實際長度肯定比這個小。如果你試了 100001 次、101000 次等等,還是會說 4587520。這是因為每次的容量都是之前的兩倍。不過我們可以用 .shrink_to_fit() 來縮小它(和 Vec 一樣)。我們的 String 已經非常大了,我們不想再給它增加任何東西,所以我們可以把它縮小一點。但是只有在你有把握的情況下才可以這樣做。這裡是原因:
fn main() { let mut push_string = String::with_capacity(4587520); let mut capacity_counter = 0; for _ in 0..100_000 { if push_string.capacity() != capacity_counter { println!("{}", push_string.capacity()); capacity_counter = push_string.capacity(); } push_string.push_str("I'm getting pushed into the string!"); } push_string.shrink_to_fit(); println!("{}", push_string.capacity()); push_string.push('a'); println!("{}", push_string.capacity()); push_string.shrink_to_fit(); println!("{}", push_string.capacity()); }
印出:
4587520
3500000
7000000
3500001
所以首先我們的大小是 4587520,但我們沒有全部使用到。我們用了 .shrink_to_fit(),然後把大小降到了 3500000。但是我們忘記了需要推上 a。當我們這樣做的時候,Rust 看到我們需要更多的空間,並加倍給了我們:現在是 7000000。哎呀!所以我們又呼叫了 .shrink_to_fit() 一次,現在又回到了 3500001。
.pop() 能用在 String,就像用在 Vec 一樣。
fn main() { let mut my_string = String::from(".daer ot drah tib elttil a si gnirts sihT"); loop { let pop_result = my_string.pop(); match pop_result { Some(character) => print!("{}", character), None => break, } } }
印出 This string is a little bit hard to read. 因為它從最後一個字元開始。
.retain() 是使用閉包的方法,這對 String 來說很少見。就像在疊代器上的 .filter() 一樣。
fn main() { let mut my_string = String::from("Age: 20 Height: 194 Weight: 80"); my_string.retain(|character| character.is_alphabetic() || character == ' '); // 如果是字母或空白就保留 dbg!(my_string); // 為了好玩這次讓我們用 dbg!() 而不是 println! }
印出:
[src\main.rs:4] my_string = "Age Height Weight "
OsString 和 CString
std::ffi 是 std 的一部分,它幫助你將 Rust 與其他程式設計語言或作業系統一起使用。它有 OsString 和 CString 這樣的型別,它們就像給作業系統用的 String 或給 C 語言用的 String 一樣,它們各自也有自己的 &str 型別:OsStr 和 CStr。ffi 的意思是"外部函式介面"(foreign function interface)。
當你必須與沒有 Unicode 的作業系統互動時,你可以使用 OsString。Rust 所有的字串都是 unicode,但不是每個作業系統支援。這些是標準函式庫中關於為什麼我們會有 OsString 的簡單解釋。
- Unix (Linux 等等)上的字串可能是很多沒有零的位元組組合在一起。而且有時你會把它們讀取為 Unicode UTF-8。
- Windows 上的字串可能是由隨機的沒有零的 16 位元值組成。有時你會把它們讀取為 Unicode UTF-16。
- 在 Rust 中,字串總是有效的 UTF-8,其中可能包含多個零。
所以 OsString 被設計為可以被它們全部讀取到。
你可以用 OsString 來做所有常規的事情,比如 OsString::from("Write something here")。它還有個有趣的方法叫做 .into_string(),那會試圖把自己變成常規的 String。它會回傳 Result,但 Err 部分只是原來的 OsString:
#![allow(unused)] fn main() { // 🚧 pub fn into_string(self) -> Result<String, OsString> }
所以如果不行用的話,那你就把它拿回來。你不能呼叫 .unwrap(),因為它會恐慌,但是你可以使用 match 來拿回 OsString。讓我們透過呼叫不存在的方法來測試一下:
use std::ffi::OsString; fn main() { // ⚠️ let os_string = OsString::from("This string works for your OS too."); match os_string.into_string() { Ok(valid) => valid.thth(), // 編譯器: "什麼是 .thth()??" Err(not_valid) => not_valid.occg(), // 編譯器: "什麼是 .occg()??" } }
然後編譯器準確地告訴我們什麼是我們想知道的:
error[E0599]: no method named `thth` found for struct `std::string::String` in the current scope
--> src/main.rs:6:28
|
6 | Ok(valid) => valid.thth(),
| ^^^^ method not found in `std::string::String`
error[E0599]: no method named `occg` found for struct `std::ffi::OsString` in the current scope
--> src/main.rs:7:37
|
7 | Err(not_valid) => not_valid.occg(),
| ^^^^ method not found in `std::ffi::OsString`
我們可以看到 valid 的型別是 String 以及 not_valid 的型別是 OsString。
mem
std::mem 有一些非常有趣的方法。我們已經看到過一些了,比如 .size_of()、.size_of_val() 和 .drop():
use std::mem; fn main() { println!("{}", mem::size_of::<i32>()); let my_array = [8; 50]; println!("{}", mem::size_of_val(&my_array)); let mut some_string = String::from("You can drop a String because it's on the heap"); mem::drop(some_string); // some_string.clear(); 如果我們這樣做就會恐慌 }
印出:
4
200
這裡是 mem 中的一些其他方法:
swap():用這個方法你可以交換兩個變數之間的值。你為每個變數建立可變參考來做到這件事。在你有兩樣東西想交換,卻因為借用規則 Rust 不允許時很有用。或是當你只想快速切換兩樣東西的時候。
這裡是一個範例:
use std::{mem, fmt}; struct Ring { // 從 Lord of the Rings 建立戒指 owner: String, former_owner: String, seeker: String, // 意思是 "尋求它的人" } impl Ring { fn new(owner: &str, former_owner: &str, seeker: &str) -> Self { Self { owner: owner.to_string(), former_owner: former_owner.to_string(), seeker: seeker.to_string(), } } } impl fmt::Display for Ring { // Display 用來秀出誰擁有它及誰想得到它 fn fmt(&self, f: &mut fmt::Formatter<'_>) -> fmt::Result { write!(f, "{} has the ring, {} used to have it, and {} wants it", self.owner, self.former_owner, self.seeker) } } fn main() { let mut one_ring = Ring::new("Frodo", "Gollum", "Sauron"); println!("{}", one_ring); mem::swap(&mut one_ring.owner, &mut one_ring.former_owner); // Gollum 拿回了戒指一下子 println!("{}", one_ring); }
會印出:
Frodo has the ring, Gollum used to have it, and Sauron wants it
Gollum has the ring, Frodo used to have it, and Sauron wants it
replace():這像是 swap,其實裡面也用了 swap,如同你看到的:
#![allow(unused)] fn main() { pub fn replace<T>(dest: &mut T, mut src: T) -> T { swap(dest, &mut src); src } }
所以它只是做交換,然後回傳另外一個。有了這個,你就能用放進去的其他東西來替換值。因為它會回傳舊的值,所以你應該用 let 來取得它。這裡是個便捷的範例:
use std::mem; struct City { name: String, } impl City { fn change_name(&mut self, name: &str) { let old_name = mem::replace(&mut self.name, name.to_string()); println!( "The city once called {} is now called {}.", old_name, self.name ); } } fn main() { let mut capital_city = City { name: "Constantinople".to_string(), }; capital_city.change_name("Istanbul"); }
印出 The city once called Constantinople is now called Istanbul.。
有個函式叫 .take(),和 .replace() 類似,但它在元素中留下了預設值。你會記得,預設值通常像是 0、"" 之類的東西。這裡是它的簽名:
#![allow(unused)] fn main() { // 🚧 pub fn take<T>(dest: &mut T) -> T where T: Default, }
所以你可以做像這樣的事情:
use std::mem; fn main() { let mut number_vec = vec![8, 7, 0, 2, 49, 9999]; let mut new_vec = vec![]; number_vec.iter_mut().for_each(|number| { let taker = mem::take(number); new_vec.push(taker); }); println!("{:?}\n{:?}", number_vec, new_vec); }
如同你看到的,所有數字都被替換為 0:沒有任何索引的元素被刪除。
[0, 0, 0, 0, 0, 0]
[8, 7, 0, 2, 49, 9999]
對於你自己的型別,你當然可以把 Default 實現成任何你想要的型別。讓我們來看看我們的 Bank 和 Robber 的範例。每次他搶了 Bank,他就會在桌子上拿到錢。但是辦公桌可以隨時從後面拿錢,所以它永遠會有 50。我們將會為這件事做我們自己的型別,所以它也永遠會有 50。這裡是它怎麼做到的:
use std::mem; use std::ops::{Deref, DerefMut}; // 我們將會使用這個來得到 u32 的威力 struct Bank { money_inside: u32, money_at_desk: DeskMoney, // 這是我們的 "智慧指標" 型別. 它有自己的預設值, 但他會使用 u32 } struct DeskMoney(u32); impl Default for DeskMoney { fn default() -> Self { Self(50) // 預設值永遠是 50, 不是 0 } } impl Deref for DeskMoney { // 有的這個我們可以使用 * 存取 u32 type Target = u32; fn deref(&self) -> &Self::Target { &self.0 } } impl DerefMut for DeskMoney { // 並且有了這個我們就可以做加減法等等 fn deref_mut(&mut self) -> &mut Self::Target { &mut self.0 } } impl Bank { fn check_money(&self) { println!( "There is ${} in the back and ${} at the desk.\n", self.money_inside, *self.money_at_desk // 要用 * 這樣我們才能印出 u32 ); } } struct Robber { money_in_pocket: u32, } impl Robber { fn check_money(&self) { println!("The robber has ${} right now.\n", self.money_in_pocket); } fn rob_bank(&mut self, bank: &mut Bank) { let new_money = mem::take(&mut bank.money_at_desk); // 這裡拿走錢, 並留下 50 因為那是預設值 self.money_in_pocket += *new_money; // 用 * 因為我們可以只加上 u32. DeskMoney 不能加 bank.money_inside -= *new_money; // 這裡一樣 println!("She robbed the bank. She now has ${}!\n", self.money_in_pocket); } } fn main() { let mut bank_of_klezkavania = Bank { // 安排我們的銀行 money_inside: 5000, money_at_desk: DeskMoney(50), }; bank_of_klezkavania.check_money(); let mut robber = Robber { // 安排我們的搶匪 money_in_pocket: 50, }; robber.check_money(); robber.rob_bank(&mut bank_of_klezkavania); // 搶劫, 再來檢查金額 robber.check_money(); bank_of_klezkavania.check_money(); robber.rob_bank(&mut bank_of_klezkavania); // 再做一次 robber.check_money(); bank_of_klezkavania.check_money(); }
會印出:
There is $5000 in the back and $50 at the desk.
The robber has $50 right now.
She robbed the bank. She now has $100!
The robber has $100 right now.
There is $4950 in the back and $50 at the desk.
She robbed the bank. She now has $150!
The robber has $150 right now.
There is $4900 in the back and $50 at the desk.
你可以看到桌子上總是有 50 美元。
prelude
標準函式庫也有 prelude (預先載入的函式庫),這就是為什麼你不用寫像是 use std::vec::Vec 的東西來建立 Vec。你可以在這裡看到所有這些元素,並且已經大致瞭解他們:
std::marker::{Copy, Send, Sized, Sync, Unpin}。你以前沒有見過Unpin,因為幾乎每一種型別都會用到它(比如Sized,也很常見)。"Pin" 的意思是釘住不讓東西動。在這種情況下,Pin意味著它不能在記憶體中移動,但大多數都有Unpin,所以可以移動。這就是為什麼像std::mem::replace這樣的函式能用,因為它們沒有被釘住。std::ops::{Drop, Fn, FnMut, FnOnce}。std::mem::drop。std::boxed::Box。std::borrow::ToOwned。你之前在Cow有看到過一些,它可以把內容從借來的變成擁有所有權的。它使用.to_owned()來做到這件事。你也可以使用.to_owned()在&str上來得到String,對於其它的借來值用法也一樣。std::clone::Clone。std::cmp::{PartialEq, PartialOrd, Eq, Ord}。std::convert::{AsRef, AsMut, Into, From}。std::default::Default。std::iter::{Iterator, Extend, IntoIterator, DoubleEndedIterator, ExactSizeIterator}。我們之前在疊代器用過.rev():實際上是做出了DoubleEndedIterator。ExactSizeIterator只是類似於0..10的東西:它已經知道自己的.len()是 10。其他疊代器肯定是不知道它們的長度。std::option::Option::{self, Some, None}。std::result::Result::{self, Ok, Err}。std::string::{String, ToString}。std::vec::Vec。
如果你因為某些原因不想要有 prelude 怎麼辦?就加上屬性 #![no_implicit_prelude]。讓我們來試一試,看編譯器抱怨什麼:
// ⚠️ #![no_implicit_prelude] fn main() { let my_vec = vec![8, 9, 10]; let my_string = String::from("This won't work"); println!("{:?}, {}", my_vec, my_string); }
現在 Rust 根本不知道你在嘗試做什麼:
error: cannot find macro `println` in this scope
--> src/main.rs:5:5
|
5 | println!("{:?}, {}", my_vec, my_string);
| ^^^^^^^
error: cannot find macro `vec` in this scope
--> src/main.rs:3:18
|
3 | let my_vec = vec![8, 9, 10];
| ^^^
error[E0433]: failed to resolve: use of undeclared type or module `String`
--> src/main.rs:4:21
|
4 | let my_string = String::from("This won't work");
| ^^^^^^ use of undeclared type or module `String`
error: aborting due to 3 previous errors
因此對於這個簡單的程式碼,你需要告訴 Rust 去使用叫做 std 的 extern (外部) crate,以及你想要用的元素。這裡是一切我們所需要做的事,只是為了建立 Vec 和 String 並印出它:
#![no_implicit_prelude] extern crate std; // 現在你需要告訴 Rust 你想要用叫做 std 的 crate use std::vec; // 我們需要 vec 巨集 use std::string::String; // 還有 String use std::convert::From; // 和這個來轉換 &str 到 String use std::println; // 還有這個來列印 fn main() { let my_vec = vec![8, 9, 10]; let my_string = String::from("This won't work"); println!("{:?}, {}", my_vec, my_string); }
現在終於成功印出 [8, 9, 10], This won't work。所以你可以明白為什麼 Rust 要用 prelude 了。但如果你願意,你不需要使用它。而且你甚至可以使用 #![no_std] (我們曾經看過一次),用在你連堆疊記憶體這種東西都無法使用的時候。但大多數時候,你根本不用考慮是否不用 prelude 或 std。
那為什麼之前我們沒有看過 extern 這個關鍵字呢?是因為你已經不再那麼需要它了。以前在引進外部 crate 時,你必須使用它。所以過去要用 rand,你必須要寫成:
#![allow(unused)] fn main() { extern crate rand; }
然後用 use 陳述式來表示你想要使用的模組、特徵等等。但現在 Rust 編譯器已經不需要這些幫助了──你只需要使用 use,Rust 就知道在哪裡可以找到它。所以你幾乎再也不需要 extern crate 了,但在其他人的 Rust 程式碼中,你可能仍然會在頂部看得到它。
時間
std::time 是你可以找到時間相關函式的地方。(如果你想要更多的功能,有 chrono 這樣的 crate 可以用。) 最簡單的功能就是用Instant::now() 取得系統時間。
use std::time::Instant; fn main() { let time = Instant::now(); println!("{:?}", time); }
如果你印出來,你會得到這樣的東西:Instant { tv_sec: 2738771, tv_nsec: 685628140 }。那裡講的是秒和奈秒,但用處不大。比如你看 2738771 秒(寫於 8 月),就是31.70 天。這和月份、日數沒有任何關係。但是 Instant 的頁面告訴我們,它對本身不應該有用。它說它是 "不透明的(Opaque),只有和 Duration 一起才有用"。這裡不透明的的意思是"你無法搞清楚",而 Duration 的意思是"過去多少時間"。所以它只有在做比較時間這樣的事情時才有用。
如果你看頁面左側的特徵,其中一個是 Sub<Instant>。也就是說我們可以用 - 來減去另一個。而當我們點選 [src] 看它做了什麼時,它說:
#![allow(unused)] fn main() { impl Sub<Instant> for Instant { type Output = Duration; fn sub(self, other: Instant) -> Duration { self.duration_since(other) } } }
因此,它需要 Instant,並使用 .duration_since() 給出 Duration。讓我們試著把它印出來。我們將做出兩個直接相鄰的 Instant::now(),然後再讓程式忙碌一下。然後我們再多做出一個 Instant::now()。 最後我們將看看花了多長時間。
use std::time::Instant; fn main() { let time1 = Instant::now(); let time2 = Instant::now(); // 這兩個直接相鄰 let mut new_string = String::new(); loop { new_string.push('წ'); // 讓 Rust 把喬治亞字母推到 String 上 if new_string.len() > 100_000 { // 直到它長達 100,000 位元組 break; } } let time3 = Instant::now(); println!("{:?}", time2 - time1); println!("{:?}", time3 - time1); }
會印出類似這樣:
1.025µs
683.378µs
所以這只是 1 微秒多對上 683 毫秒。我們可以看到 Rust 確實花了一些時間來做。
然而我們可以只用一個 Instant 來做一件有趣的事情。我們可以用 format!("{:?}", Instant::now()); 把它轉換成 String。看起來像這樣:
use std::time::Instant; fn main() { let time1 = format!("{:?}", Instant::now()); println!("{}", time1); }
那會印出類似 Instant { tv_sec: 2740773, tv_nsec: 632821036 } 的東西。那沒什麼用,但是如果我們使用 .iter() 和 .rev() 以及 .skip(2),我們可以跳過尾端的 } 和 。我們可以用它來做出隨機數產生器。
use std::time::Instant; fn bad_random_number(digits: usize) { if digits > 9 { panic!("Random number can only be up to 9 digits"); } let now = Instant::now(); let output = format!("{:?}", now); output .chars() .rev() .skip(2) .take(digits) .for_each(|character| print!("{}", character)); println!(); } fn main() { bad_random_number(1); bad_random_number(1); bad_random_number(3); bad_random_number(3); }
會印出類似這樣:
6
4
967
180
這個函式被稱為 bad_random_number,因為它不是個非常好的隨機數產生器。Rust 有更好的 crate,可以用比 rand 更少的程式碼做出隨機數,比如 fastrand。但這是個你如何可以利用你的想像力透過 Instant 來做一些事情的好範例。
當你有個執行緒運作時,你可以使用 std::thread::sleep 使它停止一段時間。當你這樣做時,你必須給它 duration。你不必做出多個執行緒來做這件事,因為每個程式至少運作在一個執行緒上。然而 sleep 需要 Duration,所以它可以知道要睡多久。你可以像這樣選擇單位:Duration::from_millis()、Duration::from_secs 等等。這裡舉個例子:
use std::time::Duration; use std::thread::sleep; fn main() { let three_seconds = Duration::from_secs(3); println!("I must sleep now."); sleep(three_seconds); println!("Did I miss anything?"); }
只會印出:
I must sleep now.
Did I miss anything?
但執行緒在三秒鐘內什麼也不做。當你有很多執行緒需要經常嘗試一些事情時,比如連線,你通常會使用 .sleep()。你不希望執行緒使用你的處理器在一秒鐘內嘗試十萬次,而你只是想讓它有時檢查一下。所以你就可以設定 Duration,它就會在每次醒來的時候嘗試做它的任務。
其他巨集
讓我們再來看看一些其他巨集。
unreachable!()
這個巨集有點像 todo!(),除了它是針對你永遠不會用的程式碼。也許你在列舉中有個 match,你知道它永遠不會選擇其中的某個分支,所以程式碼永遠無法到達。如果是這樣,你可以寫 unreachable!(),這樣編譯器就知道可以忽略這部分。
例如,假設你有個程式,當你選擇一個地方居住時,它會寫一些東西。在烏克蘭除了車諾比外,其他地方都不錯。你的程式不讓任何人選擇車諾比,因為它現在不是個居住的好地方。但是這個列舉是很早以前在別人的程式碼裡做的,你無法更改。所以在 match 的分支中,你可以在這裡用這個巨集。看起來像這樣:
enum UkrainePlaces { Kiev, Kharkiv, Chernobyl, // 假裝我們不能改變列舉 - 車諾比會永遠在這 Odesa, Dnipro, } fn choose_city(place: &UkrainePlaces) { use UkrainePlaces::*; match place { Kiev => println!("You will live in Kiev"), Kharkiv => println!("You will live in Kharkiv"), Chernobyl => unreachable!(), Odesa => println!("You will live in Odesa"), Dnipro => println!("You will live in Dnipro"), } } fn main() { let user_input = UkrainePlaces::Kiev; // 假裝使用者輸入是來自一些其它函示. 無論如何使用者不能選擇車諾比 choose_city(&user_input); }
會印出 You will live in Kiev。
unreachable!() 對你來說也很好讀,因為它提醒你程式碼的某些部分是不能到達的。不過你必須確定程式碼實際上是到達不了的。如果呼叫了 unreachable!(),程式就會恐慌。
此外,如果你曾經有到達不了的程式碼,而編譯器知道,它就會告訴你。這裡是個便捷的範例:
fn main() { let true_or_false = true; match true_or_false { true => println!("It's true"), false => println!("It's false"), true => println!("It's true"), // 哎呀, 我們又寫了 true } }
它會說:
warning: unreachable pattern
--> src/main.rs:7:9
|
7 | true => println!("It's true"),
| ^^^^
|
但是 unreachable!() 是用於編譯器無法知道的時候,就像我們的另一個範例。
column!、line!、file!、module_path!
這四個巨集有點像 dbg!(),因為你只是把它們放進程式碼來給你除錯資訊。但是它們不需要接受任何變數——你只需要把它們和括號一起使用,而且沒有其他東西。它們放到一起很容易學:
column!()給你寫的那一列file!()給你寫的檔案名稱line!()給你寫的那一行,然後是module_path!()給你模組所在的位置。
接下來的程式碼會在簡單的例子中秀出這三者。我們將假裝有更多的程式碼(模組裡面的模組),因為那就是我們要使用這些巨集的原因。你可以想像 Rust 大程式,它有許多模組與檔案。
pub mod something { pub mod third_mod { pub fn print_a_country(input: &mut Vec<&str>) { println!( "The last country is {} inside the module {}", input.pop().unwrap(), module_path!() ); } } } fn main() { use something::third_mod::*; let mut country_vec = vec!["Portugal", "Czechia", "Finland"]; // 做一些事情 println!("Hello from file {}", file!()); // 做一些事情 println!( "On line {} we got the country {}", line!(), country_vec.pop().unwrap() ); // 做多一些事情 println!( "The next country is {} on line {} and column {}.", country_vec.pop().unwrap(), line!(), column!(), ); // 很多很多的程式碼 print_a_country(&mut country_vec); }
印出這樣:
Hello from file src/main.rs
On line 23 we got the country Finland
The next country is Czechia on line 32 and column 9.
The last country is Portugal inside the module rust_book::something::third_mod
cfg!
我們知道你可以使用 #[cfg(test)] 和 #[cfg(windows)] 這樣的屬性來告訴編譯器在某些情況下該怎麼做。當你有 test 時,當你在測試模式下執行Rust 時,它會執行程式碼(如果是在電腦上,你輸入 cargo test)。而當你使用 windows 時,如果使用者使用的是 Windows,它就會執行程式碼。但也許你只是想根據不同作業系統對依賴系統的程式碼做很小的修改。這時候這個巨集就很有用了。它回傳 bool。
fn main() { let helpful_message = if cfg!(target_os = "windows") { "backslash" } else { "slash" }; println!( "...then in your hard drive, type the directory name followed by a {}. Then you...", helpful_message ); }
取決於你的系統這將以不同的方式列印。Rust Playground 在 Linux上執行,所以會印出:
...then in your hard drive, type the directory name followed by a slash. Then you...
cfg!() 適用於任何一種配置。這裡的範例是當你在測試中使用函式時,它的執行方式會有所不同。
#[cfg(test)] // cfg! 會知道要尋找 test 這個字 mod testing { use super::*; #[test] fn check_if_five() { assert_eq!(bring_number(true), 5); // bring_number() 函式應該回傳 5 } } fn bring_number(should_run: bool) -> u32 { // 這個函式接受 bool 作為是否他應該執行的條件 if cfg!(test) && should_run { // 如果它應該執行並且有組態測試就回傳 5 5 } else if should_run { // 如果它不是 test 但它應該執行, 印出某些東西. 當你執行測試它會忽略 println! 陳述式 println!("Returning 5. This is not a test"); 5 } else { println!("This shouldn't run, returning 0."); // 否則回傳 0 0 } } fn main() { bring_number(true); bring_number(false); }
現在根據組態的不同,它的執行方式也會不同。如果你只是執行程式,它會給你這樣的結果:
Returning 5. This is not a test
This shouldn't run, returning 0.
但如果你在測試模式下執行它 (cargo test,用你電腦上的 Rust 跑),它實際上會執行測試。因為在這種情況下,測試總是回傳 5,所以它會通過。
running 1 test
test testing::check_if_five ... ok
test result: ok. 1 passed; 0 failed; 0 ignored; 0 measured; 0 filtered out
撰寫巨集
撰寫巨集可以到非常複雜。而你幾乎永遠都不需要寫巨集,但有時你可能會因為它們非常方便而想去寫。寫巨集很有趣,因為它們幾乎是不同的語言。寫巨集時你實際上會用到另一個叫 macro_rules! 的巨集。然後加入你的巨集名稱,並開啟 {} 區塊。裡面有點像 match 陳述式。
這裡有個巨集的範例只有接受 (),也只回傳 6:
macro_rules! give_six { () => { 6 }; } fn main() { let six = give_six!(); println!("{}", six); }
但它和 match 陳述式不太一樣,因為巨集實際上不會編譯任何東西。它只是接受一個輸入並給出一個輸出。然後編譯器會檢查它是否合理。這就是為什麼巨集就像是"寫程式碼的程式碼"。你會記得,真正的 match 陳述式需要給出相同的型別,所以這個就會不能編譯:
fn main() { // ⚠️ let my_number = 10; match my_number { 10 => println!("You got a ten"), _ => 10, } }
它會抱怨你在一種情況下要回傳 (),卻在另一種情況下要回傳 i32。
error[E0308]: `match` arms have incompatible types
--> src\main.rs:5:14
|
3 | / match my_number {
4 | | 10 => println!("You got a ten"),
| | ------------------------- this is found to be of type `()`
5 | | _ => 10,
| | ^^ expected `()`, found integer
6 | | }
| |_____- `match` arms have incompatible types
但巨集並不關心,因為它只是給予輸出。它不是編譯器——它是程式碼的程式碼。所以你可以這樣做:
macro_rules! six_or_print { (6) => { 6 }; () => { println!("You didn't give me 6."); }; } fn main() { let my_number = six_or_print!(6); six_or_print!(); }
這就好辦了,印出 You didn't give me 6.。你也可以看到,這不是匹配陳述式的分支,因為沒有 _ 的情況。我們只能給它 (6),或者 (),其他的都會出錯。而我們給它的 6 甚至不是 i32,只是輸入的 6。其實你可以設定任何東西作為巨集的輸入,因為它只查看輸入見到了什麼。比如說:
macro_rules! might_print { (THis is strange input 하하はは哈哈 but it still works) => { println!("You guessed the secret message!") }; () => { println!("You didn't guess it"); }; } fn main() { might_print!(THis is strange input 하하はは哈哈 but it still works); might_print!(); }
所以這個奇怪的巨集只回應兩件事。() 和 (THis is strange input 하하はは哈哈 but it still works)。沒有其他的東西。印出:
You guessed the secret message!
You didn't guess it
所以巨集不完全是 Rust 語法。但是巨集也可以理解你給它的不同型別的輸入。拿這個例子來說:
macro_rules! might_print { ($input:expr) => { println!("You gave me: {}", $input); } } fn main() { might_print!(6); }
會印出 You gave me: 6。$input:expr 的部分很重要。它的意思是"對於表達式,給它取變數名稱為 $input"。巨集中的變數是以 $ 開頭。在這個巨集中,如果你給它表達式,表達式就會印出來。讓我們再來多試幾次:
macro_rules! might_print { ($input:expr) => { println!("You gave me: {:?}", $input); // 現在我們將會使用 {:?} 因為我們將會給它不同的種類的表達式 } } fn main() { might_print!(()); // 給它 () might_print!(6); // 給它 6 might_print!(vec![8, 9, 7, 10]); // 給它向量 }
會印出:
You gave me: ()
You gave me: 6
You gave me: [8, 9, 7, 10]
另外注意,我們寫的是 {:?},但它不會檢查 &input 是否實現了 Debug。它只會寫程式碼,並嘗試讓它編譯,如果不行,那它就會給出錯誤。
那麼除了 expr fragment,巨集還能看到什麼呢?它們是 block | expr | ident | item | lifetime | literal | meta | pat | path | stmt | tt | ty | vis。這就是複雜的部分。你可以在這裡看到它們各自的意思,這裡說:
item: an Item
block: a BlockExpression
stmt: a Statement without the trailing semicolon (except for item statements that require semicolons)
pat: a Pattern
expr: an Expression
ty: a Type
ident: an IDENTIFIER_OR_KEYWORD
path: a TypePath style path
tt: a TokenTree (a single token or tokens in matching delimiters (), [], or {})
meta: an Attr, the contents of an attribute
lifetime: a LIFETIME_TOKEN
vis: a possibly empty Visibility qualifier
literal: matches -?LiteralExpression
有個好網站叫 cheats.rs,在這裡解釋了它們,並且為每一種 fragment 給出範例。
然而對於大多數巨集,你只會用到 expr、ident 和 tt。ident 表示識別字,用於變數或函式名稱。tt 表示標記樹 (Token tree),和任何型別的輸入。讓我們嘗試用前兩者寫個簡單的巨集。
macro_rules! check { ($input1:ident, $input2:expr) => { println!( "Is {:?} equal to {:?}? {:?}", $input1, $input2, $input1 == $input2 ); }; } fn main() { let x = 6; let my_vec = vec![7, 8, 9]; check!(x, 6); check!(my_vec, vec![7, 8, 9]); check!(x, 10); }
所以這將接受一個 ident (像是變數名)和一個表達式,看看它們是否相同。印出:
Is 6 equal to 6? true
Is [7, 8, 9] equal to [7, 8, 9]? true
Is 6 equal to 10? false
而這裡有一個巨集,它接受輸入 tt,然後把它印出來。它會先使用叫做 stringify! 的巨集做出字串。
macro_rules! print_anything { ($input:tt) => { let output = stringify!($input); println!("{}", output); }; } fn main() { print_anything!(ththdoetd); print_anything!(87575oehq75onth); }
印出:
ththdoetd
87575oehq75onth
但如果我們給它一些帶有空格、逗號等的東西,它就不會印出來了。它會認為我們給它不止一個元素或額外的資訊,所以它會感到困惑。
這就是巨集開始變得困難的地方。
要一次提供給巨集多個元素,我們必須使用不同的語法。不是原先的 $input,而是要用 $($input1),*。這意味著用逗號分隔的零或更多(這就是 * 的意思)元素。如果你想要一個或多個,要改用 + 而不是 *。
現在我們的巨集看起來像這樣:
macro_rules! print_anything { ($($input1:tt),*) => { let output = stringify!($($input1),*); println!("{}", output); }; } fn main() { print_anything!(ththdoetd, rcofe); print_anything!(); print_anything!(87575oehq75onth, ntohe, 987987o, 097); }
所以它接受任何用逗號隔開的標記樹,並使用 stringify! 把它變成字串,再印出來。印出:
ththdoetd, rcofe
87575oehq75onth, ntohe, 987987o, 097
如果我們使用 + 而不是 *,它會給出錯誤,因為其中一次呼叫時我們沒有給它輸入。所以 * 是個比較安全一點的選擇。
所以現在我們可以開始見識到巨集的威力了。在接下來的範例中,我們實際上可以做出我們自己的函式:
macro_rules! make_a_function { ($name:ident, $($input:tt),*) => { // 首先你給它函式一個名字, 然後它檢查其它所有東西 fn $name() { let output = stringify!($($input),*); // 它讓其它所有東西變成字串 println!("{}", output); } }; } fn main() { make_a_function!(print_it, 5, 5, 6, I); // 我們想要函式呼叫 print_it() 來印出我們給的其它所有東西 print_it(); make_a_function!(say_its_nice, this, is, really, nice); // 這裡一樣但是我們改了函式名 say_its_nice(); }
印出:
5, 5, 6, I
this, is, really, nice
所以現在我們可以開始瞭解其他的巨集了。你可以見到,我們已經使用的一些巨集相當簡單。這裡是我們過去常用來寫入檔案的 write! 巨集:
#![allow(unused)] fn main() { macro_rules! write { ($dst:expr, $($arg:tt)*) => ($dst.write_fmt($crate::format_args!($($arg)*))) } }
要使用它時,你要輸入這些:
- 一個表達式 (
expr) 用來得到變數名$dst。 - 之後的所有東西。如果它寫的是
$arg:tt,那麼它只會接受一個元素,但因為它寫的是$($arg:tt)*,所以它可以接受零、一個或者任意多個。
然後它接受 $dst,並對它呼叫了叫做 write_fmt 的方法。在那裡面,它使用了另一個叫做 format_args! 的巨集來接受所有的 $($arg)*,或者說我們放進去的全部引數。
現在我們來看一下 todo! 這個巨集。當你想讓程式能編譯但你的程式碼還沒寫出來時,這就是你會用到的那個巨集。看起來像這樣:
#![allow(unused)] fn main() { macro_rules! todo { () => (panic!("not yet implemented")); ($($arg:tt)+) => (panic!("not yet implemented: {}", $crate::format_args!($($arg)+))); } }
這個有兩個選項:你可以輸入 (),也可以輸入一些標記樹 (tt)。
- 如果你輸入的是
(),它只是使用加上訊息的panic!。所以其實你可以直接寫panic!("not yet implemented"),而不是todo!,結果也一樣。 - 如果你輸入一些引數,它會嘗試印出它們。你可以見到裡面有同樣的
format_args!巨集,它的工作原理和println!一樣。
所以如果你寫成這樣,一樣也行得通:
fn not_done() { let time = 8; let reason = "lack of time"; todo!("Not done yet because of {}. Check back in {} hours", reason, time); } fn main() { not_done(); }
會印出:
thread 'main' panicked at 'not yet implemented: Not done yet because of lack of time. Check back in 8 hours', src/main.rs:4:5
在巨集裡面你甚至可以呼叫相同的巨集。這裡是這樣的範例:
macro_rules! my_macro { () => { println!("Let's print this."); }; ($input:expr) => { my_macro!(); }; ($($input:expr),*) => { my_macro!(); } } fn main() { my_macro!(vec![8, 9, 0]); my_macro!(toheteh); my_macro!(8, 7, 0, 10); my_macro!(); }
這個巨集接受 ()、或一個表達式、或很多個表達式都可以。但是不論你放了什麼,它都會忽略所有的表達式,並且最後只呼叫 my_macro! 的 ()。所以四次輸出都只是 Let's print this。
在 dbg! 巨集中也可以看到同樣的情況,也就是呼叫自己。
#![allow(unused)] fn main() { macro_rules! dbg { () => { $crate::eprintln!("[{}:{}]", $crate::file!(), $crate::line!()); // $crate 的意思是指本身所在的 crate. }; ($val:expr) => { // 這裡 `match` 的使用是有意的因為它影響了暫存變數的 // 生命週期 - https://stackoverflow.com/a/48732525/1063961 match $val { tmp => { $crate::eprintln!("[{}:{}] {} = {:#?}", $crate::file!(), $crate::line!(), $crate::stringify!($val), &tmp); tmp } } }; // 單一引數的後緣逗號會被忽略 ($val:expr,) => { $crate::dbg!($val) }; ($($val:expr),+ $(,)?) => { ($($crate::dbg!($val)),+,) }; } }
eprintln!與println!相同,除了它印出到io::stderr而不是io::stdout。當然也有個eprint!印出時不會加上換行。
所以我們可以自己去試一試。
fn main() { dbg!(); }
這與第一分支相匹配,所以它會用 file! 和 line! 巨集印出檔名和行數。印出 [src/main.rs:2]。
讓我們用這個來試試:
fn main() { dbg!(vec![8, 9, 10]); }
這將會匹配到下一個分支,因為它是個表達式。然後它將把輸入叫做 tmp 並使用這段程式碼:$crate::eprintln!("[{}:{}] {} = {:#?}", $crate::file!(), $crate::line!(), $crate::stringify!($val), &tmp);。所以它會用 file! 和 line! 來印出,再把 $val 做成 String,並且用 {:#?} 來給 tmp 做漂亮列印。所以對於我們的輸入,它會寫成這樣:
[src/main.rs:2] vec![8, 9, 10] = [
8,
9,
10,
]
剩下的部分,即使你加了額外的逗號,它也只是對自己呼叫 dbg!。
正如你所見,巨集是非常複雜的!通常你只想讓巨集自動做些簡單函式無法做得很好的事情。學習巨集的最佳方法就是看看其他巨集的例子。沒有多少人能夠快速寫出巨集而不出問題。所以在 Rust 中,不用認為你需要知道巨集的一切才能知道如何撰寫。但如果你讀了其他巨集,並稍加修改,你就可以很容易地借用它們的威力。之後你可能就會開始習慣寫出自己的巨集。
第二部 - 電腦上的 Rust
你見到了我們可以只使用 Playground 就學習到 Rust 裡的幾乎任何東西。但到目前為止如果你已經學了這麼多,現在你也許會想要在你的電腦上使用 Rust。總有一些事情是你沒辨法用 Playground 做到的,比如使用檔案或在多個檔案中的程式碼。也有一些其它東西需要在電腦上安裝 Rust 的是輸入功能和 flags。但最重要的事是在你的電腦上有了 Rust,你可以使用 Crate。我們已經學過 Crate ,但在 Playground 中你只能使用最流行的那一個。但在你的電腦上有了 Rust,你就可以在你的程式中使用任何 Crate。
cargo
rustc 的意思是 Rust 編譯器,實際的編譯工作由它完成。Rust 檔案是用 .rs 作結尾。但大多數人不會去寫類似 rustc main.rs 的東西來編譯。他們使用的是名為 cargo 的東西,它是 Rust 的主要套件管理器。
關於這個名字的說明:之所以叫 cargo,是因為當你把板條箱 (crate) 放在一起時,你會得到貨物 (cargo)。Crate 就是你在貨船或卡車上見到的木箱,但你會記得,每個 Rust 專案也叫 Crate。那麼當你把它們放在一起時,你就會得到一整個 Cargo。
當你使用 Cargo 來執行專案時,你可以見到這一點。讓我們用 rand 來試試簡單的東西:我們只會隨機在八個字母之間選擇。
use rand::seq::SliceRandom; // 讓 .choose 能使用在 slices 上 fn main() { let my_letters = vec!['a', 'b', 'c', 'd', 'e', 'f', 'g', 'h']; let mut rng = rand::thread_rng(); for _ in 0..6 { print!("{} ", my_letters.choose(&mut rng).unwrap()); } }
會印出 b **c** g h e a 這樣的東西。但我們想先看看 cargo 的作用。要使用 cargo 來執行我們的程式,通常我們按鍵輸入 cargo run。這樣就可以組建我們的程式,並為我們執行。當它開始編譯時,會做這樣的事情:
Compiling getrandom v0.1.14
Compiling cfg-if v0.1.10
Compiling ppv-lite86 v0.2.8
Compiling rand_core v0.5.1
Compiling rand_chacha v0.2.2
Compiling rand v0.7.3
Compiling rust_book v0.1.0 (C:\Users\mithr\OneDrive\Documents\Rust\rust_book)
Finished dev [unoptimized + debuginfo] target(s) in 13.13s
Running `C:\Users\mithr\OneDrive\Documents\Rust\rust_book\target\debug\rust_book.exe`
g f c f h b
所以看起來不只引進了 rand,還有一些其它的也是。這是因為我們的 crate 需要 rand,而 rand 也有一些程式碼也需要其它 crate。所以 cargo 會找到我們需要的所有 crate,並把它們放在一起。在我們的案例中,我們只有七個,但在非常大的專案中,你可能會有 200 個或更多的 crate 要引進。
這就是你可以看到 Rust 的權衡妥協的地方。Rust 的速度極快,因為它提前編譯。它透過檢視程式碼,看你寫的程式碼到底做了什麼。例如,你可能會寫這樣的泛型程式碼:
use std::fmt::Display; fn print_and_return_thing<T: Display>(input: T) -> T { println!("You gave me {} and now I will give it back.", input); input } fn main() { let my_name = print_and_return_thing("Windy"); let small_number = print_and_return_thing(9.0); }
這個函式可以接受實作 Display 的任何型別作為引數,所以我們給它 &str,接下來給它 f64,這對我們來說沒什麼問題。但是編譯器不看泛型,因為它不想在執行時期做任何事情。它想把能執行的程式儘可能快地組裝起來。所以當它看第一部分的 "Windy" 時,它不是看到 fn print_and_return_thing<T: Display>(input: T) -> T,它看到的是 fn print_and_return_thing(input: &str) -> &str 這樣的東西。而接下來它看到的是 fn print_and_return_thing(input: f64) -> f64。所有關於特徵的檢查等等都是在編譯時期完成的。這就是為什麼泛型需要更長的時間來編譯,因為它需要弄清楚它們,並使之具體化。
還有一件事:Rust 2020 正在努力處理編譯時間問題,因為這部分需要的時間最長。每個版本的 Rust 在編譯時都會快一點,而且還有一些其他的計劃來加快它的速度。但與此同時,這裡是你該知道的:
cargo build會組建你的程式,這樣你就可以執行它了。cargo run將組建你的程式並且執行。cargo build --release和cargo run --release有同樣的效果,不過是在釋出模式 (Release mode) 下。那是什麼?釋出模式是用在當你的程式碼終於完成的時候。然後 Rust 會花更多的時間來編譯,但它這樣做是因為它使用了它所知道的一切,來使編譯出的程式執行得更快。釋出模式實際上比被稱為除錯模式 (Debug mode) 的常規模式執行時還 快的多。那是因為常規模式的編譯速度更快,而且有更多的除錯資訊。常規的cargo build叫做 "debug build",cargo build --release叫做 "release build"。cargo check是一種檢查程式碼的方式。它就像編譯一樣,除了它並不會真正地做出你的程式。這是經常檢查你的程式碼的好方式,因為它不像build或run那樣需要花很長時間。
對了,命令中的 --release 這部分叫做 flag。這意味著命令裡帶有額外的資訊。
一些其他你需要知道的事情:
cargo new這麼做是為了建立新的 Rust 專案。在new之後寫上專案名稱,cargo將會做出所有你需要的檔案和資料夾。cargo clean當你把 crate 新增到Cargo.toml時,電腦會下載所有需要的檔案,並且會佔用很多空間。如果你不想再讓它們留在你的電腦上,可以輸入cargo clean。
關於編譯器還有一件事:只有當你第一次使用 cargo build 或 cargo run 時,它才會花費最多的時間。在那之後它就會記得一些資訊,又會快速的編譯了。但如果你使用 cargo clean,然後執行 cargo build,它將不得不再慢慢地編譯一次。
接受使用者輸入
接受使用者的輸入的一個簡單的方式是用 std::io::stdin。這意味著"標準輸入" (standard input),也就是來自鍵盤的輸入。用 stdin() 可以獲得使用者的輸入內容,但是接下來你就會想用 .read_line() 把它放到 &mut String 中。這裡是那種情境的簡單範例,但它既能用、也不能用:
use std::io; fn main() { println!("Please type something, or x to escape:"); let mut input_string = String::new(); while input_string != "x" { // 這是不能用的部分 input_string.clear(); // 首先清除 String 內容. 不然會一直加入東西進去 io::stdin().read_line(&mut input_string).unwrap(); // 從使用者獲得的 stdin, 並把它放進去 read_string println!("You wrote {}", input_string); } println!("See you later!"); }
這裡是輸出看起來的樣子:
Please type something, or x to escape:
something
You wrote something
Something else
You wrote Something else
x
You wrote x
x
You wrote x
x
You wrote x
它接受我們的輸入,然後把它還給我們,它甚至知道我們輸入了 x。但它並沒有退出程式。唯一的辦法是關閉視窗,或者輸入 ctrl 和 c。讓我們把 println! 中的 {} 改為 {:?},來得到更多資訊(如果你喜歡用巨集,也可以使用 dbg!(&input_string))。現在它說:
Please type something, or x to escape:
something
You wrote "something\r\n"
Something else
You wrote "Something else\r\n"
x
You wrote "x\r\n"
x
You wrote "x\r\n"
這是因為鍵盤輸入其實不只是 something,而是 something 和 Enter 鍵。有個簡單的方法可以修正這個問題,叫做 .trim(),它可以把所有的空白字元都去掉。順便說一下,這些字元都是空白字元:
U+0009 (horizontal tab, '\t')
U+000A (line feed, '\n')
U+000B (vertical tab)
U+000C (form feed)
U+000D (carriage return, '\r')
U+0020 (space, ' ')
U+0085 (next line)
U+200E (left-to-right mark)
U+200F (right-to-left mark)
U+2028 (line separator)
U+2029 (paragraph separator)
這樣就可以把 x\r\n 變成只剩 x 了。現在它可以用了:
use std::io; fn main() { println!("Please type something, or x to escape:"); let mut input_string = String::new(); while input_string.trim() != "x" { input_string.clear(); io::stdin().read_line(&mut input_string).unwrap(); println!("You wrote {}", input_string); } println!("See you later!"); }
現在會印出:
Please type something, or x to escape:
something
You wrote something
Something
You wrote Something
x
You wrote x
See you later!
還有另一種使用者輸入叫 std::env::Args(env 的意思是環境 environment )。Args 是使用者啟動程式時打字輸入的內容。其實在程式執行時總是至少有一個 Arg。讓我們寫個程式,裡面只使用 std::env::args() 印出它們,來看看它們是什麼。
fn main() { println!("{:?}", std::env::args()); }
如果我們寫 cargo run,就會像這樣印出來:
Args { inner: ["target\\debug\\rust_book.exe"] }
讓我們給它更多輸入來看看它的作用。我們輸入 cargo run but with some extra words 來執行,會給我們:
Args { inner: ["target\\debug\\rust_book.exe", "but", "with", "some", "extra", "words"] }
真有趣。而當我們瀏覽 Args 文件時,我們看到它實作了 IntoIterator。這意味著我們可以做全部疊代器我們所知的一切事情來讀取和改變它。讓我們試試這個:
use std::env::args; fn main() { let input = args(); for entry in input { println!("You entered: {}", entry); } }
現在它說:
You entered: target\debug\rust_book.exe
You entered: but
You entered: with
You entered: some
You entered: extra
You entered: words
你可以看到第一個引數總是程式名,所以你經常會想跳過它,比如這樣:
use std::env::args; fn main() { let input = args(); input.skip(1).for_each(|item| { println!("You wrote {}, which in capital letters is {}", item, item.to_uppercase()); }) }
會印出:
You wrote but, which in capital letters is BUT
You wrote with, which in capital letters is WITH
You wrote some, which in capital letters is SOME
You wrote extra, which in capital letters is EXTRA
You wrote words, which in capital letters is WORDS
Args 的一個常見用途是用於使用者設定。你可以確保使用者寫出你需要的輸入,只有在正確的情況下才執行程式。這裡有個小程式能讓字母變大(大寫)或變小(小寫):
use std::env::args; enum Letters { Capitalize, Lowercase, Nothing, } fn main() { let mut changes = Letters::Nothing; let input = args().collect::<Vec<_>>(); if input.len() > 2 { match input[1].as_str() { "capital" => changes = Letters::Capitalize, "lowercase" => changes = Letters::Lowercase, _ => {} } } for word in input.iter().skip(2) { match changes { Letters::Capitalize => println!("{}", word.to_uppercase()), Letters::Lowercase => println!("{}", word.to_lowercase()), _ => println!("{}", word) } } }
這裡的一些範例是它給的輸出:
輸入:cargo run please make capitals:
make capitals
輸入:cargo run capital:
// 這裡沒東西輸出...
輸入:cargo run capital I think I understand now:
I
THINK
I
UNDERSTAND
NOW
輸入:cargo run lowercase Does this work too?:
does
this
work
too?
除了使用者給予的 Args,在 std::env::args() 中找得到的那些,還有系統變數 Vars。這些都是非使用者輸入的程式基本設定。你可以用 std::env::vars() 把它們全部輸出成格式 (String, String),會有非常多筆資料。舉例來說:
fn main() { for item in std::env::vars() { println!("{:?}", item); } }
只要這樣做就能秀出你目前使用者會話 (user session) 的所有資訊。它將會顯示像這樣的資訊:
("CARGO", "/playground/.rustup/toolchains/stable-x86_64-unknown-linux-gnu/bin/cargo")
("CARGO_HOME", "/playground/.cargo")
("CARGO_MANIFEST_DIR", "/playground")
("CARGO_PKG_AUTHORS", "The Rust Playground")
("CARGO_PKG_DESCRIPTION", "")
("CARGO_PKG_HOMEPAGE", "")
("CARGO_PKG_NAME", "playground")
("CARGO_PKG_REPOSITORY", "")
("CARGO_PKG_VERSION", "0.0.1")
("CARGO_PKG_VERSION_MAJOR", "0")
("CARGO_PKG_VERSION_MINOR", "0")
("CARGO_PKG_VERSION_PATCH", "1")
("CARGO_PKG_VERSION_PRE", "")
("DEBIAN_FRONTEND", "noninteractive")
("HOME", "/playground")
("HOSTNAME", "f94c15b8134b")
("LD_LIBRARY_PATH", "/playground/target/debug/build/backtrace-sys-3ec4c973f371c302/out:/playground/target/debug/build/libsqlite3-sys-fbddfbb9b241dacb/out:/playground/target/debug/build/ring-cadba5e583648abb/out:/playground/target/debug/deps:/playground/target/debug:/playground/.rustup/toolchains/stable-x86_64-unknown-linux-gnu/lib/rustlib/x86_64-unknown-linux-gnu/lib:/playground/.rustup/toolchains/stable-x86_64-unknown-linux-gnu/lib")
("PATH", "/playground/.cargo/bin:/playground/.cargo/bin:/usr/local/sbin:/usr/local/bin:/usr/sbin:/usr/bin:/sbin:/bin")
("PLAYGROUND_EDITION", "2018")
("PLAYGROUND_TIMEOUT", "10")
("PWD", "/playground")
("RUSTUP_HOME", "/playground/.rustup")
("RUSTUP_TOOLCHAIN", "stable-x86_64-unknown-linux-gnu")
("RUST_RECURSION_COUNT", "1")
("SHLVL", "1")
("SSL_CERT_DIR", "/usr/lib/ssl/certs")
("SSL_CERT_FILE", "/usr/lib/ssl/certs/ca-certificates.crt")
("USER", "playground")
("_", "/usr/bin/timeout")
所以如果你需要這些資訊,Vars 就是你想要的。
要獲得單獨的 Var 最簡單的方法是使用 env! 巨集。你只要給它變數名,它就會給你 &str 的值。如果變數拼寫錯誤或不存在就沒作用了,所以如果你不確定那就用 option_env!。如果我們在 Playground 上寫這樣:
fn main() { println!("{}", env!("USER")); println!("{}", option_env!("ROOT").unwrap_or("Can't find ROOT")); println!("{}", option_env!("CARGO").unwrap_or("Can't find CARGO")); }
那我們會得到輸出:
playground
Can't find ROOT
/playground/.rustup/toolchains/stable-x86_64-unknown-linux-gnu/bin/cargo
所以 option_env! 永遠會是比較安全的巨集。如果你實際上是想讓程式在找不到環境變數 (environment variable) 時崩潰,那麼 env! 會更好。
使用檔案
現在我們正在電腦上使用 Rust,我們可以開始處理檔案了。你會注意到,現在我們會開始在程式碼中看到愈來愈多的 Result。這是因為一旦你開始處理檔案和類似的東西,很多事情都會出錯。檔案可能不在那裡,或者也許計算機無法讀取它。
你可能還記得,如果你想使用 ? 運算子,它所在的函式也必須回傳 Result。如果你不記得錯誤型別,你可以什麼都不給它,讓編譯器告訴你。讓我們寫個試圖用 .parse() 建立數字的函式來試試。
// ⚠️ fn give_number(input: &str) -> Result<i32, ()> { input.parse::<i32>() } fn main() { println!("{:?}", give_number("88")); println!("{:?}", give_number("5")); }
編譯器明確告訴我們到底該怎麼做:
error[E0308]: mismatched types
--> src\main.rs:4:5
|
3 | fn give_number(input: &str) -> Result<i32, ()> {
| --------------- expected `std::result::Result<i32, ()>` because of return type
4 | input.parse::<i32>()
| ^^^^^^^^^^^^^^^^^^^^ expected `()`, found struct `std::num::ParseIntError`
|
= note: expected enum `std::result::Result<_, ()>`
found enum `std::result::Result<_, std::num::ParseIntError>`
很好!所以我們只要把回傳值改成編譯器說的就可以了:
use std::num::ParseIntError; fn give_number(input: &str) -> Result<i32, ParseIntError> { input.parse::<i32>() } fn main() { println!("{:?}", give_number("88")); println!("{:?}", give_number("5")); }
現在程式可以執行了!
Ok(88)
Ok(5)
所以現在我們想用 ? 直接給我們數值,如果這樣可以的話,如果不能就給錯誤。但是如何在 fn main() 中做到呢?如果我們嘗試在 main 中使用 ?,那就行不通了。
// ⚠️ use std::num::ParseIntError; fn give_number(input: &str) -> Result<i32, ParseIntError> { input.parse::<i32>() } fn main() { println!("{:?}", give_number("88")?); println!("{:?}", give_number("5")?); }
它說:
error[E0277]: the `?` operator can only be used in a function that returns `Result` or `Option` (or another type that implements `std::ops::Try`)
--> src\main.rs:8:22
|
7 | / fn main() {
8 | | println!("{:?}", give_number("88")?);
| | ^^^^^^^^^^^^^^^^^^ cannot use the `?` operator in a function that returns `()`
9 | | println!("{:?}", give_number("5")?);
10 | | }
| |_- this function should return `Result` or `Option` to accept `?`
但實際上 main() 可以回傳 Result,就像其它函式一樣。如果我們的函式能用,我們不想回傳任何東西(main() 不會回傳任何東西以外的東西)。而如果它不能用,我們將回傳同樣的錯誤。所以我們可以寫成這樣:
use std::num::ParseIntError; fn give_number(input: &str) -> Result<i32, ParseIntError> { input.parse::<i32>() } fn main() -> Result<(), ParseIntError> { println!("{:?}", give_number("88")?); println!("{:?}", give_number("5")?); Ok(()) }
不要忘了最後的 Ok(()):這在 Rust 中非常常見,它的意思是 Ok,裡面是 (),也就是我們的回傳值。現在印出:
88
5
只有用 .parse() 的時候不是很有用處,但是用在檔案就不同了。這是因為 ? 也為我們改變了錯誤型別。這裡是用簡單英語改寫來自 ? 運算子文件所說的內容:
If you get an
Err, it will get the inner error. Then?does a conversion usingFrom. With that it can change specialized errors to more general ones. The error it gets is then returned.
另外,在使用 File 和類似的東西時,Rust 有個方便的 Result 型別叫做 std::io::Result。在 main() 中當你使用 ? 在開啟和操作檔案時,通常看到的就是這個。這其實是類型別名 (type alias)。像這樣:
#![allow(unused)] fn main() { type Result<T> = Result<T, Error>; }
所以這是 Result<T, Error>,但我們只需要寫 Result<T> 的部分。
現在讓我們第一次嘗試操作檔案。std::fs 是處理檔案的方法所在的模組,並且用 std::io::Write 特徵你就可以寫入資料。有了那些,我們就可以用 .write_all() 來寫資料進檔案。
use std::fs; use std::io::Write; fn main() -> std::io::Result<()> { let mut file = fs::File::create("myfilename.txt")?; // 用這個名稱建立檔案. // 小心! 如果你有已經有個同名的檔案, // 它會刪除檔案裡面所有內容. file.write_all(b"Let's put this in the file")?; // 別忘記在 " 前面的 b. 那是因為檔案接受位元組資料. Ok(()) }
然後如果你開啟新檔案 myfilename.txt,會看到內容說 Let's put this in the file。
然而我們不需要寫成兩行,因為我們有 ? 運算子。如果能用,它就會傳遞我們想要的結果下去,有點像在疊代器上串連很多方法一樣。這時候 ? 就變得非常方便了。
use std::fs; use std::io::Write; fn main() -> std::io::Result<()> { fs::File::create("myfilename.txt")?.write_all(b"Let's put this in the file")?; Ok(()) }
所以這是說"請嘗試建立檔案,然後檢查是否成功。如果成功了,那就使用 .write_all(),然後檢查是否成功。"
而事實上,也有個函式可以同時做這兩件事。它叫做 std::fs::write。在它裡面,你給它你想要的檔名,以及你想放在裡面的內容。再次強調,要小心!如果該檔案已經存在,它將刪除其中的所有內容。另外,它允許你寫入 &str,而前面不用寫 b,因為這個:
#![allow(unused)] fn main() { pub fn write<P: AsRef<Path>, C: AsRef<[u8]>>(path: P, contents: C) -> Result<()> }
AsRef<[u8]> 就是為什麼你給它兩者皆可。
用起來非常簡單:
use std::fs; fn main() -> std::io::Result<()> { fs::write("calvin_with_dad.txt", "Calvin: Dad, how come old photographs are always black and white? Didn't they have color film back then? Dad: Sure they did. In fact, those photographs *are* in color. It's just the *world* was black and white then. Calvin: Really? Dad: Yep. The world didn't turn color until sometimes in the 1930s...")?; Ok(()) }
所以這就是我們要用的檔案。這是名叫 Calvin 的漫畫人物和他爸爸的對話,他爸爸對他的問題並不認真。有了這個,每次我們都可以建立檔案來使用。
開啟檔案如同建立檔案一樣簡單。你只要用 open() 代替 create() 就可以了。之後(如果它找到了你的檔案),你就可以做像 read_to_string() 這樣的事情。你可以建立可變的 String 來做到,然後把檔案讀取到那裡面。像這樣:
use std::fs; use std::fs::File; use std::io::Read; // 這是為了要使用 .read_to_string() 函式 fn main() -> std::io::Result<()> { fs::write("calvin_with_dad.txt", "Calvin: Dad, how come old photographs are always black and white? Didn't they have color film back then? Dad: Sure they did. In fact, those photographs *are* in color. It's just the *world* was black and white then. Calvin: Really? Dad: Yep. The world didn't turn color until sometimes in the 1930s...")?; let mut calvin_file = File::open("calvin_with_dad.txt")?; // 開啟我們做的檔案 let mut calvin_string = String::new(); // 這個 String 會保留讀取內容 calvin_file.read_to_string(&mut calvin_string)?; // 讀取檔案到 String 裡 calvin_string.split_whitespace().for_each(|word| print!("{} ", word.to_uppercase())); // 現在用 String 做些事 Ok(()) }
會印出:
CALVIN: DAD, HOW COME OLD PHOTOGRAPHS ARE ALWAYS BLACK AND WHITE? DIDN'T THEY HAVE COLOR FILM BACK THEN? DAD: SURE THEY DID. IN
FACT, THOSE PHOTOGRAPHS *ARE* IN COLOR. IT'S JUST THE *WORLD* WAS BLACK AND WHITE THEN. CALVIN: REALLY? DAD: YEP. THE WORLD DIDN'T TURN COLOR UNTIL SOMETIMES IN THE 1930S...
好吧,要是我們想建立檔案,但如果已經有同名的檔案就不要這樣做該怎麼辦?也許你不想為了建立新的檔案而刪除已經存在的其他檔案。要做到這一點,有個結構叫 OpenOptions 可以用。其實我們一直有在用 OpenOptions 卻不知道。看看 File::open 的原始碼吧:
#![allow(unused)] fn main() { pub fn open<P: AsRef<Path>>(path: P) -> io::Result<File> { OpenOptions::new().read(true).open(path.as_ref()) } }
真有趣,這好像是我們學過的生成器模式。File::create 也是如此:
#![allow(unused)] fn main() { pub fn create<P: AsRef<Path>>(path: P) -> io::Result<File> { OpenOptions::new().write(true).create(true).truncate(true).open(path.as_ref()) } }
如果你去看 OpenOptions 文件,你可以見到所有你能選擇使用的方法。大多數都接受 bool:
append():意思是"加入資料到已經存在的內容後面,而不是刪除"。create():這讓OpenOptions建立檔案。create_new():意思是檔案還沒有在那裡的情況下才會建立檔案。read():如果你想讓它讀取檔案,就把這個設定為true。truncate():如果你想在開啟檔案時把檔案內容清空為 0 (刪除內容),就把這個設定為true。write():這讓它寫入檔案。
然後在結尾你用 .open() 加上檔名,你就會得到 Result。讓我們來看這樣的範例:
// ⚠️ use std::fs; use std::fs::OpenOptions; fn main() -> std::io::Result<()> { fs::write("calvin_with_dad.txt", "Calvin: Dad, how come old photographs are always black and white? Didn't they have color film back then? Dad: Sure they did. In fact, those photographs *are* in color. It's just the *world* was black and white then. Calvin: Really? Dad: Yep. The world didn't turn color until sometimes in the 1930s...")?; let calvin_file = OpenOptions::new().write(true).create_new(true).open("calvin_with_dad.txt")?; Ok(()) }
首先我們用 new 做了一個 OpenOptions (總是以 new 開頭)。然後我們給它 write 的能力。之後我們把 create_new() 設定為 true,然後試著開啟我們做出的檔案。會打不開,是我們想要的結果:
Error: Os { code: 80, kind: AlreadyExists, message: "The file exists." }
讓我們嘗試使用 .append(),這樣我們就可以寫入到檔案。為了寫入檔案,我們可以使用 .write_all(),這是個會嘗試寫入你給它的一切內容的方法。
另外,我們將使用 write! 巨集來做同樣的事情。你會記得這個巨集是來自我們在為結構體做 impl Display 的時候。而這次我們是在檔案上使用它,不是在緩衝區 (buffer) 上。
use std::fs; use std::fs::OpenOptions; use std::io::Write; fn main() -> std::io::Result<()> { fs::write("calvin_with_dad.txt", "Calvin: Dad, how come old photographs are always black and white? Didn't they have color film back then? Dad: Sure they did. In fact, those photographs *are* in color. It's just the *world* was black and white then. Calvin: Really? Dad: Yep. The world didn't turn color until sometimes in the 1930s...")?; let mut calvin_file = OpenOptions::new() .append(true) // 現在我們可以繼續寫入而不用刪除檔案 .read(true) .open("calvin_with_dad.txt")?; calvin_file.write_all(b"And it was a pretty grainy color for a while too.\n")?; write!(&mut calvin_file, "That's really weird.\n")?; write!(&mut calvin_file, "Well, truth is stranger than fiction.")?; println!("{}", fs::read_to_string("calvin_with_dad.txt")?); Ok(()) }
印出:
Calvin: Dad, how come old photographs are always black and white? Didn't they have color film back then?
Dad: Sure they did. In fact, those photographs *are* in color. It's just the *world* was black and white then.
Calvin: Really?
Dad: Yep. The world didn't turn color until sometimes in the 1930s...And it was a pretty grainy color for a while too.
That's really weird.
Well, truth is stranger than fiction.
cargo doc 命令
你可能已經注意到,Rust 文件看起來總是幾乎一樣。在左邊你可以見到 struct 和 trait,程式碼範例在右邊等等。這是因為你只要輸入 cargo doc 就可以自動產生文件。
即使是建立一個什麼都不做的專案,也可以幫助你瞭解 Rust 中的特徵。例如,這裡有兩個幾乎什麼都不做的結構體,以及一個也什麼都不做的 fn main()。
struct DoesNothing {} struct PrintThing {} impl PrintThing { fn prints_something() { println!("I am printing something"); } } fn main() {}
但如果你輸入 cargo doc --open,你可以見到比你預期更多的資訊。首先它秀出這些給你:
Crate rust_book
Structs
DoesNothing
PrintThing
Functions
main
但是如果你點選其中的一個結構體,會讓你看到很多你想都沒想到過的特徵:
Struct rust_book::DoesNothing
[+] Show declaration
Auto Trait Implementations
impl RefUnwindSafe for DoesNothing
impl Send for DoesNothing
impl Sync for DoesNothing
impl Unpin for DoesNothing
impl UnwindSafe for DoesNothing
Blanket Implementations
impl<T> Any for T
where
T: 'static + ?Sized,
[src]
[+]
impl<T> Borrow<T> for T
where
T: ?Sized,
[src]
[+]
impl<T> BorrowMut<T> for T
where
T: ?Sized,
[src]
[+]
impl<T> From<T> for T
[src]
[+]
impl<T, U> Into<U> for T
where
U: From<T>,
[src]
[+]
impl<T, U> TryFrom<U> for T
where
U: Into<T>,
[src]
[+]
impl<T, U> TryInto<U> for T
where
U: TryFrom<T>,
這是因為 Rust 自動為每個型別所實作的所有特徵。
那麼如果我們新增一些文件註解,當你輸入 cargo doc 的時候就可以看到。
/// This is a struct that does nothing struct DoesNothing {} /// This struct only has one method. struct PrintThing {} /// It just prints the same message. impl PrintThing { fn prints_something() { println!("I am printing something"); } } fn main() {}
現在會印出:
Crate rust_book
Structs
DoesNothing This is a struct that does nothing
PrintThing This struct only has one method.
Functions
main
當你使用很多別人的 crate 時,cargo doc 就非常友善。因為這些 crate 全部都在不同的網站上,可能需要花些時間來搜尋所有的 crate。但如果你使用 cargo doc,你就會擁有它們全部,而且被放在你硬碟裡的同個地方。
結束了嗎?
簡單英語學 Rust 就這樣結束了。但是我還在這裡,如果你有什麼問題可以告訴我。歡迎在 Twitter 上聯絡我或者新增 pull request、issue 等。如果有些地方不容易理解,你也可以告訴我。簡單英語學 Rust 需要非常容易理解,所以請告訴我英語太難的地方。當然 Rust 本身也可能是很難理解的,但我們至少可以確保英語是容易的。